Render
| Toolbar | Menu |
|---|---|
|
|
File Properties |
The Render page in Document Properties manages the Rhino Render settings for the current model.
Use the Rendering panel to access these settings without opening Document Properties.
Before you start the command
- On the Render menu, click Current Renderer, and then click Rhino Render.
For information about assigning render materials to objects and layers, see Materials.
Current Renderer
Sets the current renderer. This can be the built-in Rhino Render or a plug-in.
View
Specify a source for the view.
Current Viewport
Renders the current viewport.
Specific Viewport
Select a viewport to render from the list.
Named View
Select a named view to render from the list.
Snapshot
Select a snapshot to render from the list.
Resolution and Quality
Dimensions
The aspect ratio displays to the right of the menu.
Viewport (<size>)
Renders the active viewport the active viewport using the pixel size of the viewport.
Custom (<size>)
Renders the active viewport using the custom resolution. Type the custom width and height resolution in pixels.
Preset sizes
Renders the active viewport the selected pixel resolution.
If you add a text file named render_sizes.txt to the folder where the Rhino executable (.exe) resides, Rhino Render and some other renderers will read this text file for custom render sizes.
Example:
// My custom render sizes
500,500
600,600
700,700
800,800
900,900
Lock to viewport aspect ratio
Maintains the aspect ratio of the viewport. When the height or width is changed, the other dimension changes in relation.
Size
Calculates the size of the image in the selected unit system based on the Resolution and DPI ("dots" per inch) settings. This is useful for determining the size of the image for printing.
Units
Sets the image size in pixels, inches, millimeters, or centimeters.
DPI
Image pixels ("dots") per inch.
Quality
Low quality
Render 15 samples.
Draft quality
Render 50 samples.
Good quality
Render 500 samples.
Final quality
Render 1500 samples.
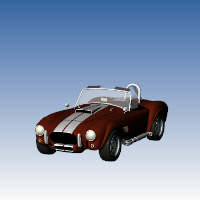
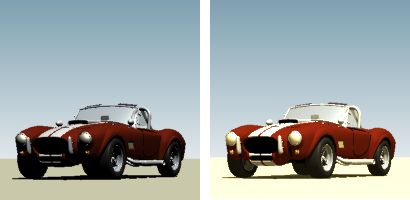
Backdrop
The backdrop is what you see directly in front of the camera if there are no objects in the way. The background is not 3‑D — it exists only on the screen.
Solid color
Displays a solid color.
To select the color for the background
- Click the color swatch.
Gradient
Displays a two-color gradient. The color for the top of the image background is the Solid color set above.
To select the color for the bottom of the background
- Click the color swatch.
360° Environment
Displays the portion of the current environment that the camera sees in the viewport.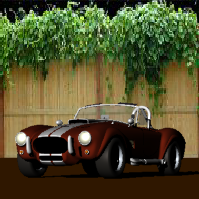
 New
New
Creates a new environment using a template from the library.
 Edit
Edit
Edits the selected environment.
See: Environment Editor.
 Duplicate
Copies the selected environment to a new environment with the same settings.
Wallpaper
Displays the current viewport wallpaper.

Wallpaper in perspective viewport.
Stretch to fit
Fits the wallpaper to the rendered view.
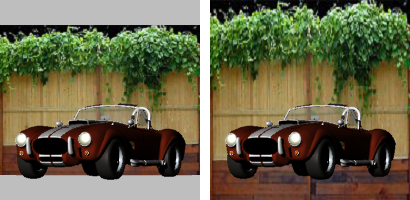
Wallpaper at normal aspect ratio (left) and stretched to fit (right).
Transparent background
The background is rendered with an alpha channel for transparency. The image must be saved to a file format that supports alpha channel transparency (.png, .tga, .tif).![]()
Ground plane
Turns on the ground plane.
Ground Plane Settings
Opens the Ground Plane panel.
Use custom environment for reflections
Assigns a custom environment that will be reflected by objects in the scene.
New
Creates a new environment using a template from the library.
Edit
Edits the selected environment.
See: Environment Editor.
Duplicate
Copies the selected environment to a new environment with the same settings.
Default environments
No environment
The No environment setting applies a plain gray background.
Studio
The Studio environment offers soft lighting provided by a high-dynamic range image.
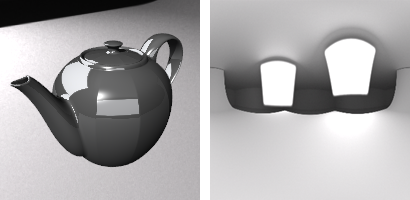
Studio lighting example (left) and hdr background (right).
Lighting
Sun
Turns on the sun.
Sun Settings
Opens the Sun panel.
Skylight
Turns on skylight.
Skylight off (left) and Skylight on (right).
Intensity
Adjusts the skylight intensity.
Use custom environment for skylighting
Sets an environment that is used as sky light.
New
Creates a new environment using a template from the library.
Edit
Edits the selected environment.
See: Environment Editor.
Duplicate
Copies the selected environment to a new environment with the same settings.
Lights
Opens the Lights panel.
Use lights on layers that are off
Controls whether or not spotlights that are on hidden layers or that are hidden with the Hide command are rendered.

Snapshots
The Snapshots command saves and restores Named Views, Named Positions, Layer States, as well as rendering settings, object settings including locked/hidden state, display mode, material, position, light settings, curve piping, displacement, edge softening, shutlining, and thickness.
Wireframe
Render curves
Curve objects are rendered with the surfaces.
Render surface edges and isocurves
Surface isoparametric curves and edges are rendered with the surfaces. Edge thickness set in the Rendered viewport apply.
Render dimensions and text
Dimensions and texts are rendered with the surfaces.
Snapshots
The Snapshots command saves and restores Named Views, Named Positions, Layer States, as well as rendering settings, object settings including locked/hidden state, display mode, material, position, light settings, curve piping, displacement, edge softening, shutlining, and thickness.
Dithering and Color Adjustment
Dithering
The rendered image is usually produced at a higher color depth than monitors and low-dynamic-range file types like bitmaps like JPEG, PNG, BMP can reproduce. The most important effect this causes is banding, which is a quantization error. Dithering reduces quantization errors and so gets rid of banding.
Both dithering methods, generally do the same thing. Sometimes, one might be better than the other, but in general, Simple Noise is the best.
See: Wikipedia: Dither.
None
No dithering.
Floyd-Steinberg
The algorithm achieves dithering by diffusing the quantization error of a pixel to its neighboring pixels.
See: Wikipedia: Floyd-Steinberg dithering.
Simple noise
A random variation of brightness or color information in images.
See: Wikipedia: Image noise.
Gamma
Image files are color corrected so that they can be loaded byte-by-byte into the RGB pixels of a computer screen and look right on a monitor. This means that the color response of a standard image is non-linear, that is, it is gamma corrected. Gamma refers to the power function that is used to correct the image.
The Gamma value changes, and therefore corrects the output of the image.
See: Wikipedia: Gamma correction.
Use linear workflow
The Rendered display mode supports a linear workflow for accurate color, gamma and lighting computation.
Gamma correction for bitmap images that are loaded from disk is removed (by the inverse of the amount in the Gamma edit box) so that they have a linear response before they are passed to the renderer. The renderer renders them in this uncorrected state. The gamma correction is applied to the entire finished image. This can do a better job of processing the color in rendered images.
Snapshots
The Snapshots command saves and restores Named Views, Named Positions, Layer States, as well as rendering settings, object settings including locked/hidden state, display mode, material, position, light settings, curve piping, displacement, edge softening, shutlining, and thickness.
Render Channels
 Automatic
Automatically enables the required render channels.
 Custom
Manually select the render channels to include in the rendering.
RGBA
Represents Red, Green, Blue, and Alpha transparency. It is mainly used for presentations.
Distance
Uses grayscale colors to represent the distance from the camera. The farthest pixel in the rendering is black. the nearest pixel is white.
Normal
Uses RGB values to represent the XYZ coordinates of normal directions. Red=X, Green=Y, and Blue=Z.
Albedo
The unshaded colors. It is the result of rendering a scene with totally uniform lighting and without shadows.
Advanced Rhino Render Settings
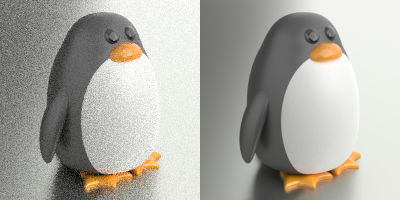
Seed
Change the seed value to vary the noise pattern.
Session
Samples
Amount of samples taken per pixel in the Raytraced viewport. More samples means better convergence, thus better quality.
Override Production Render Quality 
When enabled, the Render command will use the samples above to render the scene. Render quality settings will be ignored.
Ray Bounces
Maximum bounces
Maximum number of light bounces. For best quality, this should be set to a high value. However, in practice, it may be good to set it to lower values for faster rendering. Setting the maximum to 0 bounces results in direct lighting only.
Diffuse
Maximum number of diffuse bounces. The ray is generated by a diffuse reflection or transmission (translucency).
Glossy
Maximum number of glossy bounces. The ray is generated by a glossy specular reflection or transmission.
Transmission
Maximum number of transmission (light that is transmitted throughout a volume) bounces.
Volume
Maximum number of volume scattering bounces.
Transparency
Maximum number of transparency bounces.
Texture Baking
Texture Bake Quality
When decal textures, multi-channel textures, procedural textures, or textures using custom mappings are rendered by Rhino Render or in the Raytraced viewport, these texture types are converted into bitmap textures. Baking qualities control the bitmap texture resolution:
Low: 2048 x 2048 pixels
Standard: 4096 x 4096 pixels
High: 8192 x 8192 pixels
Ultra: 16384 x 16394 pixels
When you zoom in close to an object, the types of textures may look pixelated in the rendering if the baking quality is less than required. Using a higher baking quality will fix the problem, but memory usage of the rendering will increase exponentially.

The AdaptiveBakingQuality setting in Advanced settings limits the baking resolution by how big the baked texture pixels appear on the object in the world space.
- 0 = adaptive baking quality disabled
- 100 = bake to the level of document tolerance
- 200 = bake to the level of 2.00 * document tolerance (default value)
- n = bake to the level of n / 100 * document tolerance
See also
Render
Render the objects using the current renderer.