Environments
| Toolbar | Menu | Panel Gear Menu |
|---|---|---|
|
|
Render Environment Editor Panels Environments |
Environments |
The Environments command opens the Environments panel to edit background color, image, projection.
-
Render contents (materials, environment, and textures) can be hidden by plug-ins or scripts. More information...
![]() Environments panel
Environments panel
Environments panel toolbar
The Environments panel has additional browsing tools.
 Back
Back
Selects the previous item in the list.
 Forward
Selects the next item in the list.
 Current item
Displays the current item icon and name.
 Search
- Click the search box (magnifying glass) to display a menu for searching names, notes, or tags.
 Search Names
Limits the search to names.
 Search Notes
Limits the search to notes.
 Search Tags
Limits the search to tags.
- When tags: is selected, a list of available tags appears. These tags are gathered from the materials, environments, and textures in the document.
- In the tags list, arrow keys move up and down and the selected tag is appended to the search.
- Type a semicolon to keep the selected tag and append a semicolon to the search.
- Backspace removes the last tag from the search.
- Once the focus is on the tags list, you can navigate the list using the keyboard with the semicolon and backspace keys appending and removing tags from the search without having to use the mouse.
Show Search Tips
Displays how 'name:', 'note:', 'tag:', '?', '#' and '^' are used for searching items.
 Menu
Menu
Displays the Tools menu.
 Help
Help
Thumbnail preview actions
- Right-click a thumbnail to display a context menu.
- Right-click the blank area of the thumbnail browser to display a context menu.
- Right-click and drag in the thumbnail to change the view.
- Double-click to display a larger preview window.
- Double-click the large preview to open a floating window that can be re-sized to get a higher resolution view of the preview.
This window has all the same functionality as the original preview image including the context menu and the ability to drag and drop onto other materials or objects in the model. - Right-click the large preview window or the floating preview window to display the context menu.
- Information entered to the Notes section appears in the tooltip when you mouse-over the thumbnail.
Drag and drop actions in the list section
- Drag and drop to a different position in the list to reorder.
- Drag and drop with Ctrl to a blank area to make a copy.
- Drag and drop with Alt to a blank area to make an instanced copy.
Creating and editing environments
To create a new environment
- In the thumbnail browser, click the Create New Environment button
 .
. - On the menu, select a environment type.
Create New Environment
A new blank environment is created.
 Import Environment from File
Imports environments from a saved Rhino .renv file.
 Basic Environment
Creates a new basic environment.
 More Types
Opens the content type browser to see more options for creating a new environment.
Name
The name of the environment.
See: Naming conventions in Rhino
Type
Sets the environment type.
![]() Basic
Basic
Basic Environment Settings
Background
The basic environment is a simple background color and optional texture. The projection of the texture can be set to either planar, spherical (otherwise known as equirectangular or longitude/latitude) or box.
To set the background color
- Select the color for the environment background.
You can drag the color swatch to a folder to create a Rhino color file (.rcolor).
To add this color to a color library
- Drag it from a folder to another color swatch in the Materials, Environments, or Textures panels, or you can drag it onto an object.
Background image
Uses an image as the environment background.
To specify an image
- Click the texture control.
(click to assign texture)
The check box automatically becomes checked the first time you do this.
You can clear the check box to turn off the assignment. - Select an image file to use.
Projection
Sets the projection style for the background image.
Planar
Maps texture directly to background. Environment looks always the same no matter where the camera is looking.
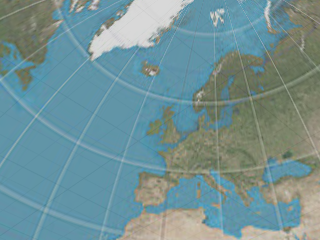
Light probe
Also known as angular fish-eye projection or azimuthal equidistant projection. Elliptical subsection reaching each border of the texture is mapped onto the sphere.
See: Wikipedia: Azimuthal equidistant projection.
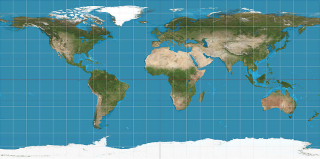
Equirectangular
Also known as spherical projection. Horizontal line in the middle of the texture is mapped to the equator of the sphere.
See: Wikipedia: Equirectangular projection.
Cubemap
Subsections corresponding to each side of the cube are located side by side dividing the texture into six equal parts.
See: Wikipedia: Cube mapping.
Vertical cross cubemap
Subsections corresponding to each side of the cube are located in a vertical cross pattern. Each subsection is one fourth of the image in height and one third in width.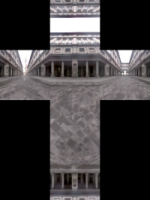
Horizontal cross cubemap
Subsections corresponding to each side of the cube are located in a horizontal cross pattern. Each subsection is one third of the image in height and one fourth in width.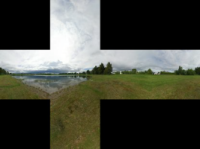
Emap
Elliptical subsection reaching each border of the texture is mapped onto the sphere. This projection is the result of taking a photo of a mirror sphere with an orthographic camera.
Hemispherical
Like spherical projection but the entire texture is mapped onto the upper half of the sphere. The bottom border of the texture is stretched over the under side of the sphere.
Rotation
Sets the rotation of the environment. This helps put the image in the correct position to accomplish the correct reflections and lighting.
Intensity
Specifies the strength of the environment.
Save and share render content
Render content (materials, environments, and textures) are stored in models. They can also be saved to files and shared across models. The Libraries panel displays the default content folder. Content can be dragged and dropped between Rhino sessions or between a Rhino window and a disk folder.
To access command-line options
- Type a hyphen in front of the command name: -Environments.
| Command-line options | |
|---|---|
|
ShowPanel |
Displays the Environment Editor panel. |
|
Options |
Displays command-line options. AddDeleteRenameChangeDuplicateLoadFromFileSaveToFile |
See also
Materials
Open or close the Materials panel.
Textures
Open or close the Textures panel.
Render
Render the objects using the current renderer.
Resolving render content conflicts
Rhino detects material, environment and texture name conflicts in the following file operations:
- Import a model.
- Insert a model.
- Paste objects from a different model
- Attach or activate a worksession model.
When a render content item name already exists in the current model, but the content settings are different, the conflicted items will be resolved based on the related advanced settings.
Search for PasteConflictOption (for paste) and ImportRenameConflictingEx (for import and insert) in Advanced settings and change the value as described below.
0 = Do not import incoming conflicted render contents.
1 = Import and rename incoming conflicted render contents with [imported] post-fix.
2 = Import incoming conflicted render contents and overwrite existing ones.
3 = Pop up the Render Content Name Conflict dialog and let you decide how to resolve the conflicts.