![]()
面板
渲染
贴图
| 工具列 | 功能表 |
|---|---|
|
|
面板 渲染 贴图 |
Textures 指令可以打开贴图面板,在贴图面板中可以创建贴图,贴图可以拖拽到材质和环境中。
![]() 贴图面板
贴图面板
贴图面板有附加的浏览工具。
选取上一个选取的贴图。
选取下一个选取的贴图。
显示目前的贴图的图示与名称。
搜索材质。
显示工具功能表。
从之前保存的 Rhino .rtex 文件导入材质。
设置贴图类型。
每一种贴图类型都有该类型相应的设置。
除了贴图类型特定的设置以外,下列设置也会在适当时候出现在子面板中。
命名贴图,所有贴图会被自动赋予一个名称,您可以修改名称。
直接将贴图或图片文件拖放至 Rhino 物件会通过该图片自动建立一个新材质。
材质的每个组成部分的颜色可以设置为不同的颜色或纹理。
打开选取颜色对话框。
拾取荧幕上任何位置的颜色。
复制颜色方块的颜色。
在另一个颜色方块粘贴颜色。
为颜色控件赋予贴图。
打开贴图编辑器。
从控件上移除贴图。
赋予贴图做为颜色。
 浏览
浏览
打开图片贴图设置面板。
复制整个按钮图示至 Windows 剪贴板。
将剪贴板中的图像粘贴到贴图栏位中。
将剪贴板中的图像粘贴为引例,更改父图像也会更改引例。
开打一个浮动的贴图缩略图预览窗口。
选取一个其他的图像或贴图类型。
从栏位移除贴图。
移除引例,断开与原始父图像的连接。
打开属性对话框来设置输出通道。
属性
颜色 1 和 2 彼此交换。
尝试减少纹理中的混叠。
请参考: 维基百科, Supersampling.
您可以将颜色样本拖拽到文件夹以创建一个 Rhino 颜色文件。
确定贴图的原始 uv(w)坐标处的颜色如何转换为物件上的 uv 位置, Rhino 的默认设置是使用由几何体本身给出的 uv 坐标:曲面的参数或网格的原始贴图坐标。 这些控件允许修改贴图视觉上包裹物体的方式。
在贴图空间中沿着 u 和/或 v 方向移动贴图。
使贴图在贴图空间中重现。
将贴图空间中的贴图旋转特定的度数。
UV 坐标从物件在世界空间中的实际位置生成,用于真实世界大小的材质非常有效,特别是 3D 程序贴图。
UV 坐标系统由物件上的世界空间位置坐标以及该物件法线在该位置所指向的虚拟立方体的侧面生成,这对于真实世界风格的材质很有用,尤其是位图这样的二维贴图,我们可以通过这种方式确定这个二维贴图贴到物件的哪个位置。
在特定的贴图轴通道上使用该物件的贴图坐标,默认情况下,在物件上使用单个贴图通道时,贴图坐标使用“物件属性”>“贴图轴”选项设置的值来生成。
在缩略图和预览窗口中以三维物件的方式显示物件上的贴图轴。请参考: 贴图面板缩图快显菜单。
如果勾选此项,贴图预览将被贴图轴参数修改,如果重复值设置较高,将很难看清贴图本身
当贴图在工作视窗中显示不正确时,使用此功能显示贴图的映射结果,贴图暂时显示为物件的颜色。当某些高级渲染引擎的特性无法直接显示在工作视窗中时(例如反射效果),这个功能就非常有用。
确定贴图的原始 uv(w)坐标处的颜色如何转换为物件上的 uv 位置, Rhino 的默认设置是使用由几何体本身给出的 uv 坐标:曲面的参数或网格的原始贴图坐标。 这些控件允许修改贴图视觉上包裹物体的方式。
在贴图空间中沿着 u 和/或 v 方向移动贴图。
使贴图在贴图空间中重现。
将贴图空间中的贴图旋转特定的度数。
物件上只能看到一个不重复的贴图。
使用与 EMap 指令类似的贴图轴投影图像,同时允许使用其他输入投影。
使用贴图自身的信息来确定投影类型,可能贴图自身已经包含了投影类型的信息,例如 HDR 贴图和投影方式转换贴图等就包含了输出投影的信息。
以椭圆将贴图分段并映射到球体上。这种投影是由正交摄影机拍摄的球体镜像照片产生的。
将整个贴图映射到立方体的每个面上。
又称为角度鱼眼投影 (Angular Fisheye Projection),或正方位等距离投影 (Azimuthal Equidistant Projection)。以椭圆将贴图分段并映射到球体上
请参考: 维基百科: Azimuthal equidistant projection。
又被称为球面投影,图片的水平中心线对应到球体的赤道。
请参考: 维基百科: Equirectangular projection。
将贴图并排分割为等大的六份分配给立方体的每个面。
请参考: 维基百科: Cube mapping。
六个方向的平面投影图片以垂直十字排列做为环境背景。高度方向每个面为高度的四分之一,宽度方向每个面为宽度的三分之一。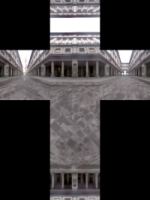
六个方向的平面投影图片以水平十字排列做为环境背景。高度方向每个面为高度的三分之一,宽度方向每个面为宽度的四分之一。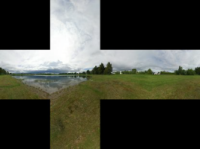
贴图轴参数将修改贴图预览,如果重复值设置较高,将很难看清贴图本身。
使用物件在屏幕上二维坐标来定义贴图的 UV,坐标(0,0)是屏幕的左上角,坐标(1,1)是屏幕的右下角,通常与背景图像结合使用,使物件上的颜色与背景相匹配。
UV 坐标从物件在世界空间中的实际位置生成,用于真实世界大小的材质非常有效,特别是 3D 程序贴图。
UV 坐标系统由物件上的世界空间位置坐标以及该物件法线在该位置所指向的虚拟立方体的侧面生成,这对于真实世界风格的材质很有用,尤其是位图这样的二维贴图,我们可以通过这种方式确定这个二维贴图贴到物件的哪个位置。
在特定的贴图轴通道上使用该物件的贴图坐标,默认情况下,在物件上使用单个贴图通道时,贴图坐标使用“物件属性”>“贴图轴”选项设置的值来生成。
当贴图在工作视窗中显示不正确时,使用此功能显示贴图的映射结果,贴图暂时显示为物件的颜色。当某些高级渲染引擎的特性无法直接显示在工作视窗中时(例如反射效果),这个功能就非常有用。
显示贴图 UV 上特定部分的颜色值,当使用颜色值表示非颜色参数(例如凹凸、透明度)时,此项非常有用。![]()
显示贴图红色部分的值。
显示贴图绿色部分的值。
显示贴图蓝色部分的值。
显示贴图 Alpha 分量(A)的值。
显示贴图的组合亮度(L)(使用 CIE 标准方法从红色,绿色和蓝色通道计算),用于计算透明度、凹凸等非颜色值。
显示出一个穿过贴图指定 U 方向参数位置的断面。
显示出一个穿过贴图指定 V 方向参数位置的断面。
显示出一个穿过贴图指定 W 方向参数位置的断面。
允许使用一些通用的转换方法将贴图进行一些转换处理。
给定一个特定的输出颜色分量(R,G,B),限制控制可以将该颜色值进行缩放,并将其置于指定阈值以上或以下。
打开或关闭限制功能。
将分量值缩放到最大值和最小值之间。
设置最小值。
设置最大值。
将图像转为负片图像,对于低动态(LDR)图像,计算方法为 1 减去每个分量的颜色值,如果是高动态(HDR)图像,计算方法为将数值直接取反。
每种颜色都被替换为基于亮度的灰度值。
每种颜色通过给定的伽玛转换,效果是增加或减少对比度。
每个颜色值乘以这个数量,效果是增加或减少亮度。
一个用来增加或减少对比度和亮度的简单设置。
更改图像饱和度,1.0 代表原始的颜色饱和度,0.0 代表达到了最大灰度。
在调色盘上按给定的度数改变每种颜色的色调值。
输入对贴图的附加描述信息,所有贴图都有附注栏。
2D 棋盘格贴图是一种仅在 UV 两个方向的棋盘格图案的程序贴图。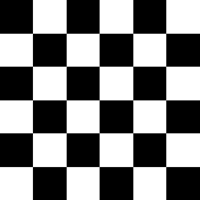
重新定义子贴图的大小到棋盘格中的小格子。
3D 棋盘格贴图是一种在 UVW 三个方向的棋盘格程序贴图,可以自由设定棋盘格的两种颜色或两种贴图,UVW三个方向的格子图案缩放也可以分别设置。
命名贴图,所有贴图会被自动赋予一个名称,您可以修改名称。
直接将贴图或图片文件拖放至 Rhino 物件会通过该图片自动建立一个新材质。
重新定义子贴图的大小到棋盘格中的小格子。
图片贴图包含一个简单的位图图片,当图片不包含 alpha 通道信息时,您也可以选择一个透明颜色作为 alpha 通道。
预览图片
像素大小
色彩深度
图像大小
文件大小
Mirrors every other tile to allow easier edge matching on non-repeatable bitmaps.
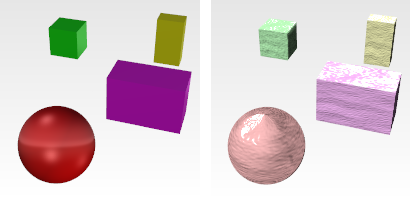
当曲面上的多个点被映射到贴图中相同的点时,图像可以被"像素化", 在颜色和贴图间显示出锯齿和阶梯式过度,在大多数情况下,像素化是平滑的,但如果一个非常小的贴图映射到一个非常大的曲面,过度往往会很模糊。
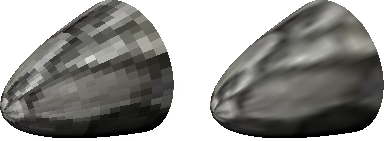
开启过滤 (左);关闭过滤 (右)。
位图文件的路径和名称。
 浏览文件
浏览文件打开文件浏览器。
在您指定的图像编辑器(画图、PaintShop 或其他类似的软件)中打开图片。
 (颜色选择器)
设置颜色。
| 功能表选项 | |
|---|---|
|
调色盘 |
打开选取颜色对话框。 |
|
取色滴管 |
拾取荧幕上任何位置的颜色。 |
|
复制 |
复制颜色方块的颜色。 |
|
粘贴 |
在另一个颜色方块粘贴颜色。 |
公差决定贴图颜色与透明颜色的匹配度。
使用储存在图片文件中的 Alpha 通道。
混合贴图是由两种贴图混合的贴图。
混合颜色 1 和 2 的总量。
混合颜色 1 和 2 的贴图亮度值。

立方体贴图可以输入六张图片,将六张图片在一个矩形范围内以栅栏状排列,这个贴图可以再使用“投影方式转换贴图”转换成其他投影方式。
请参考: 维基百科: Cube Mapping
应用到立方体每个面的贴图。
这些按钮总是处于禁用状态,图片总是打开的。
要使用的子贴图。
这些按钮总是处于禁用状态,图片总是被设置为 100% 使用。
斑点贴图生成一个随机的斑点图案,可以设置斑点与背景两种颜色,也可以将其他贴图套用到这两种颜色。
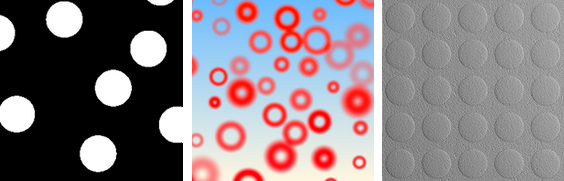
默认设置(左);自定义设置(中);使用了凹凸贴图(右)。
设置产生斑点的演算方法。
斑点以随机运算放置,斑点的分布较均匀。
斑点的位置以矩形阵列开始运算,内存使用量较低,但斑点的分布较不均匀。
图案中圆点的近似数量。
决定生成圆点之间的距离有多远,操作的时候看起来就像在做放大与缩小操作,在放大时,会出现更多圆点,使圆点数量尽可能达到圆点的数量。
设置斑点与底色如何融合,这里的设置可以让以斑点贴图作为凹凸贴图时有较好的效果。
设置斑点边缘的衰减曲线。
生成边缘有明显分界线的圆点。
使用线性衰减方式,当此贴图作为凹凸贴图使用时,产生的圆锥体会有一个尖锐的顶点。
与线性类似,但是算法不同,此贴图作为凹凸贴图时,产生的凸起顶部会更光滑一些。
与立方类似,但是算法不同,此贴图作为凹凸贴图时,会产生一个圆顶的凸起。
设定圆点的半径。
设置斑点大小的随机变化。
将斑点设为圆环状。
设置洞所占整个外径的百分比。
设置洞所占整个外径的百分比。
设置斑点与底色如何互动。
设置斑点贴图两种颜色的混合方式。
将圆点与底色混合计算,然后将得到的颜色通道数值作为插值应用到前景色与底色。
使用每个颜色通道(R,G,B,A)的最大值。
以颜色通道的数值相加。
以颜色通道的数值相减。
以颜色通道的数值相乘。
以颜色通道的数值的平均值。
此为圆点的总体效果,当贴图作为颜色贴图时,将影响圆点的亮度,如果作为凹凸贴图使用,将影响凹凸的程度。
设置振幅的随机化程度。
通常圆点的颜色是由颜色 2 的设置决定,此设置可以使色调产生随机变化。
设置色调随机变化的程度,当合成方式设置为标准时无效。
通常圆点的颜色是由颜色 2 的设置决定,此设置可以使饱和度产生随机变化。
设置饱和度随机变化的程度,当合成方式设置为标准时无效。
使用与高动态范围贴图相同的曝光度算法将高动态范围的亮度数据转换为低动态范围的亮度信息。
添加要控制曝光度的高动态范围贴图(HDR)。
修改 HDR 贴图的曝光值,它决定 HDR 动态范围映射到像素范围(0 到 255)的程度。
这个数值作为比例因子,将与显示出来之前最终的像素颜色相乘,得到的像素颜色再映射到 0 到 255 之间。
分形布朗运动(fBm)贴图是一种标准的计算机图形噪声类型,噪声叠加在不同的梯度和振幅上,所以观察距离越近,就能看到更多细节,这种算法基于一个用于凹凸贴图的基础的连续噪点函数——Perlin 噪音,fBm 就是由 Perlin 噪音和 Fractal Sum 算法合成演变而来。可以设置在两种颜色之间产生噪点。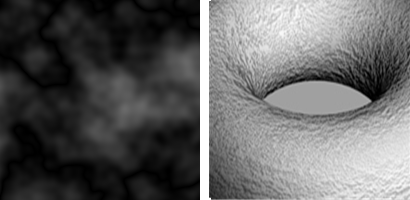
类似的效果也可以使用更加强大且复杂的噪点贴图来制作。
参考: 维基百科: Perlin 噪音.
八度之间的幅度变化。
拼合的最大数量,决定了噪音的细节总数。
将贴图输出从线性变为指数的标准方法。
渐变色贴图让用户可以在自定义的变化曲线上通过预设的几种渐变类型生成渐变效果,可以设置两种颜色之间的渐变。
渐变类型
设置颜色渐变的方式。
|

线性 |

立方 |

放射状 |
|

菱形 |

扫掠 |

Pong |
|

螺旋 |
|
|
打开自定义曲线面板。
拖拽图形上的点来设置曲线。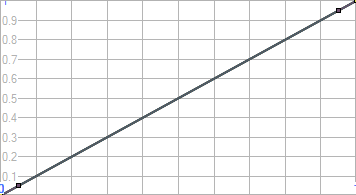
在曲线上新增用来控制曲线的编辑点。
从曲线上删除编辑点。
选取全部启用的曲线。
![]() 红(R)
红(R)
![]() 绿(G)
绿(G)
![]() 蓝(B)
蓝(B)
![]() Alpha(A)
Alpha(A)
重置缩略图。
将图形重置为默认值。
面板作为独立的视窗打开。
花岗岩贴图是一个三维的斑点贴图,在基础控制选项上又新增了生成随机分布斑点的控制选项。
贴图的整体大小。
斑点的大小。
基础颜色与斑点颜色的混合程度。
The Grid texture uses a numbered grid bitmap as the texture.
The number of squares.
The size of the font used to number the grid squares.
A High-Dynamic-Range (HDR) texture provides automatic conversion to a bitmap for non-HDR capable renderers. This allows the Rhino renderer and viewport display to show HDR environments. The HDR texture also provides projection conversion features. Most HDRi files come as light probe projection.
See: www.easyhdr.com/examples.
Image and file properties.
The path and name of the HDR.
不论视图方向为何,渲染时都以选取的图片填满背景。
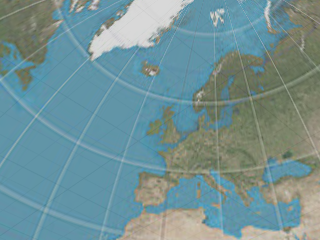
又称为角度鱼眼投影 (Angular Fisheye Projection),或正方位等距离投影 (Azimuthal Equidistant Projection)。以椭圆将贴图分段并映射到球体上
请参考: 维基百科: Azimuthal equidistant projection。
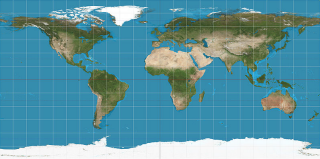
又被称为球形投影,图片的水平中心线对应到球体的赤道。
请参考: 维基百科: Equirectangular projection。
将贴图并排分割为等大的六份分配给立方体的每个面。
请参考: 维基百科: Cube mapping。
六个方向的平面投影图片以垂直十字排列做为环境背景。高度方向每个面为高度的四分之一,宽度方向每个面为宽度的三分之一。
六个方向的平面投影图片以水平十字排列做为环境背景。高度方向每个面为高度的三分之一,宽度方向每个面为宽度的四分之一。
以椭圆将贴图分段并映射到球体上。这种投影是由正交摄影机拍摄的球体镜像照片产生的。
类似球形投影,但是整个贴图映射到球体的上半部分,贴图的底部边缘一直延伸到球体的下半部分。
Use the same projection as the input image.
Modify the way the image is rotated in space during the projection conversion.
See: Tone Mapping.
A simple linear multiplier on all values in the image. This can be used to brighten or dim the image in an HDR capable renderer.
Converts the image to a bitmap file.
将响应曲线更改为幂函数,以便缓慢给出较高范围的突显,它是基于亮度值的对数压缩,模仿人对光的反应。
Adjusts the brightness of the output image to suit displaying conditions.
Adjusts the compression of bright areas and visibility of details in dark areas. The default value of 0.85 produces consistent, well-balanced images.
Adjusts the overall contrast of the image.
Creates alternating slabs of base and vein components. 
The overall size of the texture
The fraction of the distance from one base stripe to the next. Values range from 0 for no Vein component to 1 for no base component.
Blurs the edges of the veins.
Adds noise to the texture.
The Mask texture creates a grayscale image from a specific component of an input texture. This is useful for creating textures suitable for non-color uses (like transparency, or bump). It is even more useful for calculating a mask from only a single component. It is most commonly used to extract the alpha channel from an input texture.
The texture to be used as input.
The texture component to be used as the output.
Calculates the output texture from the grayscale of the input image.
Calculates the output texture from the grayscale color made by using the red component for all components (R, R, R, 1.0).
Calculates the output texture from the grayscale color made by using the green component for all components (G, G, G, 1.0).
Calculates the output texture from the grayscale color made by using the blue component for all components (B, B, B, 1.0).
Calculates the output texture from the grayscale color made by using the alpha component for all components (A, A, A, 1.0).
The noise texture is a general purpose procedural texture for creating many types of coherent or partially coherent multi-octave noise. The texture is very useful as a building block for other procedural types, but can also be used on its own for non-repeating bump patterns or random variations in color.
Many different types of noise for use in computer graphics have been developed. The noise texture provides several of them.
The classic noise developed by Ken Perlin in 1983.
See: Wikipedia: Perlin noise.
Creates a lattice of points which are assigned random values.
See: Wikipedia: Value noise.
The result of Perlin noise and Value noise added together.
A method for constructing an n-dimensional noise function comparable to Perlin noise but with a lower computational overhead.
See: Wikipedia: Simplex noise.
A noise method with accurate spectral control, easily mapped to a surface, and anisotropic filtering.
See: Procedural Noise using Sparse Gabor Convolution.
Similar to Value noise but with a different interpolation method.
A Hermite noise published by Greg Ward.
A coherent noise function developed by Robert McNeel & Associates.
Determines how the noise octaves are combined.
Results in a smooth noise function where there are no discontinuities.
Results in a non-smooth function where there are sudden discontinuities in the noise function.
Multi-layered noise is available by adding octaves. Noise octaves are additional noise waveforms layered onto the base wave at increasing frequencies and decreasing amplitude. Multi-layered noise can be used to simulate fractal-type effects such as ocean waves and landscape.
The frequency is multiplied by this number to reach the next octave.
Typically each octave is reduced in amplitude to create a fractal like pattern. This multiplier determines how much each octave is reduced by.
Sets the minimum and maximum values.
将分量值缩放到最大值和最小值之间。
将图像转为负片图像,对于低动态(LDR)图像,计算方法为 1 减去每个分量的颜色值,如果是高动态(HDR)图像,计算方法为将数值直接取反。
一个用来增加或减少对比度和亮度的简单设置。
A simple Perlin marble texture implementation. 
参考: 维基百科: Perlin 噪音.
Sets the size of the marble pattern.
Sets the saturation level of Color 1.
Sets the saturation level of Color 2.
Sets the number of times the turbulence algorithm is applied. The higher the value, the more complicated the marble pattern.
Adds noise to the texture.
Blurs the edges of the veins.
The perturbing texture takes a source texture, and a texture that controls the perturbation of the source; generally a noise or fBm texture although anything will work.
The source texture.
The texture that controls the perturbation of the source.
Adjusts the strength of the perturbing texture.
Creates a texture based on the appearance of the sky based on date, time, and location settings.
Uses the settings from the Sun panel.
设置日期,移动滑杆或在编辑框中输入日期,贴图会随之产生相应的变化,滑块的颜色代表指定时间太阳光的强度。
设置时间,移动滑杆或在编辑框中输入时间,贴图会随之产生相应的变化,滑块的颜色代表指定时间太阳光的强度。
以电脑的时间设定日期与时间。
在地图上指定一点,自动选择最靠近的城市。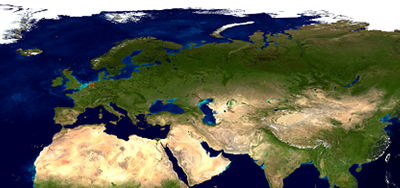
从城市清单选择位置。
以您所在的位置设定时区。
搜寻城市清单里的城市。
设定地点的纬度。
设定地点的经度。
设定地点的时区。
Shows the sun in the texture.

The size of the sun in the rendered image.

The brightness of the sun.
The color of the sun's corona (halo around the sun).
The denser the atmosphere, the larger the Sun will appear because the atmospheric density acts as a magnifier.
How much the light particles spread out and how fast. This is similar to the way refraction works through transparent materials. As the sun approaches the horizon, the light scatters more and at a faster rate the lower it gets because you are looking through a thicker slice of the atmosphere, which causes the light to scatter more. Higher values cause the sun to appear more red.
Affects the results when the Sun is low on the horizon. Higher numbers cause thicker (smoggier) air. More particles “scatter” as the Sun approaches the horizon causing a greater effect (sunset, sun size, color distribution, etc...).
Attempts to model how wavelengths of light are diffused and refracted through our atmosphere. The settings represent the physical wavelengths of the primary colors. The default values are the physically correct values for our atmosphere (Earth). However, these values do not define the color of the sky, but rather how light interacts within the atmosphere due to its wavelengths using Rayleigh and Mie scattering models.
Multiplies the overall intensity. Brighter areas will become more intense than darker areas.
The projection changer texture converts a texture or image from one type of projection to another. The options available are the same as for the HDR image and cover most forms of texture projection. This can be very useful for conversion of environment maps.
See: Environment Editor, Projection.
See: Environment Editor, Projection.
Use the same projection type as the input image.
Modify the way the image is rotated in space during the projection conversion.
The Resample texture takes an input texture and divides it into pixels. The color of these pixels is determined by sampling the colors from the input texture. Fewer samples may result in noisy pixelation, especially on noisy input textures, but will be quicker.
It also has features for smooth interpolation between the pixel centers, and blurring controls. The re-sample texture is especially useful for creating blurred or pixelated versions of other textures, particularly procedural textures or HDR textures which cannot be easily blurred in an image editing package.
The input texture. Click to assign a new texture.
The number of pixels in the re-sampled texture in the u‑direction.
The number of pixels in the re-sampled texture in the v‑direction.
The minimum number of samples taken from the original image used to determine the color of the re-sampled pixel.
If the maximum is higher than the minimum, the input texture will be adaptively sampled up to the maximum number of samples.
The interpolate option causes the sample values taken from the grid to be linearly interpolated. For a grid of simple colors, clear this check box.
Texture colors will be generated using bi-linear interpolation between the colors at the nearest pixel centers. Causes the re-sampled texture to switch between pixelated and smooth.
Blurring causes the values of neighboring re-sampled pixels to be averaged with their near neighbors.
Turns blur on.
The re-sample texture supports four averaging types, each with its own characteristics.
Uses a simple and fast technique to sum and average neighboring pixels. This method can result in artifacts.
A fast averaging technique that reduces the edge artifacts.
A true Gaussian blurring technique that uses a bell-curve weighting to produce most accurate and artifact-free blur. This method can result in “over blurring” and can be slow.
A modification of the Gaussian curve that preserves details while keeping artifacts to a minimum. This method can be slow.
The radius determines how colors far from the original pixel contribute to the resulting pixel's color. A larger radius means more blurring. The radius is measured in texture units (1.0 means the entire width of the image). Values of around 0.1 - 0.2 work for significant blurred results.
Determines whether pixels at the left and right edges of the image can use color information from the opposite side of the image in the blurring results.
Determines whether pixels at the top and bottom edges of the image can use color information from the opposite side of the image in the blurring results.
The Single Color texture acts as a placeholder for either a color or a sub-node texture. It can be useful in situations where you want to instance colors across many materials or textures.
Click to use a texture.
Performs a basic randomized multi-sampling of the texture. This can help with moiré effects in sub-pixel ray sampling
The texture uses the wire color of the object being rendered instead of its own color. This means you can have a single Basic Material with this texture in the Color slot and each object using that material will be colored according to its Display Color attribute.
The Stucco texture generates a simple surface pattern useful for creating the effect of a stuccoed surface using bump mapping.
Controls the size of the bumps. Increasing this value appears to zoom in on the texture.
Controls the thickness of the bumpy areas. Higher values create more detail in the bumps.
Controls how pronounced the bumps are. Lower values make the texture more bumpy. Higher values smooth the texture out and show fewer bumps. A value of 1 makes the texture completely smooth.
The Texture Adjustment Texture provides a set of color and geometry adjustment settings that are applied to the child texture. The settings are much as the same as the adjustment section available for most textures.
The name of the image file.
打开或关闭限制功能。
将分量值缩放到最大值和最小值之间。
设置最小值。
设置最大值。
将图像转为负片图像,对于低动态(LDR)图像,计算方法为 1 减去每个分量的颜色值,如果是高动态(HDR)图像,计算方法为将数值直接取反。
每种颜色都被替换为基于亮度的灰度值。
每种颜色通过给定的伽玛转换,效果是增加或减少对比度。
每个颜色值乘以这个数量,效果是增加或减少亮度。
一个用来增加或减少对比度和亮度的简单设置。
更改图像饱和度,1.0 代表原始的颜色饱和度,0.0 代表达到了最大灰度。
在调色盘上按给定的度数改变每种颜色的色调值。
Flips the image vertically.
Flips the image horizontally (as in mirror).
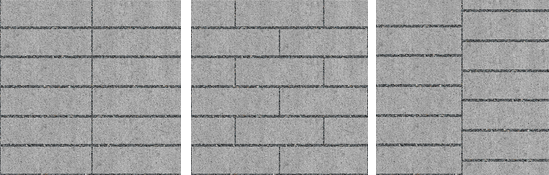
Tile textures are repeating patterns of color or texture or both.
Specifies the tile pattern.


Specifies the width of the joint color in each u,v, w direction.
The offset in tile space between each row or column of tiles (for each of the axes in u, v, and w). This is used to create brick-like patterns (where, for a simple stretcher bond, the u‑phase shift is 0.5).
The Turbulence texture creates a simplified partially coherent noise texture.
Similar effects are possible using the more complex but much more powerful Noise texture. Turbulence is a variation of Perlin noise Turbulence spectral synthesis.
参考: 维基百科: Perlin 噪音.
A measure of the contrast between noise levels.
The levels of fractal detail in the noise algorithm.
一个用来增加或减少对比度和亮度的简单设置。
The waves texture produces grayscale strips with a sine wave value curve in either a linear or radial pattern.
Produces linear waves (parallel lines).
Produces radial waves (concentric circles)
The steepness of the sine wave on the negative u side of the texture (1.0 is linear).
The steepness of the sine wave on the positive u side of the texture (1.0 is linear).
The distance in texture units between the waves.
Specifies the distance in simple texture units.
Specifies the distance by evaluating the luminance of another texture at that point.
The Wood texture consists of concentric cylinders of alternating Base and Ring components. The Wood procedure defines how the Base and Ring components combine.
The method used to create wood materials depends on how close it will be viewed.
If the viewpoint is not close to the wood, a solid color can take the place of wood without sacrificing image quality. This allows faster rendering.
The thickness of the wood grain. The thicker the grain, the more Color 2 affects the result and the less Color 1 does.
The amount of random variation in the grain. A value of zero makes the grain perfectly smooth. Higher values cause a more pronounced random variation in the grain.
Provides further random variation in the grain. This setting only has an effect when viewing the texture in 3‑D with WCS on and when Radial noise is greater than zero.
Controls the amount of blurring on the inner edge of the grain.
This controls the amount of blurring on the outer edge of the grain.
材质、贴图、环境设置都储存在模型文件里,但是渲染内容也可以保存在文件中与其他模型文件共享,渲染内容可以从 Rhino 窗口中直接拖放到文件夹里。
调色板的颜色也可以如此操作。
材质库面板直接将默认渲染内容文件中的内容显示出来, 可以从面板中直接将渲染内存拖放到模型,也可以将模型中的渲染内容拖放到文件夹变成一个文件。
| 指令行选项 | |
|---|---|
|
显示面板 |
Displays the Textures panel. |
|
选项 |
显示命令行选项。 新增删除重命名更改建立副本从文件载入保存到文件 |
| 工具列 | 功能表 |
|---|---|
|
|
|
The DownloadLibraryTextures command runs through the entire list of materials in the material library and downloads all of the required bitmap files from the Rhino server to the local computer. After that, any material can be used from the library without being online.
打开环境面板。
打开或关闭材质面板。
使用目前的渲染器渲染物件。
 快照
快照
Rhinoceros 6 © 2010-2017 Robert McNeel & Associates. 25-6月-2018
 或在颜色方块上按