Gumball
| Toolbar | Menu | Status bar |
|---|---|---|
|
|
|

The Gumball command displays the gumball widget on a selected object facilitating move, scale, and rotate transformations around the gumball origin.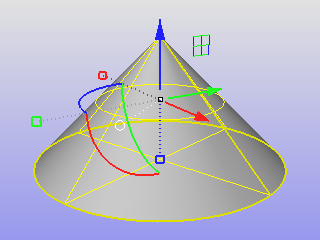
Steps
- Click the Gumball pane in the status bar.
Object actions
- Drag gumball arrows to Move the object.
- Drag scale handles (squares) to Scale the object in one direction.
- Drag arcs to Rotate the object.
- Tap Alt after starting to drag to toggle copy mode.
- Press and hold Shift during Scale to force 3-D scale.
- Press and hold Shift while clicking and dragging the Axis Plane Indicator to force 2-D Scale.
- Press and hold Ctrl during move, scale or rotate to Extrude a planar curve or surface.
- Click a control handle to enter numeric value.
Gumball controls
|
Move arrows
Rotation arcs
Scale handles
|
|
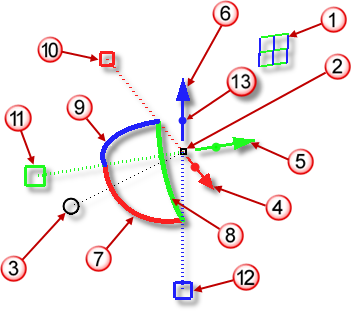
Overview
Axis plane indicator (1)
- Drag by the plane icons to constrain movement to that plane.
Hold down Shift to scale in two directions. - Direction lock and Distance constraint can be enabled.

Gumball origin (2)
- Drag the gumball origin to drag the whole object in any direction.
- Control point style and size settings in display modes control the appearance of the Gumball origin point.
Menu ball "bunny tail" (3)
- Click to change gumball settings.
Change the size in Gumball options. 0 turns it off.
Move arrows (4, 5, 6)
- Click and drag a gumball x, y, or z arrow control to move the objects in the arrow direction.
- Click an arrow to enter a distance, press Enter.
- Distance constraint can be enabled.
Rotation arcs (7, 8, 9)
- Rotate the object on the gumball origin.
- Click an arc to enter a rotation angle, press Enter.
- Angle constraint and Ortho can be enabled.
Scale handles (10, 11, 12)
- Click and drag a gumball scale handle to scale in one dimension along the arrow axis.
- When Object Snap is on, dragging a scale handle near the Gumball origin will snap to it. The object will be made flat in the scaling direction.
- Click a scale handle to enter a scale factor, press Enter.
- Press and hold Shift to force a 3-D scale.
The scale base point is the gumball origin. - Distance constraint can be enabled.
Extrude handles (13)
- Click and drag a gumball Extrude handle to Extrude a curve or point along the arrow axis.
- Click an extrude handle to enter an extruding distance, press Enter.
- Press and hold Shift to force extruding to both sides.
- While extruding, tap Alt to create a separate object.
- Extrude does not allow creating Non-manifold SubD or mesh objects.
- SubD-friendly curves will be extruded into SubD objects.
- Distance constraint can be enabled.
Copy
- Tap Alt while dragging any control to create a copy.
Quick access of Gumball settings
- Click the menu ball.
- Right-click and hold on any part of the Gumball widget. When the page icon
 appears, release the right mouse button.
The Right mouse button settings in Options > Mouse control the display timing of the page icon and the accessibility of the Gumball menu.
Relocate Gumball
Drag to relocate gumball widget away from its default position.
Reset Gumball
Restores the default placement and orientation for the gumball.
AutoReset Gumball
When an object is rotated, resets Gumball to align with CPlane or World axes based on the initial alignment.
Gumball On
Turns the gumball widget on any time objects are selected.
Gumball Off
Disables auto gumball.
Align to CPlane
Gumball widgets align to the construction plane xyz directions. The Gumball origin will be at the CPlane oriented bounding box center of the object.
Align to Object
Gumball widgets align to the object direction for:
- Curves
- Extrusion objects
- Lights
- Mesh faces and edges and vertices
- Planar objects and sub-objects
- The camera object (Camera) and NamedView camera widget
Exceptions
Free-form top-level objects
The gumball aligns with the construction plane with its origin at the object's centroid.
Curve control points
The gumball z direction (blue arrow) aligns with the curve normal.
The gumball x direction (red arrow) aligns with the curve tangent.
Surface control points
The gumball z direction (blue arrow) aligns with the surface normal.
The gumball x direction (red arrow) aligns with the surface u direction.
Align to World
Gumball widgets align to world xyz directions. The Gumball origin will be at the World oriented bounding box center of the object.
Snappy Dragging
Object snaps are used when dragging.
Smooth Dragging
Object snaps are ignored when dragging.
Rotate View Around Gumball
Rotate both the view camera and view target at the gumball origin when rotating the view.
Drag Strength
Sets the amount of the gumball drag as a percentage of mouse movement to control the speed of the gumball movement. The default 100% moves the gumball consistently with the mouse.
To fine-tune placing objects (such as with control point editing) set the strength lower, so large hand/mouse movements result in smaller gumball changes. When the control is closed, drag strength is reset to 100%.
Settings...
Opens Gumball options.
| Command-line options | |
|---|---|
|
On |
Turns gumball widgets on for selected objects. |
|
Off |
Turns gumball widgets off. |
|
Toggle |
Toggles the on/off state of the gumball widgets. |
Object actions
Specify a distance, rotation angle, or scale factor
- Click any gumball arrow, arc, or scale handle.
- In the edit box, type a distance, rotation angle or scale factor that will be applied to the selected object.
Copy with numeric input
- Press and hold Alt and click any gumball arrow, arc, or scale handle.
In the edit box, type a distance, rotation angle or scale factor that will be applied to a copy of the selected object.
Use distance and angle constraint
Normal Rhino distance and angle constraints can be used during a gumball operation.
- Start dragging an object.
- Type a number, and press Enter.
This number appears on the command line and is used to constrain a distance or angle of rotation. - Drag the object.
Distances are constrained along the axis arrow line.
Angles are constrained in increments of the angle around the rotation arc.
Extrude a curve or surface
- Click and drag any gumball arrow on a planar curve or surface.
-
Press and hold Ctrl.
- Release the mouse button.
The result is an open extrusion. To create a solid, Cap the result.
Note: Press the Shift key to extrude on both sides.
To extrude a specific distance
Gumball widget location and orientation
To move, rotate, or scale the gumball widget controls freely
-
Press and hold Ctrl and click and drag the gumball control to move, rotate, or scale the control freely.
To move rotate, or scale the gumball widget controls with numeric control
-
Press and hold Ctrl and click any gumball arrow, arc, or scale control.
- In the edit box, type a distance, rotation angle or scale factor that will be applied to the gumball control.
Relocate Gumball
Status bar options
To access the status bar menu
- Right-click the Gumball pane in the status bar to access options.
Relocate Gumball
Drag to relocate gumball widget away from its default position.
Reset Gumball
Restores the default placement and orientation for the gumball.
AutoReset Gumball
When an object is rotated, resets Gumball to align with CPlane or World axes based on the initial alignment.
Gumball On
Turns the gumball widget on any time objects are selected.
Gumball Off
Disables auto gumball.
Align to CPlane
Gumball widgets align to the construction plane xyz directions. The Gumball origin will be at the CPlane oriented bounding box center of the object.
Align to Object
Gumball widgets align to the object direction for:
- Curves
- Extrusion objects
- Lights
- Mesh faces and edges and vertices
- Planar objects and sub-objects
- The camera object (Camera) and NamedView camera widget
Exceptions
Free-form top-level objects
The gumball aligns with the construction plane with its origin at the object's centroid.
Curve control points
The gumball z direction (blue arrow) aligns with the curve normal.
The gumball x direction (red arrow) aligns with the curve tangent.
Surface control points
The gumball z direction (blue arrow) aligns with the surface normal.
The gumball x direction (red arrow) aligns with the surface u direction.
Align to World
Gumball widgets align to world xyz directions. The Gumball origin will be at the World oriented bounding box center of the object.
Snappy Dragging
Object snaps are used when dragging.
Smooth Dragging
Object snaps are ignored when dragging.
Rotate View Around Gumball
Rotate both the view camera and view target at the gumball origin when rotating the view.
Drag Strength
Sets the amount of the gumball drag as a percentage of mouse movement to control the speed of the gumball movement. The default 100% moves the gumball consistently with the mouse.
To fine-tune placing objects (such as with control point editing) set the strength lower, so large hand/mouse movements result in smaller gumball changes. When the control is closed, drag strength is reset to 100%.
Settings...
Opens Gumball options.
Related commands
| Toolbar | Menu | Status bar | Gumball widget menu |
|---|---|---|---|
|
CPlane
Object
World |
|
<Options> |
Align to CPlane Align to Object Align to World |

The GumballAlignment command resets the gumball widget alignment.
Note
- Alignment will not change if you have previously modified the gumball position or orientation.
- Right-click the gumball and use Reset from the gumball context menu to force the new alignment for these objects.
- Alignment is based on the object bounding box.
| Command-line options | |
|---|---|
|
CPlane |
Sets the gumball widget alignment to the active construction plane. |
|
Object |
Sets the gumball widget alignment to the selected object. The object aligned gumball is placed at the planar face center unless the object is a picture frame. |
|
World |
Sets the gumball widget alignment to world coordinates. |
| View |
Sets the gumball widget alignment to the view plane of the current viewport.
|
| Toolbar | Menu |
|---|---|
|
|
|

The GumballScaleMode command sets the size of the scale handles either relative to the gumball radius or based on the object size. This command does not affect the move handles (arrows) and rotate handles (arcs).
| Command-line options | |
|---|---|
|
Mode |
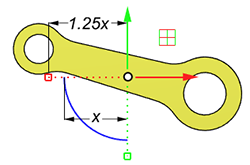
RelativeThe scale handle size is the product of the Gumball radius multiplied by the RelativeHandlePositionMultiplier value. Gumball Radius=x with RelativeHandlePositionMultiplier=1.25
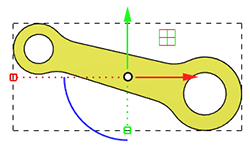
AbsoluteThe scale handles extend to the object's bounding box boundary. NoteIn the Absolute mode, entering the scale value with different formats scales the object differently.
|
|
RelativeHandlePositionMultiplier |
Specifies the size of the scale handles relative to the Gumball radius setting. Numbers larger than 1 make the gumball scale handles longer than the Gumball radius. Numbers between 0 and 1 make the gumball scale handles shorter than the Gumball radius. |
| Toolbar | Menu | Gumball widget menu |
|---|---|---|
|
|
|
Relocate Gumball |
The GumballRelocate command moves the gumball origin and orientation of an object.
The other way to move Gumball is to press and hold Ctrl and drag the Gumball widget rather than the object.
Steps
- Pick a location for the Gumball origin.
Press Enter to reset the Gumball y and z axes automatically based on the active viewport construction plane and the x axis direction. - Pick a location for the Gumball x axis direction.
- Pick a point to specify the Gumball y axis orientation.
-
Release Ctrl to use object snaps to place the widget at a snap location.
Command-line options
SetScaleHandles
Sets the length of the x, y, and z scale handles.
| Toolbar | Menu | Gumball widget menu |
|---|---|---|
|
|
|
Reset Gumball |
The GumballReset command makes the orientation of the gumball instantly snap back to its original location after being relocated with GumballRelocate.
|
Toolbar |
Menu |
Status bar |
|---|---|---|
|
|
|
AutoReset Gumball |
The GumballAutoReset command makes the orientation of the gumball snap back to its starting location after every transformation.
This setting allows free rotation of the object while constraining the original orientation.