The Rhino window
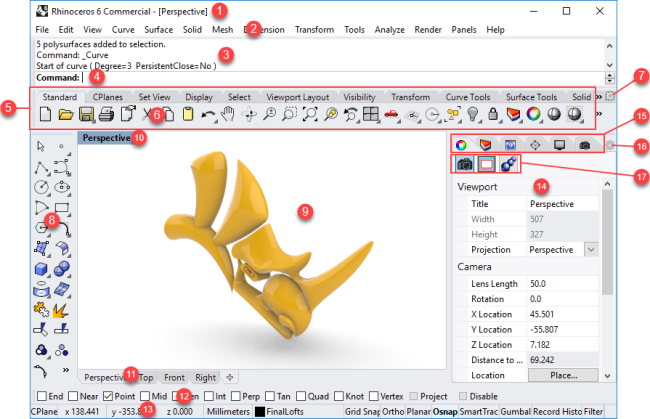
The image below illustrates some of the major features of the Rhino window.

1. Window title
Displays the current model's file name and file size. More...
2. Menu bar
Groups Rhino commands by function. More...
3. Command history
Displays the previous commands and prompts. Text from this area can be copied and pasted into the command prompt, macro editor, button command, or any application that accepts text. More...
Right-click to open a context menu.
4. Command prompt
Displays prompts for command actions, allows typing command names and options. More...
Right-click to open a context menu.
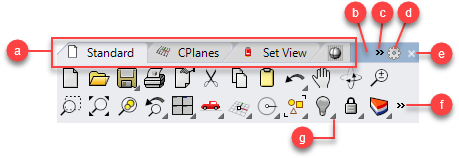
5. Toolbar group
A collection of toolbars. More...

Tabs (a), Group handle (b), Scroll control (c), Toolbar menu button (d), Close button (e), Show more (f), and Linked toolbar cascade button (g).
6. Toolbar
Contains graphical icons for initiating commands. More...
7. Toolbar menu button
Opens the toolbar menu. More...
8. Sidebar
Displays the toolbar or toolbar group that is linked with a toolbar. More...
9. Viewport
Displays the Rhino working environment including object display, viewport title, background, construction plane grid, world axis icon. More...
Context Menus
One of the three context menus appears when you right-click, hold and release in a viewport.
Select Add items to this menu... to customize the items on the specific menu in the Options dialog.
- When nothing is in selection, the Viewport Context Menu appears.
- When objects are in selection, the Object Context Menu appears.
- When control points are in selection, the Control Point Context menu appears.
10. Viewport title
Left click to activate the viewport without losing selected objects. More...
11. Viewport tabs
Manages multiple-page layout style viewports along with standard modeling viewports. More...
12. Osnap control
Contains persistent object snap toggles. More...
13. Status bar
Displays the current coordinate system, the current location and delta of the cursor, and the status bar panes. More...
The status bar is located at the bottom of the Rhino window.
14. Panel
Provides quick access to some global options, document properties, and command dialogs. More...
15. Panel tabs
Click a tab to bring the panel to front. More...
16. Panel menu button
Click to show the panel menu that controls appearance and visibility of panels. More...
17. Property page icons
Click to display different property pages in the Properties panel. More...
Status bar panes
|
CPlane |
x |
y |
z |
Inches |
■ Layer |
Grid Snap |
Ortho |
Planar |
Osnap |
SmartTrack |
Gumball |
Record History |
Filter |
Info |
Menu Help
When the mouse hovers over a menu item, a description of that item displays here.
CPlane / World
The construction plane/world coordinates toggle.
x
The mouse cursor x location.
y
The mouse cursor y location.
z
The mouse cursor z location.
Units / Delta
The current units setting.
During drawing commands, displays the distance from last picked point to the current location.
Layer pane
If objects are selected, the Layer pane displays the layer of the selected objects.
If no objects are selected, the Layer pane displays the current layer.
- Click the Layer pane to access quick controls for setting the selected objects' layer or to change layer visibility and status.
- Right-click the Layer pane to open the Layers panel.
Grid Snap pane
- Click the Grid Snap pane to toggle grid snap.
The text "Grid Snap" changes to bold when Grid Snap is on. - Right click the pane to set options.
 Grid Snap options Grid Snap options |
|
|---|---|
|
Grid Snap On/Off |
Toggles the grid snap on/off state. This is the same as clicking the Snap pane. Active Viewport / All Viewports optionsShow Grid LinesToggles the visibility of the construction plane grid. Show Grid AxesToggles the visibility of the grid x and y axes. Show World Axes IconToggles the visibility of the world axis icon in the bottom left corner of a viewport. Set Snap SizeSpecifies the grid snap size. Snap SizeReports the current snap size. SettingsOpens the Grid Document Properties. |
Ortho pane
- Click the Ortho pane to toggle Ortho mode.
The text in the pane changes to bold when the mode is on. - Right-click the pane to set options.
 Ortho options Ortho options |
|
|---|---|
|
Ortho On/Off |
Toggles the ortho on/off state. This is the same as clicking the Ortho pane. |
|
Set Ortho Angle |
Specifies the ortho angle. |
|
Ortho Angle |
Reports the current ortho angle. |
|
Settings |
Opens the Modeling Aids Options. |
Planar pane
- Click the Planar pane to toggle Planar mode.
The text in the pane changes to bold when the mode is on. - Right-click the pane to set options.
 Planar option Planar option |
|
|---|---|
|
Planar On/Off |
Toggles the planar on/off state. This is the same as clicking the Planar pane. |
Osnap pane
- The Osnap control lets you select which object snaps are currently in effect.
- Click the Osnap pane to toggle the display of the Osnap control.
The text in the pane changes to bold when one or more object snaps have been selected.
If some object snaps are selected, clicking the Osnap pane toggles the disabled state. - Right-click the pane to set options.
 Osnap options Osnap options |
|
|---|---|
|
Osnap Control On/Off |
Toggles the Osnap control on/off state. This is the same as clicking the Osnap pane. |
|
Snap to locked objects |
Turns on snapping to locked objects. |
|
Snap to apparent intersections |
Turns on snapping to apparent intersections. |
|
Settings |
Opens the Modeling Aids Options. |
SmartTrack pane
- Click the SmartTrack pane to toggle SmartTrack mode.
The text in the pane changes to bold when the mode is on. - Right-click the pane to set options.
 SmartTrack options SmartTrack options |
|
|---|---|
|
SmartTrack On/Off |
Toggles the SmartTrack on/off state. This is the same as clicking the SmartTrack pane. |
|
Settings |
Opens the SmartTrack Options. |
Gumball pane
- Click the Gumball pane to toggle Gumball widget display on the selected object.
The text in the pane changes to bold when the mode is on. - Right-click the pane to set options.
 Gumball options Gumball options |
|
|---|---|
|
AutoReset Gumball |
When an object is rotated, resets Gumball to align with CPlane or World axes based on the initial alignment. |
|
Gumball On/Off |
Toggles Gumball on/off state. This is the same as clicking the Gumball pane. |
|
Align to CPlane |
Sets the default Gumball aligned to CPlane axes. |
|
Align to Object |
Sets the default Gumball aligned to the selected object when possible. |
|
Align to World |
Sets the default Gumball aligned to World axes. |
|
Align to View |
Sets the gumball widget alignment to the view plane of the current viewport. |
|
Snappy Dragging |
Object snaps are honored when dragging. |
|
Smooth Dragging |
Object snaps are ignored when dragging. |
|
Rotate View |
When Gumball displays, use the Gumball origin as the center to rotate the view. |
|
Drag Strength |
Shows the Drag Strength dialog to change the dragging influence amount. |
|
Settings |
Opens the Gumball Options. |
Record History pane
- Click the Record History pane to toggle history recording on/off state.
The text in the pane changes to bold when the mode is on. - Right-click the pane to set options.
 Record History options Record History options |
|
|---|---|
|
Always Record History |
Turns history recording on. |
|
Update Children |
Automatically updates child objects when the input objects are changed. |
|
Lock Children |
Locks output created with history. |
|
History Break Warning |
Warns when the connection between parent and child objects is broken. |
Filter pane
- Click the Filter pane to open the Selection Filter control.
 Filter options Filter options |
|
|---|---|
|
Selection Filter Control On/Off |
Toggles the Selection Filter control on and off. |
Info pane
- Click the Info pane to display information about the current Rhino session. The Info pane cycles through the list of specified categories.
 Info options
Selected object count
Selected object layer
Relative coordinates
Curve parameter/UV coordinates
Annotation style
Notes
Absolute tolerance
Angle tolerance
Current layer
Current layer linetype
Number of off layers
Current font
CPlane name
CPlane/UPlane
Parallel view size
Minutes from last save
CPU use
Memory use
Available physical memory
