The MaterialEditor command opens the Materials panel which specifies the color, finish, transparency, texture, and bump for use by the built-in Rhino renderer.
Note
| ● | Materials can be dragged and dropped onto any Material, Texture, and Environment control. |
| ● | Any number of materials can be stored in the model. Materials can be designed in-place in the material and environment editors by adding textures as child. Opening a floating preview allows visualization of the texture during its development. |
| ● | Colors and textures can be dragged from the color swatch and dropped onto any other color swatch or control in the Material Editor, Texture Palette, or Environment Editor. |
The Materials panel has additional browsing tools.
![]() Back
Back
Walks back though the previously selected materials.
![]() Forward
Forward
Walks forward through the previously selected materials.
![]() Currently selected item name
Currently selected item name
Displays the current material icon and name.
![]() Menu
Menu
Displays the Tools menu.
![]() Help
Help
Right-click a thumbnail to display a context menu.
Right-click the blank area of the thumbnail browser to display a context menu.
Right-click and drag in the thumbnail to change the view.
Double-click to display a larger preview window.
Drag the preview thumbnails to reorder the list.
Double-click the large preview to open a floating window that can be re-sized to get a higher resolution view of the preview.
This window has all the same functionality as the original preview image including the context menu and the ability to drag and drop onto other materials or objects in the model.
Right-click the large preview window or the floating preview window to display the context menu.
To assign a material to objects
| 1. | On the Tools |
| 2. | In the Rhino viewport, select the target objects. |
To pre-select objects
| 1. | In the Rhino viewport, select the target objects. |
| 2. | On the Tools |
To drag and drop materials to objects
Drag the material from the thumbnails or list onto the target objects.
To assign a material to layers from the Material Editor
| 1. | On the Tools |
| 2. | In the Choose Layers dialog box, check the boxes for the material assignment. |
To assign materials to layers of selected objects
| 1. | On the Tools |
| 2. | In the Rhino viewport, select the target objects. |
To assign materials from the Layers panel
| 1. | In the Layer panel, select one or more layers and click the Material column. |
| 2. | In the Layer Material dialog box, select the material to assign. |
To drag and drop materials to layers
Drag the material from the thumbnails or list onto a target layer in the Layer panel.
Note: Drag and drop works for only one layer at a time.
To create a new material
| 1. | In the thumbnail browser, click the Create New Material button |
| 2. | In the Open dialog box, select a material type, or click More types.
|
Types
Start from scratch
Provides templates for materials.
![]() Load from file
Load from file
Imports materials from a saved Rhino .rmtl file.
![]() Basic Material
Basic Material
Creates a new basic material.
![]() Blend Material
Blend Material
The Blend material takes two materials and blends between them by the amount specified.
![]() Composite Material
Composite Material
The Composite material is a more complex blending material capable of merging up to ten materials with different blending modes (Add, Subtract, Multiply). Each material can have a different mode and amount specified.
Start from existing
Displays the materials in the model to use as templates.
 Make a copy
Copies the material into a new independent material.
Share all settings
Copies the material with shared settings. Changes to one material's settings changes both materials.
 Show tree view
Displays the materials in a tree showing relationships between materials.
Names the texture. All textures are automatically assigned a name. You can change this generic name.
Note: When a texture or image file is dragged to a Rhino object, a material with that image is assigned to the object.
The default material is white and matte, with no reflectivity or transparency.
The Color control sets the material's base (also called diffuse) color.
The color used to render surfaces, polysurfaces, or polygon meshes.
The color option does not affect the select wireframe display. To change the color of the wireframe display, change the color of the object's layer or set the color in Object Properties.
Note: You can drag the color swatch to a folder to create a Rhino color file.
To add this color to a color library
Drag it from a folder to another color swatch in the Material, Environment, or Texture Palette panels, or you can drag it onto an object.
To change the color ![]()
| 1. | Click the color swatch to select a color from the Select Color dialog box. |
| 2. | Click the menu arrow or right-click the swatch to open the context menu. |
Menu options
Color Picker
Opens the Select Color dialog box.
Eye Dropper
Allows picking the color from anywhere on the screen.
Copy
Copies the color in the color swatch.
Paste
Pastes the color from one color swatch to another.
| 3. | In the edit box, specify the percentage of strength the color. |
The Gloss finish control adjusts the highlight from matte to glossy and sets the color of the glossy area.
To change the glossiness ![]()
Move the slider to the right to increase the glossiness.
To set the gloss finish color ![]()
Select the gloss finish color using the color swatch.
Note: Set the highlight color to match the base color for metallic materials. Set the gloss color to white for plastic materials.
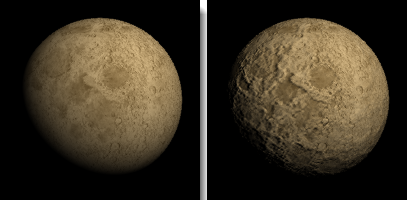
The Reflectivity setting sets the material's reflectivity amount and sets the reflective color.
To change the reflectivity amount ![]()
Move the slider to the right to increase the reflectivity.
To change the reflectivity color ![]()
Select the reflectivity color using the color swatch.
Adjusts the transparency of an object in the rendered image.
To set the transparency value ![]()
Move the slider to the right to increase the transparency.
Sets the level of transparency based on the index of refraction (IOR) scale.
Example IOR values are shown in the following table:
| Material | IOR |
|---|---|
| Vacuum | 1.0 |
| Air | 1.00029 |
| Ice | 1.309 |
| Water | 1.33 |
| Glass | 1.52 to 1.8 |
| Emerald | 1.57 |
| Ruby/Sapphire | 1.77 |
| Diamond | 2.417 |
Textures
Textures (images or procedural textures) can be used for color, transparency, bump, and environment.
Note
| ● | Images changed outside of Rhino in Photoshop or a similar program automatically update in the rendered view. |
Note
Rhino supports the following file formats:
Transparency is not supported in these formats:
| ● | JPEG - JFIF Compliant (*.jpg, *.jpeg, *.jpe) |
| ● | Windows Bitmap (*.bmp) |
Transparency is supported in these formats:
| ● | DDS files (*.dds) |
| ● | HDRi files (*.hdr, *. hdri) |
| ● | OpenEXR files (*.exr) |
| ● | Portable Network Graphics (*.png) |
| ● | Tagged Image File Format (*.tif, *.tiff) |
| ● | Truevision Targa (*.tga) |
To specify an image
| 1. | Click the texture control. |
(empty - click to assign)
The check box automatically becomes checked the first time you do this. You can clear the check box to turn off the assignment.
| 2. | Select an image file to use. |
| 3. | In the spinner/edit box, specify the percentage of strength the image will use to affect the color, transparency, bump, or environment. |
Specifies a texture to use as the material's color.
Sets a texture to use as the material's transparency.
Sets a texture to use as the material's bump.
Defines the name of an image file that will be mapped on the surface as a bumpmap when you render the scene.
An image makes a surface appear bumpy in a rendered image but does not modify the shape of the surface.
Sets a texture to use as the material's environment. This will be mapped onto the surface as though it were being reflected.
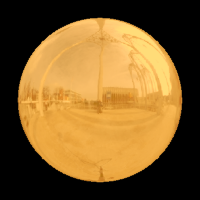
Note: The image should be an angular map or light probe projection (spherical) image. Other image projections will produce the reflection effect, but it will be distorted and not produce the realistic environment reflection.
Advanced Settings
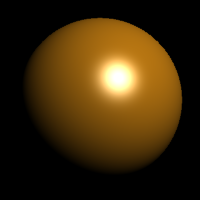
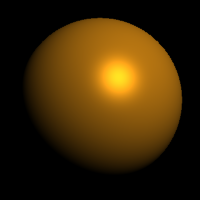
Adds a color to the shaded result. It does not take into account the lighting, so if the emission color is white, the object will always appear white. If the emission color is grey, all parts of the object will appear brighter than they would otherwise.
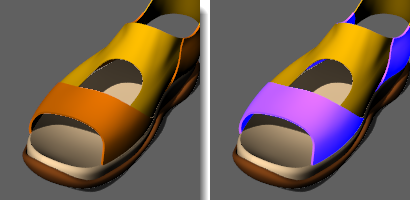
Orange material emission color black (left); emission color blue (right).
Adds a color to the unlit part of the object. This is used rarely to brighten up shadowed areas. The results are not normally useful.
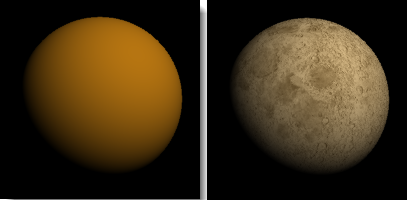
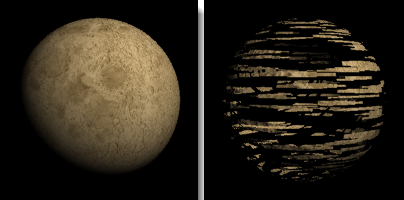
If this setting is off, the object will render the diffuse color all over with no shadowing or shading. It is used for picture frames to ensure that the color of the texture remains constant over the surface.
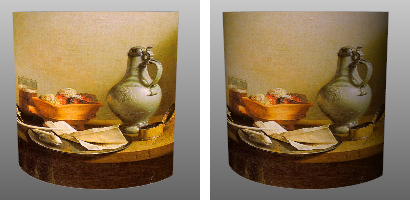
Orange material diffuse lighting on (left); diffuse lighting off (right).
Notes
Add notes to provide extra information. The notes are saved with the model and appear as tooltips in the Library, Material, Environment, and Texture panels when you mouse-over the thumbnails.
The Blend material takes two materials and blends between them by the amount specified.
Material 1 / Material 2
The two materials to mix.
empty - click to assign
Click the text to assign a texture image.
Mix amount
The value represents the percentage of Material 1.
Materials, environments, and textures are stored in the model, but render content can also be saved to files that can be shared between models. Content can be dragged between Rhino sessions and into a folder.
Color swatches can be dragged and dropped in the same way.
The Libraries panel displays the default content folder. Use this to drag and drop content into the model or to drag and drop model content to an external file.
See also
Rhinoceros 5 © 2010-2015 Robert McNeel & Associates. 17-Sep-2015
