![]()
Render
Materials
Materials
| Toolbar | Menu | Panel |
|---|---|---|
|
|
Render Materials |
Materials |
The Materials panel contains two external material libraries: Custom materials and Standard materials, and an internal list of Model Materials. Your own custom materials are stored either in the Custom materials library or in the Model Materials.
When materials are assigned to objects or layers, they are added to the Model Materials.
Materials can only be added to the Custom materials library or the Model Materials. The Standard materials library cannot be edited. The materials are stored in the application and will be replaced when Rhino is updated.
Custom materials library
Custom materials are stored in an external Rhino material (.rmtl) file. These materials can be used in any model.
Make changes to the custom material.
Make a copy of the custom material.
Open the Finder application at the custom material (.rmtl) file.
Delete the custom material.
 .
.Model Materials
Model materials are stored in the model, not in an external file. Other models do not have access to these materials. They are added to your model when you create or copy a material in the Model Materials, or when you insert or import another model that has materials assigned to objects or layers.
Select all objects in the model that have this material assigned.
Create a copy of the material in the custom library.
Standard materials library
Displays the material properties.
Names the material.
Sets the material's base (also called diffuse) color.
The color used to render surfaces, polysurfaces, or polygon meshes.
The color option does not affect the wireframe display. To change the color of the wireframe display, change the color of the object's layer or set the color in Object Properties.
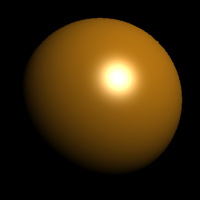
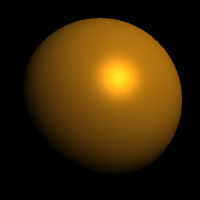
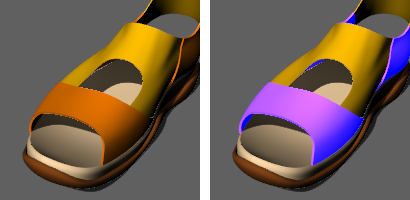
Adjusts the highlight from matte to glossy and sets the color of the glossy area.
Adjusts the transparency of an object in the rendered image.
Sets the level of transparency based on the index of refraction (IOR) scale.
Example IOR values are shown in the following table:
| Material | IOR |
|---|---|
| Vacuum | 1.0 |
| Air | 1.00029 |
| Ice | 1.309 |
| Water | 1.33 |
| Glass | 1.52 to 1.8 |
| Emerald | 1.57 |
| Ruby/Sapphire | 1.77 |
| Diamond | 2.417 |
The Reflectivity setting sets the material's reflectivity amount and sets the reflective color.
Textures (images or procedural textures) can be used for color, transparency, bump, and environment.
Images changed outside of Rhino in Photoshop or a similar program automatically update in the rendered view.
Rhino supports the following file formats:
Transparency is not supported in these formats:
Transparency is supported in these formats:
Textures options
Each of the texture options: color, transparency, bump, and environment includes the components that control how the image interacts with the object.
Specifies a texture to use as the material's color.
Selects the image to use for the color.
Specifies the percentage of strength the image will use to affect the color.
When multiple points on the surface are mapped to the same point in the texture the image can be "pixelated," displaying jagged lines and stair-stepped transitions between colors in the texture. Filtering smooths those transitions. In most cases the pixelation is smoothed out but if a very small texture is mapped to a very large surface the filtering tends to make things look blurry.
Specifies how many instances of the texture will be placed on objects in the u and v‑directions.
Specifies the u‑ and v‑distance from zero that the texture will be offset.
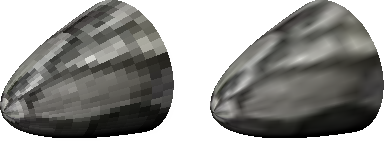
Specifies the rotation angle for the color texture.
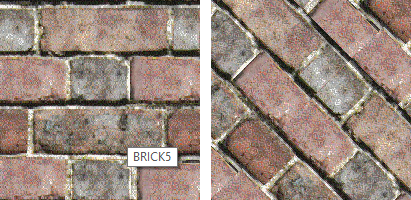
Texture Rotation=0 (left), Texture Rotation=45.
Sets a texture to use as the material's transparency.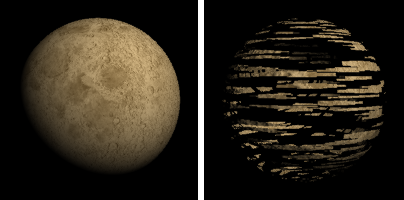
Selects the image to use for the transparency.
Specifies the percentage of strength the image will use to affect the transparency.
When multiple points on the surface are mapped to the same point in the texture the image can be "pixelated," displaying jagged lines and stair-stepped transitions between colors in the texture. Filtering smooths those transitions. In most cases the pixelation is smoothed out but if a very small texture is mapped to a very large surface the filtering tends to make things look blurry.
Specifies how many instances of the texture will be placed on objects in the u and v‑directions.
Specifies the u‑ and v‑distance from zero that the texture will be offset.
Specifies the rotation angle for the transparency texture.
Sets a texture to use as the material's bump.
Defines the name of an image file that will be mapped on the surface as a bumpmap when you render the scene.
An image makes a surface appear bumpy in a rendered image but does not modify the shape of the surface.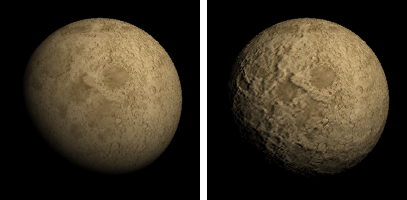
Selects the image to use for the bump.
Specifies the percentage of strength the image will use to affect the bump.
When multiple points on the surface are mapped to the same point in the texture the image can be "pixelated," displaying jagged lines and stair-stepped transitions between colors in the texture. Filtering smooths those transitions. In most cases the pixelation is smoothed out but if a very small texture is mapped to a very large surface the filtering tends to make things look blurry.
Specifies how many instances of the texture will be placed on objects in the u and v directions.
Specifies the u and v distance from zero that the texture will be offset.
Specifies the rotation angle for the bump texture.
Sets a texture to use as the material's environment. This will be mapped onto the surface as though it were being reflected.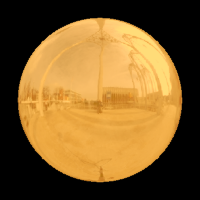
The image should be an angular map or light probe projection (spherical) image. Other image projections will produce the reflection effect, but it will be distorted and not produce the realistic environment reflection.
Selects the image to use for the environment.
Specifies the percentage of strength the image will use to affect the environment.
When multiple points on the surface are mapped to the same point in the texture the image can be "pixelated," displaying jagged lines and stair-stepped transitions between colors in the texture. Filtering smooths those transitions. In most cases the pixelation is smoothed out but if a very small texture is mapped to a very large surface the filtering tends to make things look blurry.
Specifies how many instances of the texture will be placed on objects in the u and v‑directions.
Specifies the u‑ and v‑distance from zero that the texture will be offset.
Specifies the rotation angle for the environment texture.
Advanced Settings
Adds a color to the shaded result. It does not take into account the lighting, so if the emission color is white, the object will always appear white. If the emission color is gray, all parts of the object will appear brighter than they would otherwise.
Adds a color to the unlit part of the object. This is used rarely to brighten up shadowed areas. The results are not normally useful.
If this setting is off, the object will render the diffuse color all over with no shadowing or shading. It is used for picture frames to ensure that the color of the texture remains constant over the surface.
Rhino for Mac © 2010-2017 Robert McNeel & Associates. 24-Oct-2017