 Post Effects for Raytraced viewports
The Post Effects settings in viewport properties is only visible for Raytraced viewports. It has three post-processing tabs: Post Effects, Tone Mapping, and Final Pass.
 Enable Post Effects
Turns on or off post effects for the Raytraced viewport.
 Load post effects from document
Reverts post effect settings to the state of the last save.
 Save post effects to document
Saves the current post effect settings to the 3dm file.
 Post Effects tab
The Post Effects tab list all of the selected post-processing effects.
To add a post effect
-
Click the
 button.
 -
Select a post effect from the list.
To remove a post effect
- Click the button behind the post effect.
To enable or disable a post effect
- Click on the checkbox in front of the post effect.
To reorder post effects
-
Drag a post effect up or down.
Post effects are executed from top to bottom.
Bloom
The Bloom post-effect feathers the bright areas in an image to simulate lights in a dark scene.
Brightness threshold
The Bloom effect happens when pixels are brighter than this value.
Moving the slider towards the left will add more bloom effect to the image.
Radius
The Radius setting controls the feathering distance from the bright area.
Intensity
The Intensity setting changes the brightness of the bright area. The strength falls off towards the feathering boundary.
-
Move the slider to change the value.
-
Double-click the slider to enter a number.
-
Drag the slider past the right end to increase the max value.
Glow
Produces a bright area around specific colors. It can be used to make colored lights or objects appear to glow and works well with neon type lights.
Glow Properties
Radius
Determines the radius of the glow around the bright pixel. Increasing the radius blurs the glow effect.
-
Move the slider to change the value.
-
Double-click the slider to enter a number.
-
Drag the slider past the right end to increase the max value.
Intensity
Changes the brightness of the glow color.
On
Turns on the glow effect for the color.
Color
More color actions
Click the small triangle of the color swatch for more color actions.
Color Picker
Opens the Select Color dialog.
Eye Dropper
Picks a color from anywhere on the screen.
Copy
Stores the current color to Clipboard.
Paste
Pastes the color from Clipboard.
Sensitivity
Controls how much variation on the selected color is permitted when calculating glow on pixels close to that color.
 Add
Add
Adds a new glow color. Up to 8 colors can be used.
 Delete
Deletes the last glow color.
The fog effect adds depth-dependent coloration in the image and can be used to add anything from a thick fog effect to a subtle depth cue. In this way it is similar to the environment based Haze, but instead of being rendered at raytrace time, it is added afterward and can be adjusted in real time.
Fog Properties
Strength
Determines the maximum amount of fogginess. 0.0 means no fog at all (and therefore no effect), 1.0 represents total fog. Values higher than 1.0 can be used but only make sense when used with noise.
Fog Color
Adjusts the color of the fog.
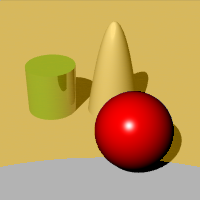
Pick
Picks the color from the rendered image.
![]() Click the image to pick a color.
Click the image to pick a color.
Start distance
Specifies the distance from the camera at which the fog begins to appear.
Pick
Picks the depth from the rendered image.
End distance
Specifies the distance from the camera at which the maximum amount of fogginess is achieved.
Pick
Pick the depth from the rendered image.
Pick Area
Pick the area in the image.
Fog Background
Determines whether the background image is also made foggy. The background will be fogged at the maximum strength.
Feathering
Determines the number of pixels outside the bounding area to fade in the fogginess.
Preview the effect on the image as you change the values in the dialog box.
Depth of Field
Blurs the image depending on the distance from the camera.
Depth of Field Properties
Blurring Strength
Determines the amount of blurring. This is an arbitrary value and you will find different values will work better with different images.
Max Blurring
Determines the maximum Gaussian blurring radius used. Since extremely blurred areas can cause the effect to be slow, this limits the effect.
Focal distance
The distance from the camera at which the image is not blurry – in focus.
Pick
Pick the distance from the rendered image.
Blur background
Determines whether the background is blurry. The background will be blurred at the maximum effect.
Intel denoiser
A CPU based denoiser which works on mostly any system irrespective of CPU and GPU brands. Works on Windows and Mac.
Max Memory
The maximum memory can be used by the denoiser plug-in.
Information
Error messages of the denoiser display here.
NVIDIA denoiser
A GPU based denoiser which works only with NVIDIA GPUs on Windows.
Information
Error messages of the denoiser display here.
Which denoiser should you use?
The Intel denoiser is generally recommended, unless you use a Windows system with an NVIDIA display card in which case the NVIDIA denoiser is recommended.
 Tone Mapping tab
Tone mapping is the process of converting an high-dynamic-range image into a low-dynamic-range image. HDR means the pixel values can have red, green, and blue values that can be represented by a 32-bit floating point number. These values can either be smaller than 1 which means there will be a quantizing error (fixed using dithering), or they can be above 1.0 which might mean they are brighter than the maximum value of the color channel on a monitor (for example, more than 255).
When values are "brighter than white," they will be burned out on the screen. They can be brought back into the screen/bitmap color gamut using tone mapping, which is the process of remapping the color in an image so that the brighter areas are better represented. The options offer a number of ways of doing this.
See: Wikipedia: High dynamic range imaging.
Black / White point
Linear interpolation between two points that are specified as black and white. In a normal image, these are 0.0 and 1.0.
Black point
Specifies the numerical value for the black point.
White point
Specifies the numerical value for the white point.
Logarithmic
Changes the response curve to a power function so that the upper range is slowly given less prominence. It is based on logarithmic compression of luminance values, imitating the human response to light.
Histogram
A graphical representation of the tonal distribution in a digital image. It plots the number of pixels for each tonal value. By looking at the histogram for a specific image, you can judge the entire tonal distribution at a glance.
 Final Pass tab
Hue/Saturation/Luminance
Hue
Adjusts the material color after rendering.
The idea is this way you can try different color combinations without having to re-render the whole scene.
Since the hue adjuster works on the pixels of the rendered image, it has no knowledge of what contributed to the color of the pixel other than the topmost object. For example reflections of the object on other objects and parts of the object seen through transparent objects will not update.
Sat
Sets the saturation amount. The smaller the saturation, the more monochromatic the image.
Lum
Sets the luminance amount.
Brightness/Contrast
Bri
Changes the overall brightness of the image.
Con
Increasing contrast makes dark pixels darker and bright pixels brighter. Colors in the image will be more distinguishable.
Decreasing contrast changes colors towards the neutral gray. The image will look less sharp.
Noise
Noise adds noise to the image. By default RGB channels are separated, so adding noise to a gray-scale image makes individual pixels shift towards random color.
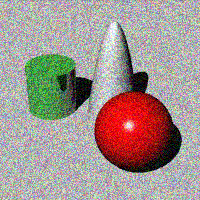
Monochromatic
Only the darkness/lightness of the pixel is altered. The color stays the same.
Gaussian blur
Adds Gaussian blur to the image. The number is the radius of the blur kernel, equivalent to the same setting in paint applications.
Horizontal
Specifies the blurring to be horizontal. This can be used to create a horizontal motion blur effect.
Vertical
Specifies the blurring to be vertical. This can be used to create a vertical motion blur effect.
Both
Blurs in both directions.