Arc

Toolbar Menu


Arc
Curve Drawing
Main
Main1

Curve

Arc >

<Options>

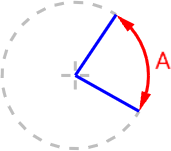
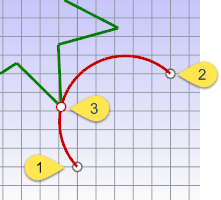
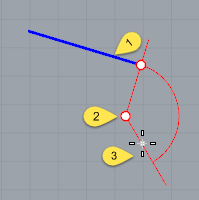
The Arc command draws an arc with options for a center location (1), one end point (2), and a second end point or an angle (3).

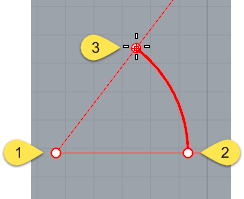
Command-line options

Center

The Center option is the default.

Center steps

  1. Pick the center of the arc's radius.
  2. Pick the arc's first endpoint.
    This point is also the arc's start point.
  3. Pick the arc's second end point, or type an angle.

Deformable

The Deformable option draws a NURBS approximation of the arc with a specified degree and number of control points.


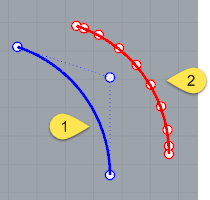
Default degree-2 arc with three control points (1).
Deformable degree-3 arc with ten control points (2).
Degree

Specifies the degree of the arc. When drawing a high-degree arc, the output curve will not be the degree you request unless there is at least one more control point than the degree.

PointCount

Specifies the number of control points.

Tilted

Draws an arc whose plane is tilted from the current construction plane.

Tilted option

Length

Sets the arc length as measured along the arc. Type a positive or negative number, or pick two points to specify the arc curve's length.

Tilted steps

  1. Pick the arc's center, and choose the Tilted option (type T).
  2. Pick the start point for the arc.
  3. Drag the mouse to start a three-point rectangle that defines the orientation of the tilt.
  4. In a different viewport from the start point, using reference geometry, or with elevator mode, drag the rectangle to the angle of the tilt.
  5. Pick the arc's endpoint, or type an angle, or choose the Length option (type L).

StartPoint

Draws an arc starting from the first end of the arc.

StartPoint steps

  1. Pick the arc's start point.
  2. Pick the arc's end point.
  3. Click a location the arc passes through.

StartPoint options

Direction

Specifies the direction of a line tangent to the arc's start point.

Direction steps

  1. Pick a start point.
  2. Pick the direction the arc will be tangent to at the start of the arc.
  3. Pick an end point.
    As you move the cursor, a center point for the arc appears as a reference.
ThroughPoint

Specifies a location the arc curve must pass through.

ThroughPoint steps

  1. Pick a start point.
  2. Pick a location for the arc to pass through.
  3. Pick the arc's endpoint.
Center

Specifies a center point for the arc's radius.

Center steps

  1. Pick a start point.
  2. Pick the arc's center point.
  3. Pick the arc's end point or type an angle, or choose the Length option (type L).

Tangent

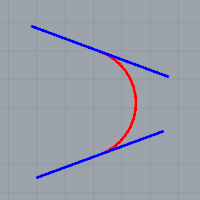
Draws an arc tangent to selected curves with options to pick a point not on the selected curves or to specify a radius. Each prompt allows you to pick a point that is not on a curve for the arc to pass through. At some prompts, the option to enter a radius appears. The red arc in the image is tangent to both blue lines.

Tangent steps

  1. Select a curve to make the arc tangent to.
  2. Select a second curve to make the arc tangent to.
    The tangent indicators adjust to fit the arc tangent to the two curves.
  3. Select a third curve to make the arc tangent to.
    The tangent indicators adjust again to fit the arc tangent to the two curves.
    Or
    Press Enter to draw the reference circle from the first two points.
  4. Drag the cursor around the arc, and click to choose from the suggested possibilities.

Tangent options

Point

The Point option appears for each prompt. It releases the command from the tangent constraint for that pick.

To use the point option

  • At any prompt, choose the Point option, and pick any point for the arc to pass through.
    The tangent indicators adjust again to fit the arc tangent to the two curves.

Example

In this example, the Point option is used to establish the first point on the arc.

  1. Choose the Point option, and pick any point.
  2. Select the second tangent curve or radius.
  3. Select the third tangent curve.
  4. Drag the cursor around the arc, and click to choose from the suggested possibilities.

Example

In this example the Point option is used to establish the second point on the arc.

  1. Select the first tangent curve.
  2. Choose the Point option again, and pick any point.
  3. Select the third tangent curve.
  4. Drag the cursor around the arc, and click to choose from the suggested possibilities.
FromFirstPoint

Forces the arc to go through the first picked point on the curve instead of allowing the point to slide along the curve.

Example

In this example the FromFirstPoint option is used to establish the start point on the curve.

  1. Select the First tangent curve.
    The tangent cursor slides along the curve.
  2. Choose the FromFirstPoint option, and pick a location on the curve.
  3. Select the third tangent curve prompt, select a curve.
  4. Drag the cursor around the arc, and click to choose from the suggested possibilities.
Radius

Specifies a radius. If a tangent point exists on the second curve that meets the radius requirement, the tangent constraint will appear at that point as you drag the circle.

Example

In this example the Radius option is used to establish the size of the arc.

  1. Select the first tangent curve prompt, select a curve.
    The tangent cursor slides along the curve.
  2. Select the second tangent curve.
  3. Choose the Radius option and type a radius value.
  4. Drag the cursor around the arc, and click to choose from the suggested possibilities.

Extension

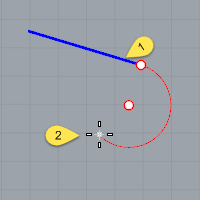
Extends a curve with an arc to a specified end point.

Extension steps

  1. Pick the curve to extend (1).
  2. Pick the arc's end point (2).

Extension option

Center

Extends a curve with an arc by from a specified center and end point.

Center options

Length

Sets the arc length, measured along the arc. Type a positive or negative number or pick two points to specify the arc curve's length.

Direction

Sets the direction for drawing the arc.

Counterclockwise

Draws the arc in a counterclockwise direction from the start point.

Clockwise

Draws the arc in a clockwise direction from the start point.

Center steps

  1. Pick the curve to extend (1).
  2. Pick the arc's center point (2).
  3. Pick the arc's end point (3).

Extension option notes

  • The arc extension is not joined to the original curve.
  • To draw an arc extension and join it in one step, use the Extend command.
  • The center point is constrained to a plane perpendicular to the curve end. If the extension is drawn in a view perpendicular to the constraint plane, the input will be automatically locked parallel to the construction plane.
  • In other views Rhino tries to make sure one of the ortho directions is parallel to the construction plane. Press Shift when making the pick to maintain the ortho direction.

See also

Draw lines and curves

Wikipedia: Tangent


Rhino for Mac © 2010-2017 Robert McNeel & Associates. 24-Oct-2017