Loft
| Toolbar | Menu |
|---|---|
|
|
Surface Loft |


The Loft command fits a surface through selected profile curves that define the surface shape.
Steps
- Select the curves in the order in which the surface should pass through them.
- Select open curves near the same ends. For closed curves, adjust the curve seams.
-
Double-click a curve or an edge segment to select segments connected with tangency or curvature continuity as a single input.

 User's Guide - Create Surfaces from Curves
Adjust seam options (Closed curves only)
Flip
Reverses the curve direction.
Automatic
Attempts to align the seam points and directions without intervention.
Natural
Moves the seam points to the way they were at the beginning of the command.
SnapToKnots
Yes
The seam points are always at the knots. You can only move them among the knots.
No
The seam points may leave the knots. You can move them without restriction.
To adjust seams
-
Select each seam point and move it along the curve to line up all curve seams.
-
Use the Flip option to make all seam arrows point to the same side.
-
Press Enter to continue.
Command-line options
Point
Allows picking a location for the start or end of the loft at a point. This tapers the loft to the selected point.
No point object is necessary, but it is a good idea to have some reference geometry in place to aid in picking the point location.
Point steps
- At the start or the end of the loft, click the Point option.
- Pick a location for the start or end location.
Chain
Selects curve or edge segments connected with a specified continuity.
ChainContinuity
Controls the level of continuity required between segments to be selected.
Tip: You can double-click or Ctrl (CMD) + double-click on a curve to select or deselect all the curves connected with tangent continuity.
Direction
Forward
Selects curves in the positive curve direction.
Backward
Selects curves in the negative curve direction.
Both
Selects curves in both the positive and negative curve direction.
GapTolerance
If the gap between two edges/curves is less than this value, the chain selection will ignore the gap and will select the next segment.
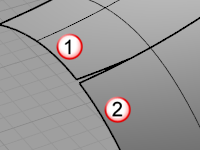
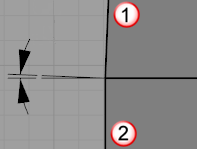
AngleTolerance
When Continuity is set to Tangency, if the angle between two edges/curves is less than this value, the chain selection will consider the criteria for continuity met and will select the next segment.
Undo
Undo last segment selection.
Next
Select next segment.
All
Select all segments.
Loft Options
Style
Determines the knot and control point structure of the surface.
When some, but not all, endpoints of loft shapes touch, the loft type is restricted to Straight sections to avoid self-intersecting loops in the resulting surfaces.
Loose
The surface control points are created at the same locations as the control points of the original. This is a good option if the control points will be edited later.
Normal
The surface has an average amount of stretching between the curves. This is a good choice when the curves are proceeding in a relatively straight path or there is a lot of space between the curves.
Straight sections
Creates a ruled surface. The sections between the curves are straight.
Tight
The surface closely follows the original. This is a good choice when the input curves are going around a corner.
Uniform
Makes the object knot vectors uniform.
Closed loft
Creates a closed surface, continuing the surface past the last curve and around to the first curve. Available when you have selected three shape curves.
Match start/end tangent
When the start or end cross-section curve is a surface edge, makes the lofted surface tangent to the adjacent surface at that end.
Isocurve
Aligns the lofted surface isocurves with the isocurves of the adjacent surface.
Perpendicular
Makes the lofted surface isocurves perpendicular to the surface edge.
Automatic
Uses Isocurve for an untrimmed surface edge and Perpendicular for a trimmed surface edge.
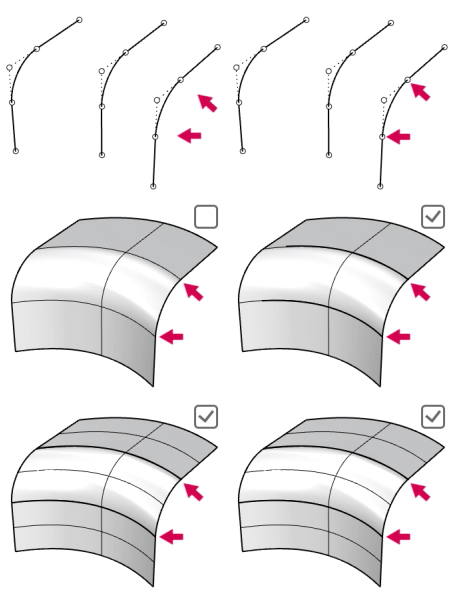
SplitAtTangents
When enabled, the loft surface is split at the tangent points between segments of the input curves. Otherwise, the tangent points are lofted as surface kinks.
Solid
Adds planar caps to both ends of the lofted surface.
This option is available only when both end curves are planar and closed.
Cross-section curve options
Align Curves
Click the end of a shape curve to reverse the direction.
Do not simplify (A)
Curves will not be rebuilt.
Rebuild with ___ control points (B)
Rebuilds the shape curves before lofting.
Refit within ___ <units> (C)
Refits the shape curves to the specified tolerance value.
| Toolbar | Menu |
|---|---|
|
|
|


The DevLoft command creates a single developable surface between two curves.
The resulting surface can be flattened by the UnrollSrf command.
Steps
- Select two curves near the same ends.
To use the interactive mode
-
Type a hyphen in front of the command name: -DevLoft.
Interactive mode provides options for fine tuning the resulting surface.
|
Command-line options |
|
|---|---|
|
Density |
The number of rulings across the surface. |
| AddRuling |
Lines across the surface that define the straight sections on the developable surface. A developable surface can be flattened to a plane by bending along the ruling lines with minimum stretch or compression distortion. |
|
Untwist |
Optimizes the rulings. It may help to run Untwist more than once. |
|
CurvatureDisplay |
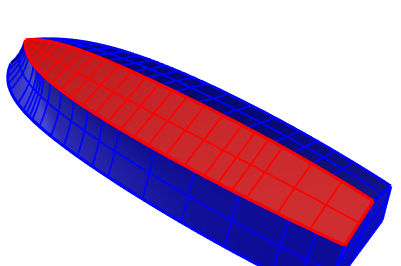
Visualizes the Gaussian curvature of the surface with false colors. The analysis mesh density is based on Polygon Mesh Options in the CurvatureAnalysis command. 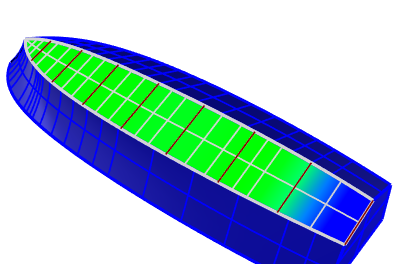
The Gaussian curvature analysis in the interactive mode. The blue area is where stretch or compression distortion happens when the surface is flattened. |
Limitations
- Acceptable results depend on material properties and manufacturing processes.
- A surface resulting from the DevLoft command is not guaranteed to be manufacturable.
See also

UnrollSrf
Flatten (develop) a surface or polysurface with curvature in one direction to a planar surface.