Block
| Toolbar | Menu | Shortcut |
|---|---|---|
|
|
Edit Blocks > Create Block Definition |
Ctrl (CMD) + B |
The Block command defines a block object from the selected objects and replaces the selected objects with an instance of the block.
Using blocks lets you
- Create parts libraries.
- Update all instances by modifying the block definition.
- Keep a smaller model size by using block instances instead of copying identical geometry.
- Use the BlockManager command to view information about the blocks defined in the model.
- Use the Insert command to place block instances into your model, which scales and rotates the instance.
Define a block in a model
-
Select the objects.
-
Pick a base point for the block.
This is the point around which the instance will be located, scaled, and rotated when it is inserted.
A block control point is placed at the base point of the block.
-
Type a name for the block definition.
The block definition is created with the active unit system (model/layout).

Block Definition Properties
Name
The name of the block definition.
- Type a letter to select the first block name starting with the letter.
See: Naming conventions in Rhino
Description
Optional descriptive information.
Hyperlink
Adds hyperlink information to a block definition. This information can be retrieved with the Hyperlink command.
Description
A description of the URL.
URL
A web address. Click the address to open the page in the default browser.
Define a block by inserting another file into a model
- Use the Insert command with the Insert as option set to Block Instance.
A block definition will be added to the model.
Define a block by dragging another file onto a model
- Drag and drop a supported file from Windows Explorer onto the model.
- Specify the Insert file option.
A block definition will be added to the model.
To redefine a block
- Follow the steps for defining a block and re-use the same block name.
Note
- Do not create blocks in a model that are named the same as the model itself.
- When inserting a file with the Insert command, the file's ModelBasepoint will determine how the geometry is being located in the new file.
Block Instances and Layers
The properties of the geometry (curves, surfaces, etc.) that are contained in the block instance are controlled either by the layer properties or object properties of the geometry itself. Block instances that you insert to the model insert onto the current layer and can be moved to any other layer. There is no relationship between the block instance's layer and the geometry contained in the block. For example, the block geometry does not change to match the layer color onto which the block instance is inserted.
When the block contains objects on a specific layer, turning that layer off will turn off only the objects on that layer. However, if the layer the block instance is inserted on is turned off, all of the objects will disappear.
Locking Layers
When you lock a layer, only the layer that contains the insertion point of the block instance is locked. If a block has objects that are on the locked layer, but the block instance insertion point is not on that layer, the object itself is not locked because the controlling factor is the layer of the block insertion point.
Groups
Grouped objects will maintain their grouped status inside a block.
Properties by parent
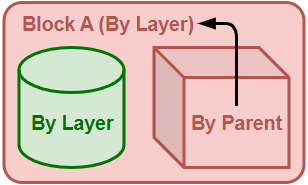
This option is only useful for objects in blocks. Think of a block instance as a container that contains objects (block members). A block instance is the parent of its block members. A block instance has its own properties. If By Parent is selected in the properties of a block member, the properties will be controlled by the block instance.
Simple block example:
-
In this example, Block A contains a cylinder and a box. The Display Color of the box is By Parent and is controlled by its parent (Block A). The box will display Block A's layer color because the display color of Block A is By Layer. The cylinder will always display its own layer color and will not be changed by Block A.
Nested block example:
-
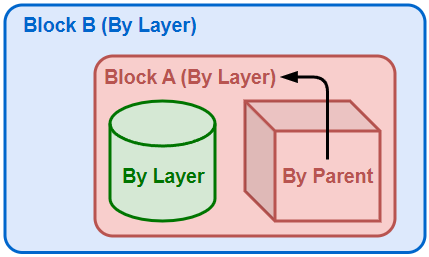
Now Block A is nested in Block B. The box still displays Block A's layer color because By Parent only works with the direct parent.
-
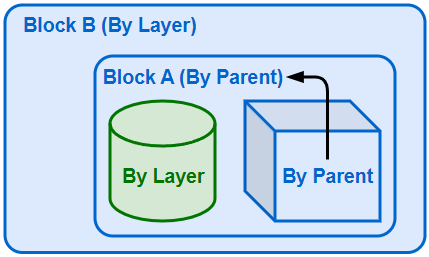
If the Display Color of Block A is changed to By Parent, the display color of the box will be indirectly controlled by its grandparent (Block B).
By Parent can be selected for Display Color, Linetype, Print Color and Print Width in object properties. For the Render material, select Use Object Parent. Render materials are only visible in Rendered and Raytraced display modes by default.
| Toolbar | Menu |
|---|---|
|
|
Edit Blocks > Block Definitions Window Panels > Block Definitions |
The BlockManager command opens the Block Definitions panel for managing the block definitions in the model.
 Create Block Definition
 From selected objects
Creates a new block definition from objects in the model as what the Block command does.
 From file
Inserts a supported file format into the model as a block definition. Similar to what the Insert command does.
![]() Filters
Filters
Show <n> hidden block definitions
Lists hidden block definitions.
Hidden block definitions have names beginning with * (asterisk character), such as *Chair.
Show reference block definitions
Lists the blocks in linked block definitions as separate top level items.
Show unused block definitions
Lists the block definitions that do not have instances in the model.
Show all objects in block definitions
Lists objects in block definitions. Otherwise, only lists top level block definitions.
Show children of nested blocks
Lists the block definitions nested in other ones.
Group similar block instances
Duplicate nested blocks in the same block definition will be listed only once.
Show embedded block definitions
Lists the block definitions saved in the model.
Show embedded and linked block definitions
Lists the block definitions saved in the model also referencing external files.
Show linked block definitions
Lists the block definitions referencing external files.
Search box
Enter a text string to filter items in the list.
You can include wildcard characters:
* = match zero or more characters
? = exactly one character
![]() Options menu
Options menu
Collapse All
Collapses the list to only show items of the top level.
Expand All
Expands the list to show items of all levels.
Get selection from viewport
Selects the block definitions referenced by the selected block instances in the viewport.
Purge unused block definitions
Deletes the block definitions that do not have any instances inserted to the model or layout spaces.
Use the Purge command to delete more types of unused data.
Export linked block definitions
Saves all the Linked and Embedded and Linked block definitions in the current model to a zip file.
Embedded and linked block should
These options decide how "embedded and linked" block definitions will update each time a model is opened.
Always update
Update without any prompt.
Prompt when update required
The Block Definitions to Update dialog box appears for actions.
Never update
Never update and prompt.
List structure
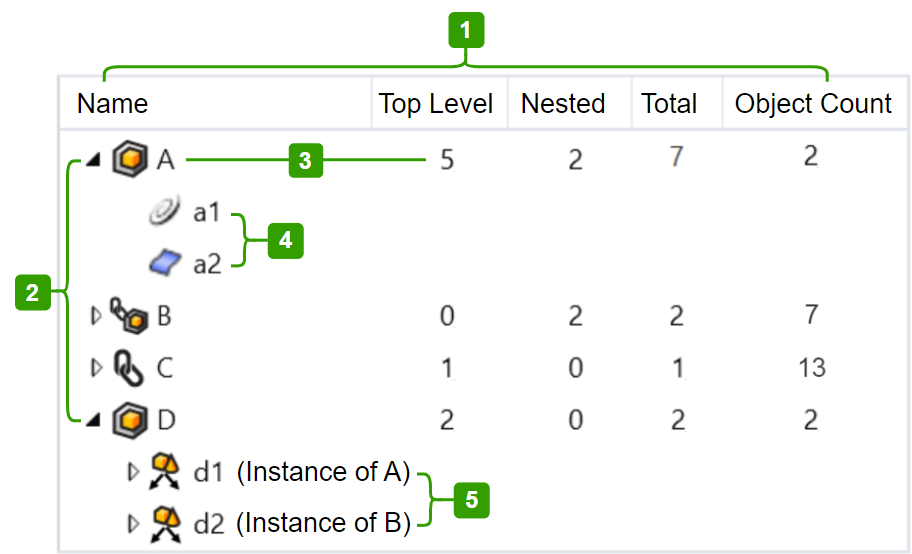
 Columns
Name
The block definition name.
Top Level
The instance number of the block definition.
Nested
The instance number of the block definition nested in other block instances.
Total
The instance number of the block definition regardless of Top Level and Nested.
Object Count
The total number of objects and direct nested blocks in the block definition.
 Block definition
Block A, B, C, and D are block definitions.
-
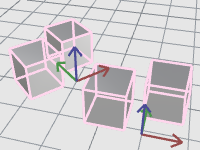
Selecting a block definition highlights its block instances in pink with axes icons.

The pink highlight is cleared when the Block Definition panel loses focus.
-
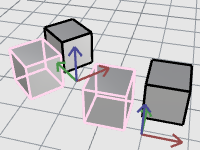
Selecting a block instance highlights its block definition in light-blue.

The icons indicate the definition types:
 Embedded
 Embedded and linked
 Linked
- Right-click on a block definition name to show the context menu.
 Select Instances
Selects instances of the selected block definition in viewports.
 Insert
Inserts the block definition to viewports as block instances.
Or, you can drag and drop a block definition into a viewport.
 Rename
Edits the block definition name.
 Delete
Deletes the selected block definition and all of its instances in the model.
Block definitions nested in another block definition cannot be deleted.
 Duplicate
Makes a new copy of the selected block definitions.
 Update
Reloads the external file to see the latest changes.
The ![]() icon appears behind the block definition name when the linked block is out of date.
icon appears behind the block definition name when the linked block is out of date.
- Click the
 icon to reload the block.
 Count/Info
Lists the details of the selected block definition in the Block Instance Info dialog box.
 Export
Saves the block definition's component objects to one of the file formats supported by Rhino.
 Instance/Nested instance numbers
Block A has 5 top-level instances and 2 nested instances in the model.
 Objects in block definition
Block A contains a curve (a1) and a surface (a2).
-
Selecting an object of a block definition highlights the objects in viewports.

The icons indicate the object types.
- Select an object in a block definition to edit its object properties.
Block object context menu
- Right-click on a block object name to show the context menu.
 Select
Selects the object in viewports.
 Rename
Edits the name of the block object.
 Delete
Deletes the block object from the block definition.
 Block definition with nested blocks
Block A and B are nested in Block D.
The ![]() icon indicates they are nested blocks.
icon indicates they are nested blocks.
Status bar
The status bar shows how many block definitions in the model and how many of them are currently selected.
-
Point the mouse cursor to the status bar to show a tooltip for the count of different block definition types: Embedded, Embedded and linked, and Linked.
![]() Properties
Properties
Name
The name of the block definition.
 Pop out
Brings up a larger and resizable Block Definition Properties window.
Description
Displays the text information of the block definition.
Preview
The preview image of the block definition.
- Right-click to change the display mode or view direction.
![]() Units
Units
(Embedded block definitions only)
Block units
The units of the block definition.
If you change the Block units, you will be prompted if you want to scale the block definition.
![]() Definition Type
Definition Type
 Embedded
Saves geometry in the model. The block definitions will not update when the external file changes.
 Embedded and Linked
Saves geometry in the model and maintains a link to the external file. Linked geometry will update when the external file changes. If the external file cannot be located, the geometry saved in the model is still available.
 Linked
Only maintains a link to the external file. Linked geometry will update when the external file changes. If the external file cannot be located, the geometry will be missing in the model.
Linked block definitions use both absolute and relative paths.
When the external file of a linked block is not found
The missing block location is marked with a text dot object listing the missing block name.
For a description of the process Rhino uses to locate files used by worksessions and linked instance definitions, see Rhino Wiki: File finding.
To resolve the issue
- Click the Browse button
 to locate the missing block file.
Or, right-click on the block name and select Delete from the right-click context menu to remove the link.
Options for "Embedded and linked" and "linked"
Filename
The path and name to the external file.
- Click the
 button to select a recently used external file.
 Browse
Change the path of the external file.
Found at:
The path of the external file.
 Edit
Edit
Edit the external file with the associated application.
 Read linked blocks from external file
Linked blocks in the file being inserted are also inserted.
![]() Layer Style
Layer Style
Defines how layer names are organized
Active
Merges layers with the same names.
Reference
Creates a parent layer using the name of the linked file. Layers in the linked file appear as sub-layers under the parent layer.
![]() Hyperlink
Hyperlink
Adds hyperlink information to a block definition. This information can be retrieved with the Hyperlink command.
Description
A description of the URL.
URL
A web address. Click the address to open the page in the default browser.
Opens the URL in the default web browser.
Related commands
|
Toolbar |
Menu |
|---|---|
|
|
Edit Blocks > Add Objects to Block |
The AddObjectsToBlock command adds objects to an existing embedded block definition.

Steps
-
Select an instance of an embedded block definition.
-
Select the objects to add to the block definition
To remove objects from a block definition, use the BlockEdit command.
| Toolbar | Menu |
|---|---|
|
|
Edit Blocks > Edit Block in Place |
The BlockEdit command allows selecting a block instance to change the block geometry and update the block definition.
Steps
- Select a block instance to edit.
Or
Double-click a block instance.
The block geometry opens in the Rhino window. All other objects are locked.
You can now edit the geometry in the block using any editing techniques. -
Click Apply to accept the editing.
To cancel, click the red button at the upper-left corner.
These command-line options are only available for the scriptable -BlockEdit command.
Open
Prompts to select a block instance to edit.
SaveAndClose
Saves any changes you have made to the block definition and closes the dialog.
DiscardAndCancel
Discards any changes you have made to the block definition and closes the dialog.
Block Edit options
The Block Edit dialog box displays the block name and a list of any blocks nested in it.
Add Object
Adds selected objects to the block definition. If the selected object is a block, this becomes a nested block and will display in the tree the next time the BlockEdit command is run.
The object added is copied to the block definition and the original object remains in the model.
Remove Object
Removes selected objects from the block definition.
When the block is updated, the removed objects are added to the model as separate individual objects.
Set Base Point
Repositions the block insertion point.
When the block is updated, the block instance will shift so the new insertion point is placed at the block insertion location.
Notes
- Hidden or locked objects are not supported in block definitions. therefore, a warning dialog will appear if you have locked or hidden objects giving you the option to leave objects hidden or locked and remove them from the block definition or to show and or unlock the objects to make further edits.
- Linked blocks in use by another user cannot be edited.
- If the Block Edit dialog left open when the current model is saved and closed, the Block Edit dialog will appear when the model is re-opened. The block editing can be continued.
- Properties of objects (selected by sub-object selection) in block instances can be directly edited.

- Objects (selected by sub-object selection) in a block instance can be directly deleted and the block definition will be updated.
BlockResetScale
| Toolbar | Menu |
|---|---|
|
|
Edit Blocks > Reset Block Scale |
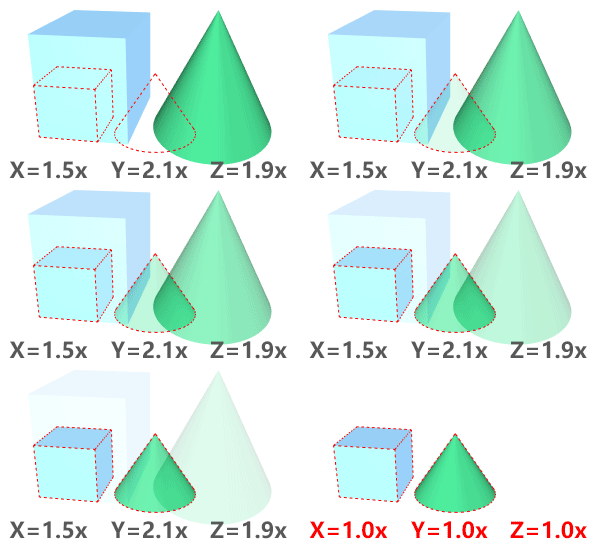
The BlockResetScale command resets the x, y, and z scales of a block instance to 1, or applies the best-fit scale to all axes.
Command-line options
Mode
One
Resets the x, y, and z scales of a block instance to 1.
Automatic
If any two axes have the same scale, applies the scale to the third axis.
If all three axes have different scales, applies the average scale to all axes.
- The command will not prompt the options if the block instances are preselected.
See Also
CopyLinkedBlockDefinition
| Toolbar | Menu |
|---|---|
|
|
|
The CopyLinkedBlockDefinition copies a linked block with Reference style layers.
To create your own example:
- Create a simple file called BlockDef.3dm that will be used as a block definition.
- Start a new model called "FancyModel.3dm".
- Use the Insert command to create a linked block definition with "reference style" layers.
- Name this block "A".
- Run the CopyLinkedBlockDefinition command and copy "A" to new block named "B".
- Run the CopyLinkedBlockDefinition command and copy "A" to new block named "C".
- Adjust the layer settings for the three blocks.
- Run BlockManager and see that you have three linked blocks that reference the same "BlockDef.3dm".
|
Toolbar |
Menu |
|---|---|
|
|
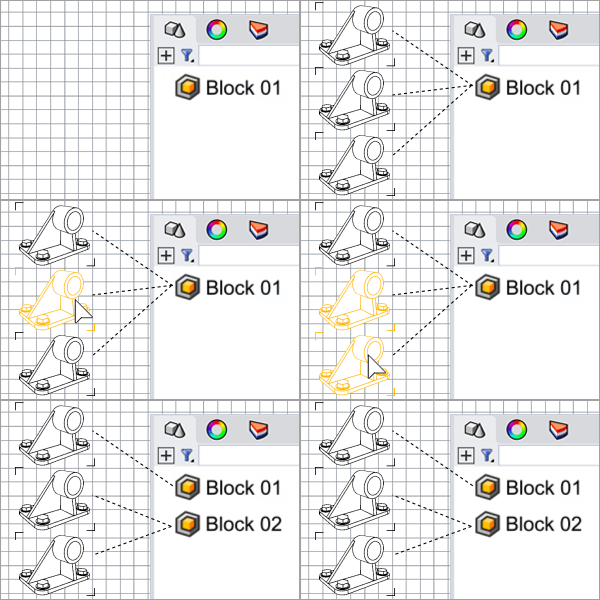
The CreateUniqueBlock command duplicates the block definition of a block instance and changes the block instance to reference the new block definition.
Steps
-
Select a block instance or multiple block instances of the same block definition.
| Toolbar | Menu |
|---|---|
|
|
|
The ReplaceBlock command redefines selected block instances with a different block definition.
Steps
- Select block instances to change in the viewports.
If you select one of several instances in the model, a command-line message displays the number of additional instances in the model. - Select a block instance that uses the desired block definition.
Command-line options
SelectFromBlockDefinitionList
Displays a list of block definitions in the model to select from.
All
Selects all instances of the current block definition including unselected, hidden, and locked instances.
None
Selects no additional instances. Only the selected instances will be changed.
BlockDefinitionName
Selects the replacement block definition by entering its name.
|
Toolbar |
Menu |
|---|---|
|
|
Edit Blocks > Export Linked Block Definitions |
The ExportLinkedBlocks command saves all the Linked and Embedded and Linked block definitions in the current model to a zip file.
See also
Work with blocks, groups, and worksessions
