Bridge
|
Toolbar |
Menu |
|---|---|
|
|
SubD/Mesh Bridge |
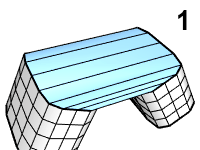
The Bridge command creates faces to connect two SubD/Mesh edge chains.
Input
- Two naked SubD/Mesh edge chains
- Boundaries of two SubD/Mesh face groups
Steps
-
Start the command.
-
Select the first naked edge chain or face group, press Enter.
-
Select the second naked edge chain or face group, press Enter.
The two edge chains must have the same edge number.
-
Click the bridge endpoints to adjust alignment as needed, press Enter.
Options
Edge selection mode
(Default)
Click selects a single edge. Double-click selects an edge loop.
Ctrl+click deselects a single edge. Ctrl+double-click deselects an edge loop.
EdgeLoop
Click an edge to select an edge loop.
The clicked edge displays a brighter highlight than the other edges in the loop.
Ctrl+click the same edge to deselect the loop.
Segments
The number of new faces added between the two edge chains.
 Join
Join
Joins the bridge into the input objects. Uncheck to create a stand-alone bridge.
 Crease (For Join=Yes only)
Enabled
Mesh - The bridge is joined with the input meshes.
SubD - The bridge connects to the input SubDs with creased edges.
Disabled
Mesh - The bridge is welded with the input meshes.
SubD - The bridge connects to the input SubDs with smooth edges.
Straightness (0~100%)
The straight level of the bridge transition. 100% creates a straight bridge. Decreasing the value creates a smoother bridge. A smooth bridge requires more segments to achieve.
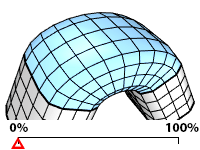
- Double-clicking the slider allows entering a value.
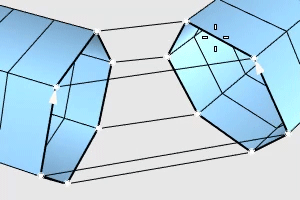
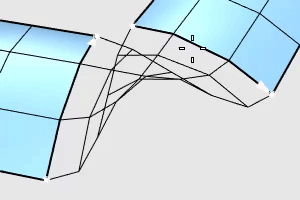
Adjust alignment
Change chain directions
Arrowheads indicate chain directions. Chain directions are automatically detected to create a non-tangled bridge. However, you can click an endpoint of a chain to reverse the direction.
Move seam location (For closed loops only)
The seam location is selected based on the first picked edge. Click a point to move the seam location to that point. Click the seam point to reverse the chain direction.