![]()
編輯與面板
物件內容
F3
| 工具列 | 功能表 | 面板 | 快速鍵 |
|---|---|---|---|
|
|
編輯與面板 物件內容 |
物件內容 |
F3 |
貼圖軸內容可管理選取的曲面、多重曲面與網格的貼圖投影設定。
貼圖軸可用不同的方式將 2D 貼圖投影到 3D 模型上。
貼圖可為 3D 模型加上色彩、光澤、反射或透明效果。
2D 貼圖以 UV 座標對應到 3D 模型上,UV 座標的 U 代表貼圖的橫向量 (左到右),V 代表貼圖的縱向量 (上到下)。
一個貼圖軸通道含有一組貼圖座標,貼圖軸通道以數字區別,一個物件可以擁有許多貼圖軸通道,每個貼圖軸通道可以使用不同的貼圖軸型式。
材質裡各種型式的貼圖可以設定不同的通道,貼圖是以與它相同編號的貼圖軸通道對應至物件上,貼圖預設的貼圖軸通道是 1。
如果一個物件未被賦予貼圖軸,貼圖會使用曲面貼圖軸將貼圖對應至物件上。
![]() 內容面板
內容面板
將物件的彩現網格展開為平面編輯貼圖座標。
請參考:Unwrap
新增一個自訂貼圖軸通道。
新增一個曲面貼圖軸通道,這個貼圖軸是以曲面或網格頂點的 UV 座標將貼圖對應至物件上。
新增一個平面貼圖軸通道。
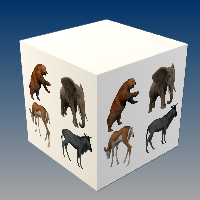
新增一個立方體貼圖軸通道。
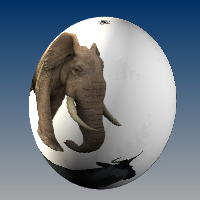
新增一個球體貼圖軸通道。
新增一個圓柱體貼圖軸通道。
刪除一個貼圖軸通道。
套用其它物件的貼圖軸。
可以變更貼圖軸使用的通道號碼。
顯示物件被賦予的貼圖軸。
隱藏物件被賦予的貼圖軸。
開啟 UV 編輯器。
請參考:UVEditor
允許物件使用一個以上的貼圖軸,材質裡的各種貼圖可以使用不同的貼圖軸通道對應至物件上。
貼圖軸通道的編號。
貼圖軸的型式。
貼圖軸的名稱。
貼圖軸的名稱。
貼圖軸的型式。
以曲面的 UV 座標將貼圖對應至物件上。
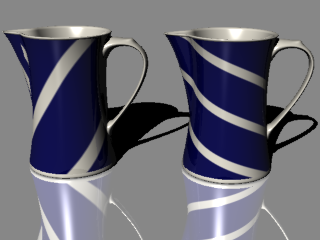
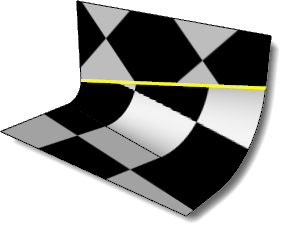
以這個不等距圓角的多重曲面為例,因為每個曲面都有自己的 UV 座標,所以使用曲面貼圖軸時三個曲面上的貼圖無法連續。
平面貼圖軸以 2D 矩形平面將貼圖投影至物件上。
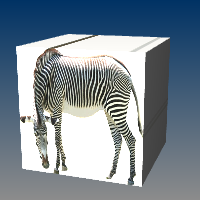
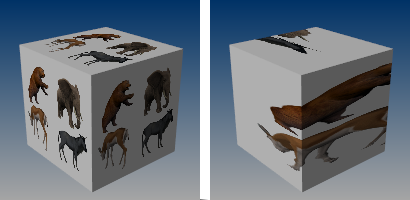
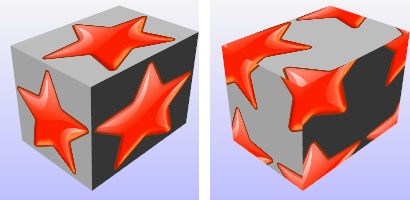
立方體貼圖軸以 3D 立方體將貼圖投影至物件上。
請參考:ApplyBoxMapping
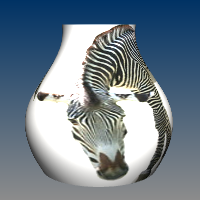
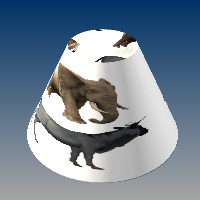
球體貼圖軸將矩形貼圖的上、下兩個邊緣集縮為球體的南、北極點再包覆至物件上。
圓柱體貼圖軸將矩形的貼圖捲成圓柱狀再包覆至物件上。
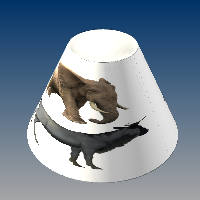
與圓柱體貼圖軸相同,但多了上、下兩個面。
新增一個自訂貼圖軸通道。
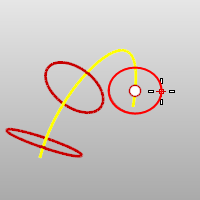
自訂貼圖軸可以將一個物件的貼圖座標投射到另一個物件上。
決定貼圖軸的 UV 座標如何投射至物件的彩現網格的頂點。
Each mesh vertex is assigned a parameter from the other object’s UV space.
以最接近點將 UV 座標投射至網格頂點。
以法線方向將 UV 座標投射至網格頂點。
不同的曲面在 UV 空間可能重疊。
不同的曲面在 UV 空間不重疊。
設定貼圖軸中心點的世界座標位置。
按此按鈕,以滑鼠游標指定位置。
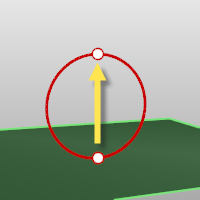
設定貼圖軸的世界座標旋轉角度。

貼圖軸的大小。
固定貼圖軸不同軸向之間的比例。
將 X、Y、Z 三個軸向的大小都設為 1。
將 X、Y、Z 三個軸向設為一樣的大小 (三個軸向的平均值)。
將貼圖軸縮放至物件大小。
以貼圖的長寬比設定貼圖軸的大小。
貼圖在 UVW 貼圖空間從原點計算的偏移量。
貼圖在 UVW 貼圖空間重複出現的次數。
固定 UVW 三個軸向之間拼貼數的比例。
If Lock is off, and you enter 1, 2, 3 in the UVW boxes, you will get one repeat in u, two repeats in v, and three repeats in w.
鎖定時 - 將 UVW 的拼貼數設為 1、2、3,當您將 U 改為 2 時,V 與 W 會自動修改為 4 與 6。
貼圖在 UVW 貼圖空間的旋轉角度。
| 工具列 | 功能表 |
|---|---|
|
|
|
The ApplyBoxMapping command adds a box texture mapping channel to an object and sets the mapping type to box.
| 指令行選項 | |
|---|---|
|
邊框方塊 |
以物件的邊框方塊決定變形控制器的位置與大小。 邊框方塊選項請參考 BoundingBox 指令的選項說明。 座標系統建立邊框方塊使用的座標系統。 加蓋建立有上、下蓋的立方體貼圖軸。 |
| 工具列 | 功能表 |
|---|---|
|
|
|
The ApplyCylindricalMapping command adds a texture mapping channel to an object and sets the mapping type to cylindrical.
| 指令行選項 | |
|---|---|
|
方向 |
方向限制可控制圓的建立方向。 無中心點可以是 3D 空間中的任何一點。 垂直建立一個與工作平面垂直的物件。
環繞曲線建立一個與曲線垂直的圓。 |
|
實體 |
以一個平面封閉底部建立實體。 |
|
BoundingBox |
以物件的邊框方塊決定變形控制器的位置與大小。 邊框方塊選項請參考 BoundingBox 指令的選項說明。 座標系統建立邊框方塊使用的座標系統。 |
|
加蓋 |
建立有上、下蓋的圓柱體貼圖軸。 |
| 工具列 | 功能表 |
|---|---|
|
|
|
The ApplyCustomMapping command adds a custom texture mapping channel to an object.
A specified mesh or NURBS surface or polysurface acts as the mapping for the selected objects. The mapping object is preserved in the mapping table so deleting the mapping object does not affect the mapping on the target object.
| 工具列 | 功能表 |
|---|---|
|
|
|
The ApplyPlanarMapping command adds a texture mapping channel to an object and sets the mapping type to planar.
| 指令行選項 | |
|---|---|
|
邊框方塊 |
以物件的邊框方塊決定變形控制器的位置與大小。 邊框方塊選項請參考 BoundingBox 指令的選項說明。 座標系統建立邊框方塊使用的座標系統。 |
|
平面 UV |
The U and V coordinates are taken from the plane size, and the W coordinate is taken as the distance from the plane along the normal. |
|
平面 UVW |
The U and V coordinates are taken from the plane size, the W coordinate is always zero. |
| 工具列 | 功能表 |
|---|---|
|
|
|
The ApplySphericalMapping command adds a texture mapping channel to an object and sets the mapping type to spherical.
| 指令行選項 | |
|---|---|
|
邊框方塊 |
以物件的邊框方塊決定變形控制器的位置與大小。 邊框方塊選項請參考 BoundingBox 指令的選項說明。 座標系統建立邊框方塊使用的座標系統。 加蓋建立有上、下蓋的立方體貼圖軸。 |
| 工具列 | 功能表 |
|---|---|
|
|
|
The ApplySurfaceMapping command adds a texture mapping channel to an object and sets the mapping type to surface.
| 工具列 | 功能表 |
|---|---|
|
|
|
The ExtractUVMesh command creates separate mesh objects extracted from the flattened UV meshes of a model.
| 工具列 | 功能表 |
|---|---|
|
|
|
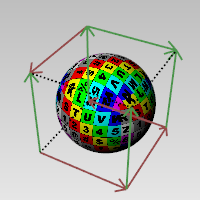
The MappingWidget command turns on the mapping widgets for the selected objects.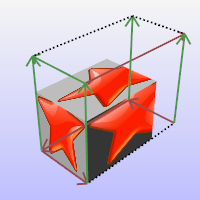
立方體貼圖軸:
| 工具列 | 功能表 |
|---|---|
|
|
|
The MappingWidgetOff command turns off the mapping widgets for selected objects.
| 工具列 | 功能表 |
|---|---|
|
|
|
The MatchMapping command changes the texture mapping properties of a selected object to duplicate a specified object.
You can also use the Match Mapping button in Texture Mapping Properties.
| 工具列 | 功能表 |
|---|---|
|
|
|
The RemoveMappingChannel command removes the specified mapping channels from an object.
| 工具列 | 功能表 |
|---|---|
|
|
|
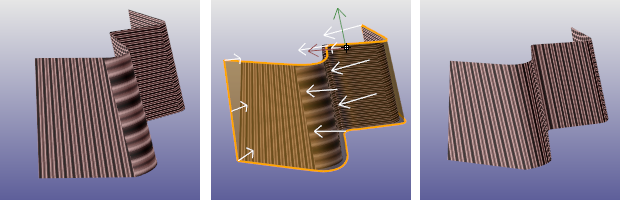
The Unwrap command projects the texture coordinates of the selected objects to a specified region of space.
曲面物件展開至 UV 空間時是以它的彩現網格展開。 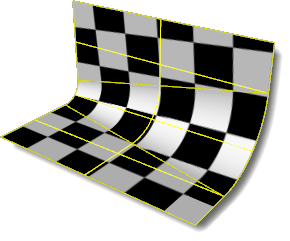
Surface mapping texture coordinates and the texture assigned to the objects are projected onto the world xy plane.
| 指令行選項 | |
|---|---|
|
連鎖選取 |
連鎖選取接縫。 |
|
上次選取的接縫 |
重新選取上次選取的接縫。 |
|
套用 |
套用選取的接縫。 |
|
編輯 |
開啟 UV 編輯器。 |
|
取消 |
中止指令。 |
| 工具列 | 功能表 |
|---|---|
|
|
|
The UVEditor command edits meshes that affect the texture coordinates of the original object. The texture meshes can be joined and split, and their control points edited.
賦予物件的貼圖也是依據這個 UV 對應關係顯示在物件上。
編輯展開的網格改變貼圖在物件上的位置。
物件的網格在展開至 UV 空間平面時會從 Unwrap 指令選取的邊緣切開。
UV 編輯器開啟時位於 UV 空間平面上的網格可以開啟頂點,或以其它變動指令 (例如:Scale1D、SetPt、CageEdit) 編輯。 
設定 UV 空間平面上的貼圖顯示的透明度。
選取 UV 空間平面上的網格時醒目提示原來的物件上相對應的網格。
在原來的物件上顯用來展開的彩現網格框線。
以目前的彩現器彩現模型場景。
About.com: Surfacing 101 - Texture Mapping
Rhinoceros 6 © 2010-2017 Robert McNeel & Associates. 10-一月-2018