Lights
The Lights command opens the Lights panel.
 Lights Panel
 Panel options
Name
The lighting object names. Double-click a lighting item in the panel to access more settings in the Properties or Sun panels.
See: Naming conventions in Rhino
Skylight
Provides an overall lighting effect.
Sun
Provides a strong, directional lighting effect depending on the settings in the Sun panel.
Isolate
Turn on the lights with the checkbox checked, all other lights will be turned off. Clearing all checkboxes turns on all lights.
Type
Displays the light type.
Intensity
The brightness of the light.
Color
The light's illuminating color.
Layer
The light's layer.
Options
 Add a new light
Click to select a light type and pick points in the viewport to place the light.
 Show lights on layers that are off
Displays the lights in the list when their layers are turned off.
 Light selection to viewport
Selecting a light in the list also selects the light in viewports.
Show groups
Displays light groups in the list.
Right-click context menu
Turn On/Off
Turns the selected lights on or off.
Delete
Deletes the selected lights. Sun and Skylight cannot be deleted.
Properties
Edits the selected light in the Properties panel.
UnIsolate All
Unchecks all Isolate checkboxes to turn on all lights.
Group
Groups the selected lights.
UnGroup
Ungroups the lights in the selected group.
Edit
Edits the light's name.
 Light properties
Color
Sets the color of the light. Setting the color to shades of gray dims the light.
On
Turns the light on or off.
Intensity
Controls the brightness of the light.
Shadow intensity
Controls the darkness of the shadow cast by the light.
Spotlight hardness (Spotlights only)
Controls the blurriness of the light spot edge.
See also
The Snapshots command saves and restores Named Views, Named Positions, Layer States, as well as rendering settings, object settings including locked/hidden state, display mode, material, position, light settings, curve piping, displacement, edge softening, shutlining, and thickness.
The DirectionalLight command inserts a light that simulates the sun defined with parallel rays and a direction.
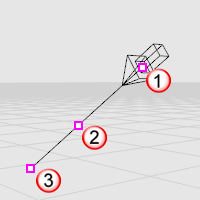
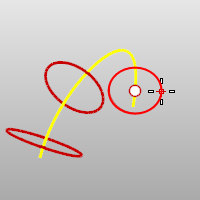
Location point (1), dolly point (2), target point (3).
Steps
- a location at which to aim the directional light.
- Pick a location for the directional light.
Note
- A directional light shines toward a specified direction. The location of the light does not matter: the light object merely indicates the direction the light shines.
- Turn on the light's control points and move or drag the control points to edit the light's direction and target.
- To move the light without changing its direction, move the dolly point (the control point at the midpoint on the direction vector).
The LinearLight command inserts a light that imitates a fluorescent tube.
Steps
- the start of the light.
- Pick the end of the light.
The PointLight command inserts a light object that emits light from a single location in all directions (omni light).
The RectangularLight command inserts a rectangular light object that emits light from an array of light points in one direction.
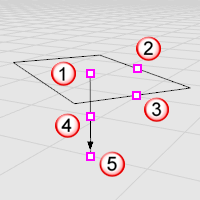
Location point (1), length control (2), width control (3), dolly point (4), target point (5).
Note
- Turn on the light's control points and move or drag the control points to edit the light's direction, length, width, and target.
- To move the light without changing its direction, move the dolly point (the control point at the midpoint on the direction vector).
Steps
- the light's start point.
- Pick a the light's length.
- Pick the light's width.
| Command-line option |
|
Target
|
Aims the light at the specified location.
|
The Spotlight command inserts a light object into the model that directs a narrow beam of light with falloff.
The spotlight object appears as a cone shape. Its light appears only in full renderings of the targeted objects.
Use the Properties command to set the light's color and on or off state. Darker colors, like gray, light the scene less.
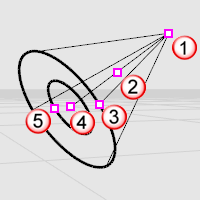
Location point (1), dolly point (2), radius control (3), target point (4), hotspot control (5).
Steps
- the center and radius of the base circle.
See the Circle command for option descriptions.
- the end of the light.
| Command-line options |
|
Direction
constraint
options
|
Direction constraints restrict the direction of the circle.
None
The center can be anywhere in 3-D space.
The second point can be placed anywhere using elevator mode, object snaps or other modeling aids.
Vertical
Draws an object perpendicular to the construction plane.
the center and a radius or diameter.
AroundCurve
Draws a circle perpendicular to a curve.
a curve and the center of the circle on the curve and a radius or diameter.
|
Note
- Turn on the spotlight's control points and move or drag the control points to edit the spotlight's direction, length, beam angle, hotspot angle, and position.
- To move the light without changing its direction, move the dolly point (the control point at the midpoint between the cone tip and the center of the cone base).
- Spotlights with narrower cones produce more detail than spotlights with wider cones.
- The cone for the spotlight represents the direction of the light, not the range of the light.
- The brightness of the light from the spotlight remains constant, even as you move away from the tip of the cone.
- The length and width of the spotlight together do control the shape of the infinite cone in space that is illuminated by the spotlight.
- Objects near the center axis line of the cone are illuminated the most brightly. That bright full illumination continues for half of the width of the cone, and then slowly drops off to nothing at the very outside of the cone.
- Spotlight hardness controls the fully illuminated region. You can either shrink it or expand it so that there is no drop-off at all. The easiest way to see what this does it is to create a plane with a single spotlight shining on it, and then play with the spotlight hardness parameter to see what it does.
See also
The Snapshots command saves and restores Named Views, Named Positions, Layer States, as well as rendering settings, object settings including locked/hidden state, display mode, material, position, light settings, curve piping, displacement, edge softening, shutlining, and thickness.
Render the objects using the current renderer.
Add lights
Rhinoceros 6 © 2010-2020 Robert McNeel & Associates. 11-Nov-2020
 Snapshots