ArrayCrv
| Toolbar | Menu |
|---|---|
|
|
Transform Array > Along Curve |
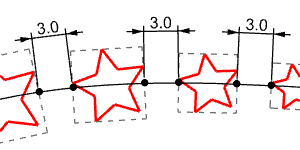
The ArrayCrv command copies objects spaced along a curve.
Steps
- Select objects to array.
- Select a path curve near the end where you want the array to start.
Or
Use the Basepoint option. - Specify the number of elements to array or the spacing distance along the curve.
- Type a value of 1 or more for the number of elements.
Command-line options
Basepoint
When the object to be arrayed is not on the curve and should be moved to the curve prior to the array, the Basepoint option establishes a reference location that will be move to the curve.
Items
The number of items array along the curve.
Distance
The distance between items. The number of items is determined by the length of the curve.
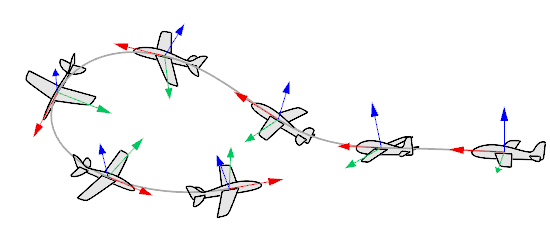
Orientation
Think about an airplane. An airplane may Roll, Pitch, or Yaw when it flies in the air. The orientation styles control how the object rolls, pitches, or yaws when it arrays along a curve.
|
|
|
|
|
Roll rotates around the x-axis.
|
Pitch rotates around the y-axis.
|
Yaw rotates around the z-axis.
|
NoRotation
The object does not roll, pitch, or yaw. It is only copied to different locations on the curve.
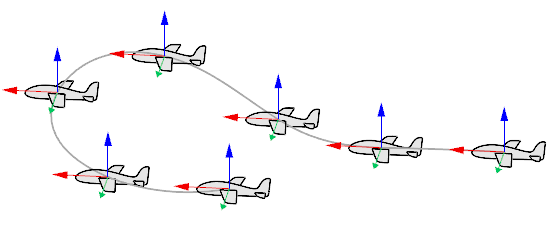
Freeform
The object rolls, pitches, and yaws at the same time along the curve.
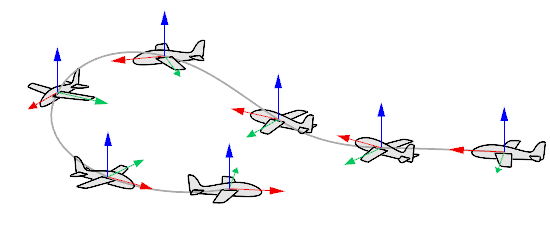
Roadlike
The object pitches and yaws but does not roll. The y-axis (green) is always parallel to the CPlane of the selected viewport.

SubCrv
When selecting the path curve, type subcrv to select part of a curve.
ArrayCrvAdvanced
| Toolbar | Menu |
|---|---|
|
|
Transform Array > Along Curve Advanced |
The ArrayCrvAdvanced command creates copies of selected objects along a curve, with an interactive preview and controls for array settings.
Steps
-
Click the
 Select Curve button and select a curve as the array path.
Edges can not be selected as the array path.
-
Set Source to Document Object and select objects to array.
If the model contains block definitions, you can set Source to Block Definition and choose one from the list.
-
Adjust the array settings.
-
Click OK to create the array.
Options
Curve Selection
Curve
Click the ![]() Select Curve button and select a curve as the array path.
Select Curve button and select a curve as the array path.
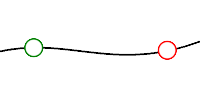
Span Range
Sets the start and end positions along the array path.
By default, the full curve length is used as the range.
-
Double-click the slider to enter a specific value.
Using on-screen handle
-
Drag the large white dot handle with a green outline to adjust the start position of the span range.
The tooltip shows the following information:
Start: The length from the curve start, shown as a percentage of the curve length.
Range: The length of the span range, shown in model units.
Inset: The length from the curve start, shown in model units.
-
Drag the large white dot handle with a red outline to adjust the end position of the span range.
The tooltip shows the following information:
End: The length from the curve start, shown as a percentage of the curve length.
Range: The length of the span range, shown in model units.
Inset: The length from the curve end, shown in model units.
As Percent
Displays the span range values as percentages of the curve length.
On Ends
Adjusts the spacing to ensure that objects' base points are placed at the start and end of the span range.
At Kinks
Adjusts the spacing to ensure that objects' base points are placed at kinks between curve segments.
Repeat Segments
Object Selection
Source
 Document Object
Arrays objects in the model.
-
Click the Select Objects button and select the objects to array.
 Block Definition
Arrays a block definition.
This option is available only when the model contains block definitions.
-
Select a block definition from the list.
Array Objects
Selects objects or a block definition, based on the Source setting, to copy along the curve, .
Use object size
Size
 Toggle uniform/non-uniform
Switches between uniform scaling and independent X, Y, and Z scaling.
Start / Mid / End
Sets the object size at the start, middle, and end of the array.
X / Y / Z
Controls scaling in each axis for the corresponding start, middle, or end size.
Using on-screen handle

-
Drag a square handle to adjust the value.
Hold the Shift key to snap in 0.1-unit steps.
-
In the Uniform mode, a blue square handle controls the X, Y, and Z sizes.
-
In the Non-uniform mode, three square handles control the X, Y, and Z sizes: red for X, green for Y, and blue for Z.
Lock
Links the values between Start, Mid, and End so they change together.
-
When unlocked, the on-screen square handles appear at the start, middle, and end locations on the array path.
Object Count and Spacing
Object Count
Sets the number of objects in the array.
The initial number is automatically calculated to distribute objects within the span range with zero spacing.
-
Type 0 to restore the automatic value.
Spacing Distance
Sets the distance between the bounding boxes of the arrayed objects. The distance may vary if the array path is a free-form curve. The value can be positive or negative, and the automatic object count updates accordingly.
Using on-screen handle

-
Drag the yellow arrow handle to adjust this value.
Hold the Shift key to snap in 0.1-unit steps.
As Percent
Sets the spacing distance as a percentage of the object size.
Relax Spacing
Box Rotation Spacing
Orientation
Sets how the arrayed objects are oriented relative to the curve.
Orient Direction
 Curvature
Orients objects using the curve curvature frame.
 World Z
Orients objects using the World Z direction.
 Object
Orients the arrayed objects so their normal directions point to a selected object.
 Origin
Orients the arrayed objects so their normal directions point to the World origin.
 Stairlike
Orients the arrayed objects so they stay horizontal as they are arrayed along the curve.
Select Orientation Object
Select an object in the viewport for the arrayed objects to look at.
 Flip Orientation Direction
Reverses the normal directions of the arrayed objects if they point at the opposite direction.
Vertical Align
Sets the vertical alignment of the object's bounding box relative to the curve.
 Unset
Unset
Uses the default vertical alignment.
 Bottom
The objects are oriented from their bounding box bottoms to the curve.
 Center
The objects are oriented from their bounding box vertical centers to the curve.
 Top
Top
The objects are oriented from their bounding box tops to the curve.
Horizontal Align
Sets the horizontal alignment of the object's bounding box relative to the curve.
Unset
Uses the default horizontal alignment.
 Left
Left
The objects are oriented to the left side of the curve.
 Center
The objects are oriented from their bounding box horizontal centers to the curve.
 Right
Right
The objects are oriented to the right side of the curve.
Transform Adjustments
Rotation
Rotates the objects around the orientation axis.
Pitch
Tilts the objects forward or backward relative to the curve orientation.
Roll
Rolls the objects around their local axis.
-
Drag the slider to change the angle.
Double-click the slider to enter a specific value.
Using on screen handle
![]()
-
Drag the blue dot handle to adjust Rotation, the green dot handle to adjust Pitch, and the red dot handle to adjust Roll.
Hold the Shift key to snap in 15-degree steps.
Offsets
Adjusts the object position relative to the curve.
U / V / N
Offsets the objects along the U, V, or Normal direction.
Using on screen handle

-
Drag the blue arrow handle to offset arrayed objects in the Normal direction.
Hold the Shift key to snap in 0.1-unit steps.
Match
Matches the settings from another ArrayCrv setup.
Object Count
Displays the resulting number of objects that will be created.
| Toolbar | Menu |
|---|---|
|
|
Transform Array > Along Curve on Surface |
The ArrayCrvOnSrf command copies objects spaced and rotated along a curve on a surface.
Details
The surface normal determines the orientation of the arrayed objects.
Steps
| Command-line options | |
|---|---|
|
Divide |
Type the number of objects. |
|
Multiple |
Specify the distance between objects.
|
|
Type subcrv to select part of a curve as input. |
|