![]()
Solid
Pipe
| Toolbar | Menu |
|---|---|
|
|
Solid Pipe |
The Pipe command creates a surface with a circular profile around curves.
| Command-line options | |
|---|---|
|
ChainEdges |
Selects surface edges that are touching the selected edge. |
|
Multiple |
Allows selecting more than one curve. |
|
Diameter/Radius |
Toggle between picking a Radius and picking a Diameter. |
|
Thick |
Determines whether the pipe has two walls or one. Thick steps
|
|
Cap |
Specifies how to cap the ends. NoneNo cap. FlatCap with planar surface. RoundCap with hemispherical surface. |
|
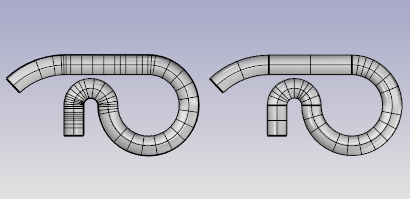
FitRail |
If the curve is a polycurve of lines and arcs, the curve is fit and a single surface is created; otherwise the result is a polysurface with joined surfaces created from the polycurve segments.  FitRail=Yes (left) and FitRail=No (right). |
|
ShapeBlending |
LocalThe pipe radius stays constant at the ends and changes more rapidly in the middle. GlobalThe radius is linearly blended from one end to the other, creating pipes that taper from one radius to the other. |
|
WallThickness |
Specifies the value for the distance between the inside and outside of the pipe. Negative numbers make the first radius the outer core. |
Rhino 6 for Mac © 2010-2020 Robert McNeel & Associates. 11-Nov-2020