The Rhino window
The image below illustrates some of the major features of the Rhino window.

 Menu bar
The menu bar groups Rhino commands by functions. Most usually used commands can be found on the menus.
 Command window
The command window is divided into command-line history and command-line prompt.
Text in the command window can be copied and pasted into text dialogs in Rhino or text editing applications.
- Right-click to open a context menu for text actions or repeat recently used commands.
Command-line history
Displays the previous commands and prompts.
- Select "Clear" on the context menu to delete all command-line history.
Command-line prompt
Displays prompts for command actions and allows typing command names and options. When the Rhino window is active, what you type will input to the command-line unless you are typing in a value box on a panel.
Command options change how a command acts. For example, when you draw a circle, the circle is drawn on the active construction plane by default. Click an option name, or type the underlined letter of the option, to change the behavior.
To run the Circle command
-
Type "Circle".
As soon as you have typed enough letters to uniquely identify the command, the Circle command automatically completes. Press the Enter key or click the command name on the auto-complete list. The autocomplete list filters out the possible commands based on your input. Usually used commands are listed on top.
-
The options for the Circle command appear.
-
To draw a circle vertical to the active construction plane, select the Vertical option.
Fuzzy autocomplete
While you are typing a command name, the autocomplete list appears. The autocomplete list uses fuzzy match. It consists of two command lists divided by a blank line. The first list contains the exact matches that start with the string you typed. The second list contains the non-exact matches sorted by how closely they match the typed string.
 Toolbar container
A toolbar container is a collection of toolbars. Each toolbar in the container displays as a tab. Click the tabs to switch between toolbars.
Toolbars contain graphical icons for initiating commands. Many icons have a second command that you can access by clicking the right mouse button. The tooltip that appears when you hover over the icon tells you what the left and right mouse button do.

-
Click the
 button to customize the container.
 Sidebar
"Sidebar" is a special container that displays an existing container according to the currently active toolbar tab. In the default workspace, if you click on the Curve Tools tab, the Curve drawing sidebar container will display in Sidebar.
To link a container to a tab as a sidebar
- Right-click on a toolbar tab and select Properties.
- In the Container Properties dialog box, click the
 button in the Sidebar section.
 Osnap panel
Contains object snap toggles.
The Selection Filters panel is grouped with the Osnap panel in a container.
 Right Container
The Right Container has a collection of panels that provide quick access to some global options, document properties, or command dialogs.
-
Click the
button to customize the container.
 Viewport area
A viewport displays the Rhino modeling environment including object display, viewport title, background, construction plane grid, world axis icon.
When no object is selected, the Properties panel displays viewport properties
Viewport title
Each viewport has a viewport title on the upper-left corner.
-
Click the triangle button or right-click on the viewport title to show the menu for view management commands. Most of the commands can be found on the View menu of the menu bar.
-
Click the title of a viewport to activate the viewport without deselecting objects.
-
Double-click a viewport title to maximize the viewport, or restore the multi-viewport layout.
-
Drag a viewport title to move the viewport around.
Viewport tabs
Viewport tabs are located at the bottom of the main viewport frame by default. Each model and layout viewport has a tab. The tabs allow you to switch between viewports especially when a viewport is maximized.
The ViewportTabs command manages the appearance of the tabs.
Context Menus
One of the three context menus appears when you click, hold, and release the right mouse button in a viewport.
Select Add items to this menu... to customize the items on the specific menu in the Options dialog.
- When nothing is in selection, the Viewport Context Menu appears.
- When objects are in selection, the Object Context Menu appears.
- When control points are in selection, the Control Point Context menu appears.
 Status bar
The status bar is located at the bottom of the Rhino window. It displays the current coordinate system, the current location and delta of the cursor, and the status bar panes.
|
|
CPlane |
x |
y |
z |
Inches |
■ Layer |
Grid Snap |
Ortho |
Planar |
Osnap |
SmartTrack |
|
Gumball |
Record History |
Filter |
Info |
|
Left sidebar visibility toggle
Click the ![]() button to expand or collapse the left sidebar.
button to expand or collapse the left sidebar.
When collapsed, click an icon to temporarily show the container.
Menu Help
When the mouse hovers over a menu item, a description of that item displays on the status bar.
CPlane / World
The construction plane/world coordinates toggle.
x/y/z
The x/y/z coordinates of the mouse cursor location.
Units / Delta
The current units setting.
During drawing commands, displays the distance from last picked point to the current location.
Layer pane
If objects are selected, the Layer pane displays the layer of the selected objects.
If no objects are selected, the Layer pane displays the current layer.
-
Click the Layer pane to access quick controls for setting the selected objects' layer or to change layer visibility and status. In the layer list popup, right-click to show the context menu.
Context menu
Select Objects
Selects all objects on the layer. Objects on the sub-layers are excluded.
Change Object Layer
Moves selected objects to the layer.
Copy Objects to Layer
Copies selected objects to the layer.
-
Right-click the Layer pane to open the Layers panel.
- Search for StatusBarLayerPaneWidth in Advanced settings to make the Layer pane wider (shows more layer information) or narrower (takes less space).
Grid Snap pane
-
Click the Grid Snap pane to toggle grid snap.
The pane lights up when the mode is turned on.
-
Right click the pane to set options.
![]() Grid Snap options
Grid Snap options
Grid Snap On/Off
Toggles the grid snap on/off state. This is the same as clicking the Snap pane.
Active Viewport / All Viewports options
Show Grid Lines
Toggles the visibility of the construction plane grid.
Show Grid Axes
Toggles the visibility of the grid x and y axes.
Show World Axes Icon
Toggles the visibility of the world axis icon in the bottom left corner of a viewport.
Set Snap Size <Value>
Specifies the grid snap size and shows the current size.
Settings
Opens the Grid Document Properties.
Ortho pane
-
Click the Ortho pane to toggle Ortho mode.
The pane lights up when the mode is turned on.
-
Right-click the pane to set options.
![]() Ortho options
Ortho options
Ortho On/Off
Toggles the ortho on/off state. This is the same as clicking the Ortho pane.
Set Ortho Angle <Value>
Specifies the ortho angle and shows the current angle.
Hash marks indicate the current ortho angle when Ortho is enabled.

-
Disable ShowOrthoHashMarks in Advanced Settings if you prefer to hide the hash marks.
Snap to CPlane Z
Snaps to the Z direction of the CPlane when the mouse cursor moves above or below the previous picked location in the view.

This menu item toggles the Ortho Snap to CPlane Z checkbox in Rhino Options > Modeling Aids.
Settings
Opens the Modeling Aids Options.
Planar pane
-
Click the Planar pane to toggle Planar mode.
The pane lights up when the mode is turned on.
-
Right-click the pane to set options.
![]() Planar option
Planar option
Planar Mode On/Off
Toggles the planar on/off state. This is the same as clicking the Planar pane.
Osnap pane
-
The Osnap controls let you select which object snaps are currently in effect.
-
When the Osnap panel is off, clicking the Osnap pane brings up the panel. If the panel is already on, the Disable checkbox is toggled.
-
Right-click the pane to set options.
![]() Osnap options
Osnap options
Osnap Control On/Off
Toggles the Osnap control on/off state. This is the same as clicking the Osnap pane.
Snap to occluded objects
Turns on snapping to objects hidden behind other objects.
Snap to locked objects
Turns on snapping to locked objects.
Only snap to selected objects
Only selected objects can be snapped.
Snap to apparent intersections
Turns on snapping to apparent intersections.
Settings
Opens the Modeling Aids Options.
SmartTrack pane
-
Click the SmartTrack pane to toggle SmartTrack mode.
The pane lights up when the mode is turned on.
-
Right-click the pane to set options.
![]() SmartTrack options
SmartTrack options
SmartTrack On/Off
Toggles the SmartTrack on/off state. This is the same as clicking the SmartTrack pane.
Settings
Opens the SmartTrack Options.
Gumball pane
-
Click the Gumball pane to toggle Gumball widget display on the selected object.
The pane lights up when Gumball is turned on.
-
Right-click the pane to show the Gumball menu.
![]() Gumball menu
Gumball menu
Relocate Gumball
Drag to relocate gumball widget away from its default position.
Reset Gumball
Restores the default placement and orientation for the gumball.
AutoReset Gumball
When an object is rotated, resets Gumball to align with CPlane or World axes based on the initial alignment.
Gumball On
Turns the gumball widget on any time objects are selected.
Gumball Off
Disables auto gumball.
Align to CPlane
Gumball widgets align to the construction plane xyz directions. The Gumball origin will be at the CPlane oriented bounding box center of the object.
Align to Object
Gumball widgets align to the object.
The default alignment is different for different object types.
Align to World
Gumball widgets align to world xyz directions. The Gumball origin will be at the World oriented bounding box center of the object.

Snappy Dragging
Object snaps are used while dragging.
Smooth Dragging
Object snaps are ignored while dragging.
Merge faces after extrude
Merges the coplanar faces related to the extruding operation when possible.
Rotate View Around Gumball
When the Gumball widget is visible, rotate the view around the Gumball origin. Otherwise, rotate the view around the center.

Drag Strength
Sets the amount of the gumball drag as a percentage of mouse movement to control the speed of the gumball movement. The default 100% moves the gumball consistently with the mouse.
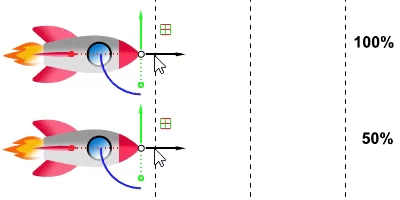
To fine-tune placing objects (such as with control point editing) set the strength lower, so large hand/mouse movements result in smaller gumball changes. When the control is closed, drag strength is reset to 100%.
Settings...
Opens Gumball options.
Auto CPlane pane
-
Click the Auto CPlane pane to toggle it on and off.
The pane lights up when the mode is turned on.
Find more information in the AutoAlignCPlane command topic.
-
Right-click the pane to set options.
![]() Auto CPlane options
Auto CPlane options
Sticky Auto CPlane
The CPlane stays on the previously selected planar object/sub-object until another one is selected.
Lock Auto CPIane
Locks the CPlane to the current position and orientation.
Keyboard: Ctrl(CMD)+1
The lock![]() /
/![]() icon on the Auto CPlane pane indicates the current locking state.
icon on the Auto CPlane pane indicates the current locking state.
-
Click on the lock icon to toggle the locking state.
Align to Object
Aligns the CPlane with the plane of the selected curve or surface.
Align to World
Attempts to keep the X and Y axes of the CPlane aligned with the closest world axes.
Align to View
Attempts to keep the CPlane Y aligned with the camera up of the view.
-
Pressing Ctrl(CMD)+R changes the alignment mode through Object, World, and View.
Record History pane
-
Click the Record History pane to toggle history recording on/off.
The pane lights up when History recording is turned on.
-
Right-click the pane to set options.
![]() Record History options
Record History options
Always Record History
Turns on History recording for all commands that support History until it is turned off.
Update Children
Automatically updates child objects when the input objects are changed.
Lock Children
Locks the objects created with history.
History Break Warning
Shows warning message when the connection between parent and child objects is broken.
Filter pane
-
When the Selection Filters panel is off, clicking the Filter pane brings up the panel. If the panel is already on, the Disable checkbox is toggled.
Info pane
- Click the Info pane to display information about the current Rhino session. The Info pane cycles through the list of specified categories.
![]() Info options
Info options
Selected object count
Selected object layer
Relative coordinates
Curve parameter/UV coordinates
Annotation style
Notes
Absolute tolerance
Angle tolerance
Current layer
Current layer linetype
Number of off layers
Current text font
CPlane name
CPlane/UPlane
Parallel view lens length
Minutes from last save
Memory use
Right sidebar visibility toggle
Click the ![]() button to expand or collapse the right sidebar.
button to expand or collapse the right sidebar.
When collapsed, click a panel icon to temporarily show the panel.
Related commands
| Toolbar | Menu | Status bar |
|---|---|---|
|
|
|
|

The ToggleLeftSidebar command shows or hides the left sidebar of the Rhino window.
ToggleRightSidebar
| Toolbar | Menu | Status bar |
|---|---|---|
|
|
|
|
The ToggleRightSidebar command shows or hides the right sidebar of the Rhino window.