Object snaps
| Toolbar | Menu |
|---|---|
|
|
Tools Object Snap > The menu versions turn the object snaps on for one pick only. |
The object snaps constrain the marker to an exact location on an object such as the end of a line or the center of a circle.
-
When Rhino asks you to choose a point, you can constrain the marker to specific parts of existing objects by turning on object snap modes.
-
When an object snap is active, moving the cursor near a specified point on an object causes the marker to jump to that point.
-
Object snaps can persist from pick to pick, or can be activated for one pick only.
-
Multiple persistent object snaps can be set in the Osnap control.
-
All object snaps behave similarly, but snap to different parts of existing geometry.
-
For example, the End object snap finds the endpoint of a curve. When activated, the end object snap constrains the marker to the endpoint of the curve closest the cursor.
Multiple object snaps
More than one object snap can be active at the same time. As the cursor passes over an object, the appropriate object snap displays.
Persistent object snaps
Use persistent objects snaps to maintain an object snap through choosing several points without having to reactivate the object snap. Only Cen, End, Int, Knot, Mid, Near, Perp, Point, Quad, Tan, and Vertex object snaps can persist.
You can set the Snap radius for object snaps. This means how close you have to move the cursor to the point before the marker jumps to the point.
To display the Osnap control
-
On the status bar, click Osnap.
When all object snap checkboxes are cleared, clicking Osnap hide/show the object snap bar, otherwise the Disable state is toggled.
-
Select or clear the desired object snap check boxes.
To turn off all persistent object snaps
-
Click Disable.
Disabling the object snaps suspends their use temporarily.
When the Disable check box is cleared, all previously set object snaps turn back on.
To enable only one object snap
-
Right-click an object snap.
The object snap is enabled and all the recently enabled object snaps are disabled.
-
Right-click the same object snap.
The object snap is disabled and all the previously disabled object snaps are enabled again.
To enable/disable all persistent object snaps
-
Right-click Disable.
All object snaps are enabled/disable.
To temporarily suspend object snaps
-
Press Alt when a command prompts to pick a point.
When Disable is on, checked object snaps are enabled temporarily.
When Disable is off, checked object snaps are disabled temporarily.
One-shot object snaps
One-shot object snaps only work when Rhino is requesting a point, are turned on for one pick only, and override all persistent object snaps for that pick.
To set a one-shot object snap
-
Press ShiftSelect and click an object snap check box.
For example, if End, Near, and Point persistent object snaps are set in the Osnap control, and you set the Mid object snap for one pick, End, Near, and Point will not work for that pick. After the pick, the persistent object snaps will reactivate.
Object snaps when dragging
When object snaps are on, click and hold near object snap locations to use them for the start or end locations of the drag.
To suspend object snaps for the drag, press and hold Alt.
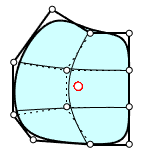
Project object snaps
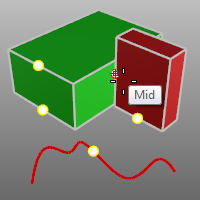
The Project button on the Osnap control projects any object snap to the current construction plane. For example, in the illustration, the curve projects to the construction plane from snapped locations on an object.
See: ProjectOsnap
Object snap culling
Object snaps work on visible objects only by default. Objects that are obscured by other objects cannot be snapped.
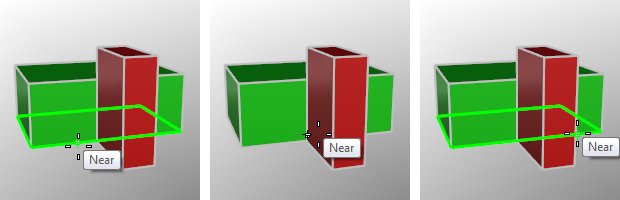
When the cursor passes behind the red box, the object snap turns off.
Simple object snaps
Simple object snaps snap to one location on an object.
Steps
- Move the cursor near the target object.
When the marker jumps to the snap location, click the left mouse button.
 NoSnap
If a command is active, NoSnap turns off persistent object snaps for one pick.
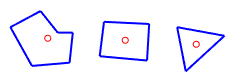
 Center (Cen)
Snaps to the center of:
-
The average coordinates of the corners of a closed planar polyline.
-
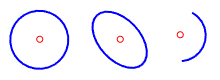
The center point of an exact or approximate circle, ellipse, or arc.
-
A single surface, or a polysurface face with a boundary of (1) or (2) above. (No holes)


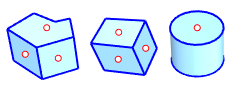
-
The bounding box of an annotation text.

-
The average coordinates of all the control points of a planar SubD.
See: Modeling Aids Options.
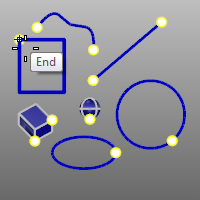
 End
End
Snap to the end of a curve, text corners, interior vertices of polylines and joined curves, the seam point on closed curves, and the "corners" of surfaces, and polysurfaces.
 Intersection (Int)
Snap to the intersections of curves, edges, mesh wires, and isoparametric curves on a surface.
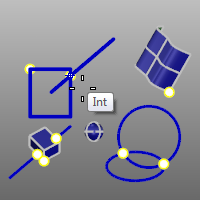
To isoparametric curves, use the OnSurface or OnPOlySurface object snap first.
To snap to mesh wires, the SnapToMeshes command has to be enabled.
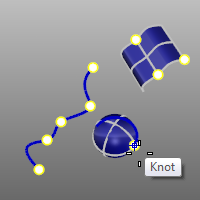
 Knot
Knot
Snap to a knot on a curve or surface.
 Midpoint (Mid)
Snap to the midpoint of a curve, surface edge, mesh wire, polycurve segment, SubD edge or adjacent smart points.
If you place four smart points, A, B, C and D, only the midpoints between A and B, B and C, or C and D can be snapped.
To snap to mesh wires, the SnapToMeshes command has to be enabled.
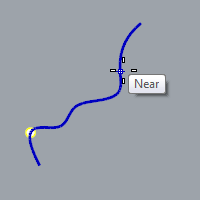
 Near
Near
Snap onto a curve, mesh wire, surface edge or SubD edge at the cursor location.
To snap to mesh wires, the SnapToMeshes command has to be enabled.
 Perpendicular (Perp)
Snap perpendicular to a curve, mesh wire, or surface edge.
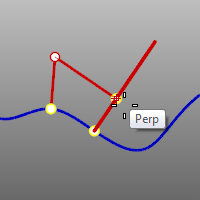
The Perpendicular object snap is not effective for the first point of a command.
To snap to mesh wires, the SnapToMeshes command has to be enabled.
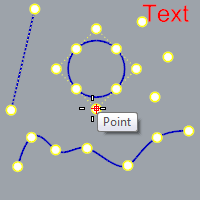
 Point
Point
Snap to a point object, extrusion point, control point, edit point, block, and text insertion points.
Also snaps to centers and corners of rectangular lights and block insertion points even if control points are not displayed.
 Quadrant (Quad)
Snap to the point on a curve that is at the maximum x or y point relative to the current construction plane.
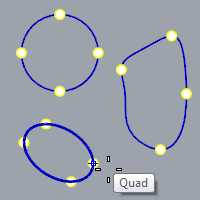
Note
- The quadrant points of circles and arcs are at the extremes in each construction plane axis direction.
- Ellipses have quadrant points at the ends of the ellipse axes if the ellipse is oblique in addition to those at the construction plane extremes.

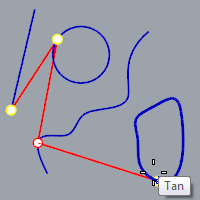
 Tangent (Tan)
Snap tangent to a curve.
The Tan object snap is not effective for the first point for a command.
 Vertex
Snap to a mesh or SubD vertex.
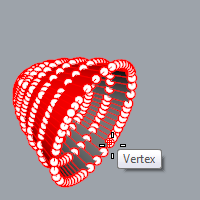
Note
- Use the CullControlPolygon to disable snapping to vertices on the back side of mesh objects.
- Mesh vertices do not have to be turned on when using the Vertex snap.
Object snaps using references
When picking points during these steps, use simple snaps (End, Near, Point, Midpoint, Center, Intersection, and Quadrant) for greater precision.
To access reference object snaps from the Osnap control
- Press the Ctrl key and hover over the Osnap control.
The alternate reference object snaps appear.
 Along
Along
Track along a line.
Along example
Start a circle located on the line between the center of the circle and the end of a line.
Along steps
- Pick the start of the tracking line (the center of the circle).
- Pick the end of the tracking line (the end of the line).
- The marker moves only along the tracking line.
- Click the left mouse button to specify the location.
To access this object snap on the Osnap control
- Press and hold the Ctrl key and hover the mouse over the Osnap control.
 AlongParallel (AlongP)
Track along a line parallel to a reference line between two points.
AlongParallel example
Start a line along a line parallel to the rectangle that passes through the circle's center.
AlongParallel steps
- Pick the start of the base line (the corner of the box).
- Pick the end of the base line (the other corner of the box).
- Pick the start point for parallel tracking (the Center of the circle).
The marker moves only along the tracking line. - Click the left mouse button to specify the location for the start of the line.
To access this object snap on the Osnap control
- Press and hold the Ctrl key and hover the mouse over the Osnap control.
 Between
Snap midway between two specified locations.
Between example
Center a circle between two rectangles
Between steps
- Pick the first reference point.
- Pick the second reference point.
To access this object snap on the Osnap control
- Press and hold the Shift key and hover the mouse over the Osnap control.
 From
From
Snap from a specified base point.
Note
- The From object snap differs from the rest of the object snap because it is used to set the base point for ortho, distance constraint, angle constraint, and relative coordinate entry.
- Ortho constrains the marker to lines radiating from the last pick point. Similarly, distance constraint constrains the marker to a circle of a specified radius from the last pick point. You can set this point, without picking it, with the From object snap.
From example
Center a circle four units from the endpoint of a line.
From steps
To access this object snap on the Osnap control
- Press and hold the Ctrl key and hover the mouse over the Osnap control.
 PerpendicularFrom (PerpFrom)
Track along a line perpendicular to a curve or surface.
PerpendicularFrom example
Draw a line perpendicular from a line at the intersection with the circle.
PerpendicularFrom steps
- Select the curve.
- The cursor moves only along the curve. Cross-hairs appear to indicate the perpendicular and tangent lines that extend from any point on the curve.
- Pick the point on the curve to extend the perpendicular line from.
The marker tracks along the perpendicular line. - Click the left mouse button to start the line.
To access this object snap on the Osnap control
- Press and hold the Ctrl key and hover the mouse over the Osnap control.
 TangentFrom (TanFrom)
Track along a line tangent to a curve.
TangentFrom example
Draw a line tangent from the circle at the intersection with the line.
TangentFrom steps
- Select the circle.
The marker moves only along the circle. Cross-hairs indicate the perpendicular and tangent lines that extend from any point on the circle. - Pick the point on the circle to extend the tangent line from.
The marker tracks along on the tangent line. - Click the left mouse button to start the line.
To access this object snap on the Osnap control
- Press and hold the Ctrl key and hover the mouse over the Osnap control.
Object snaps on an object
 OnCurve (OnCrv)
Snap to and track along a selected curve for one pick.
Notes
- The OnCrv object snap is useful if the model is complex and Near object snap alone does not lock to the object you would like it to.
- The curve parameter displays in the status bar when moving the mouse along the curve.
OnCurve example
Select the curve to move a control point along.
OnCurve steps
- Select the curve.
The marker moves only along the selected curve. - Click the left mouse button to place the point.
To access this object snap on the Osnap control
- Press and hold the Ctrl key and hover the mouse over the Osnap control.
 PersistentOnCurve (POnCrv)
Snap to and track along a selected curve until the command completes.
To access this object snap on the Osnap control
- Press and hold the Ctrl key and hover the mouse over the Osnap control.
 OnPolysurface (OnPSrf)
Snap to and track over a polysurface for one pick.
OnPolysurface example
Place a point object on a polysurface.
OnPolysurface steps
- Select the polysurface.
The marker moves only over the polysurface. - Click the left mouse button to place the points.
To access this object snap on the Osnap control
- Press and hold the Ctrl key and hover the mouse over the Osnap control.
 PersistentOnPolysurface (POnPSrf)
Snap to and track over a polysurface until the command completes.
To access this object snap on the Osnap control
- Press and hold the Ctrl key and hover the mouse over the Osnap control.
OnMesh
Snap to and track along a selected mesh object for one pick.
OnMesh steps
- Select the mesh.
The marker moves only along the selected mesh. - Click the left mouse button to place the point.
To access this object snap on the Osnap control
- Press and hold the Ctrl key and hover the mouse over the Osnap control.
PersistentOnMesh (POnMesh)
Snap to and track along a selected mesh until the command completes.
To access this object snap on the Osnap control
- Press and hold the Ctrl key and hover the mouse over the Osnap control.
 OnSurface (OnSrf)
Snap to and track over a surface for one pick.
OnSurface example
Place a point object on a surface.
OnSurface steps
- Select the surface.
The marker moves only over the surface. - Click the left mouse button to place the point.
If you are tracking over a polysurface, the marker is restricted to the single selected face. The cursor changes shape to indicate that you cannot pick. To track over the whole polysurface, see the OnPolysrf object snap.
To access this object snap on the Osnap control
- Press and hold the Ctrl key and hover the mouse over the Osnap control.
 PersistentOnSurface (POnSrf)
Snap to and track over a surface until the command completes.
To access this object snap on the Osnap control
- Press and hold the Ctrl key and hover the mouse over the Osnap control.
Percentage (Percent)
The selected curve is marked with temporary black points that can be snapped when the Point object snap is disabled.
If the percentage is less than 50, the curve is marked with multiple snap points. For example, when using 30, you get snap points at 30%, 60% and 90%.
To access this object snap on the Osnap control
- Press and hold the Shift key and hover the mouse over the Osnap control.
Isoparametric curve snapping
You can snap to surface isoparametric curves using the Int object snap whenever the input is constrained to a surface, for example in ExtractIsocurve, InsertKnot, OrientOnSrf, and with OnSrf, and OnPolysrf one-shot object snaps.
isoparametric curves object snapping is "weaker" than normal object snaps. The normal object snaps are evaluated first, and only if they fail will Rhino try to snap to the isoparametric curve intersections.
Scripting one-shot object snaps
One-shot object snaps are automatically transparent. In other words, when scripting these, you do not need to use the apostrophe character to make the object snap work while a command is running.
Related commands
| Toolbar | Menu | Status bar |
|---|---|---|
|
|
Tools Object Snap > <Options> |
The Osnap command sets the status of object snaps from the command line.
Note
- This command is useful for scripting, because it can set any object snap combination from command line.
- You can temporarily suspend the effect of the object snaps with the DisableOsnap command.
| Toolbar | Menu |
|---|---|
|
|
Tools Object Snap > Persistent Osnap Dialog |
The ShowOsnap command turns the Osnap control on, off, or toggles the current state.
| Command-line options | |
|---|---|
|
Show |
Turns the Osnap control on. |
|
Hide |
Turns the Osnap control off. |
|
Toggle |
Toggles the Osnap control. |
| Toolbar | Menu |
|---|---|
|
|
Tools Object Snap > Disable Object Snaps |
The DisableOsnap command manages the state of persistent object snaps.
To temporarily turn off persistent object snaps from the control
-
When Object snaps are disabled, persistent object snaps are temporarily suspended.
To reactivate persistent object snaps from the control
-
All persistent object snaps will be reactivated.
To clear all persistent object snaps from the control
- In the Osnap control, right-click the Disable button.
To temporarily turn off persistent object snaps from the command line
- Click an option.
To access disabled object snaps
| Toolbar | Menu |
|---|---|
|
|
Tools Object Snap > Project to Plane |
The ProjectOsnap command projects object snaps from the actual snap point to the construction plane.
Steps
- Specify a command line option.
When Osnap projection is on, and the cursor is over an object snap point, the marker projects to the current construction plane with a white tracking line between it and the cursor.
If Planar mode is on, the ProjectOsnap command will project the object snap to the "virtual plane" that is set by the planar mode.
When projection is on, the prefix "Projected" is added to the tooltip as a reminder.
| Command-line options | |
|---|---|
|
Enable |
Object snaps will be projected to the construction plane. |
|
Disable |
Object snaps land on the object snapped to. |
|
Toggle |
|
| Toolbar | Menu |
|---|---|
|
|
Tools Object Snap > Snap To Locked Objects |
The SnapToLocked command snaps work on locked objects and on objects on locked layers.
SnapToMeshes
| Toolbar | Menu |
Options |
|---|---|---|
|
|
|
Modeling Aids Near, Mid, Int and Perp snap to mesh objects |


The SnapToMeshes command enables/disables snapping to mesh edges using Near, Mid, Int, and Perp object snaps.
| Toolbar | Menu |
|---|---|
|
|
|
The SnapToOccluded command allows object snaps to work on objects that are hidden behind other objects.