Decals
|
Toolbar |
Menu |
Panel Gear Menu |
Shortcut |
|---|---|---|---|
|
|
Edit Object Properties Panels Properties |
Properties |
F3 |
The Decal properties manage object properties for the selected decals.
Decals are non-repeating textures that are applied to the surface of an object with a given projection. They are an easy-to-use way of attaching single images or similar textures to objects without going through the complexity of the texture mapping process.
Decals are textures that are placed directly on a specified area of one or more objects. Use decals to modify a limited part of an object's color.
Decals consist of a single instance of a texture, rather than being tiled as they are when used in a material.
Some uses for decals include:
- Hanging artwork on interior walls.
- Placing labels or logos on products.
- Adding signs to the model.
- Creating stained glass windows.
![]() Decal properties
Decal properties
 Add decal to selected object
Places a new decal on the object.
 Show/Hide Decal Widget
Turns on the decal widget to allow relocating and resizing the decal. The widget can be manipulated with Rhino commands such as Move, Rotate, Scale, and manipulated with the Gumball control.
 Delete Decal
Deletes the selected decal.
Change decal order
When multiple overlapping decals are applied on a single object, the first decal in the list appears to be on top.
- Drag decals up or down in the list to change the order they are displayed on the object.
Decal Mapping Style
The mapping style determines how to project the decal onto the object. Use object snaps to help accurately place decals.
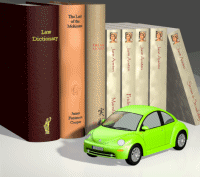
Planar
Use Planar mapping for mapping to flat or gently curved objects.
When using the planar mapping on a curved object, the entire texture must lie behind the surface of the object. Portions of the texture that lie in front of the surface will not be visible.

To place a planar decal
- The action for placing a planar decal is the same as the Rectangle command. Drag a rectangle to define the planar mapping.
Note
- The rectangle is constrained to the aspect ratio of the texture. Press and hold the Shift key to unlock the aspect ratio constraint.
- After the rectangle has been defined, the planar decal is created. The xyz position can be edited directly on the decal dialog or the position can be picked by clicking the pick button to the right of the xyz edit boxes.
Planar map properties
XYZ Position
The location of the starting corner of the planar decal widget.
Pick Position
Click to relocate the decal widget.
Transparency
Determines the visibility level of the decal map.
Direction
Sets the direction of the decal projection.
Forward / Backward
Projects the decal away from the front or back of the decal texture.

Forward projection (left) and backward projection (right).
Both
Projects the decal away from both the front and the back of the decal texture.

Projection both directions.
Texture pane
Click to create a new texture or select a different texture in the model.
 Edit
Edit
Click to edit the texture properties.
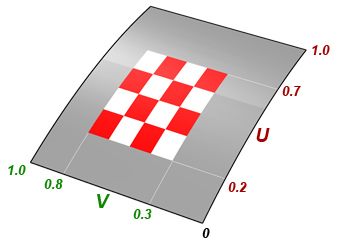
UV
Use UV mapping for objects where the decal flows and stretches to fit the surface.
The decal covers the entire object, there is no control over the decal placement.
UV mapping uses the u and v parameterization of the surface to bend and stretch the texture.
UV map properties
Min
U/V: The start of the decal display range in U/V direction.
Max
U/V: The end of the decal display range in U/V direction.
Transparency
Determines the visibility level of the decal map.
Texture pane
Click to create a new texture or select a different texture in the model.
Edit
Click to edit the texture properties.
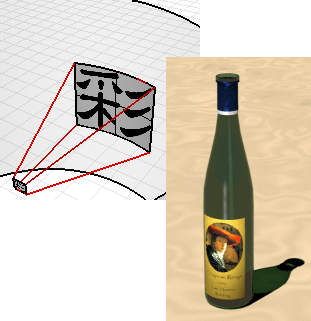
Cylindrical
Use Cylindrical mapping for placing decals onto objects that curve in one direction, such as labels on wine bottles.
The cylindrical projection maps the texture onto the cylinder with the texture's vertical axis along the cylinder's axis, and the horizontal axis around the cylinder.
To place a cylindrical decal
- The action for placing a cylindrical decal is the same as the Cylinder command.
Cylindrical map properties
XYZ Position
The location of the bounding box center of the decal widget cylinder.
Pick Position
Click to relocate the decal widget.
Sweep angles
Start/End
Horz: The start/end angle of the decal display range in the circular direction.
Radius/Height
The radius/height of the decal widget cylinder.
Transparency
Determines the visibility level of the decal map.
 Map to inside
Maps the texture to the outside (convex) or inside of the sphere or cylinder with a thickness.
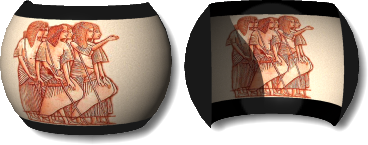
Outside (left), inside (right).
Texture pane
Click to create a new texture or select a different texture in the model.
Edit
Click to edit the texture properties.
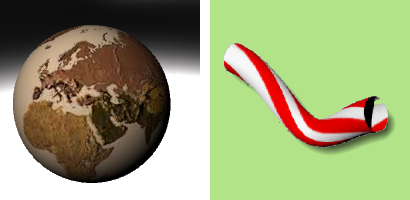
Spherical
Use Spherical mapping for placing decals onto objects that curve in two directions. The spherical projection maps the texture onto the mapping sphere with the texture's vertical axis (height), curving from pole to pole, and the horizontal axis curving around the equator.
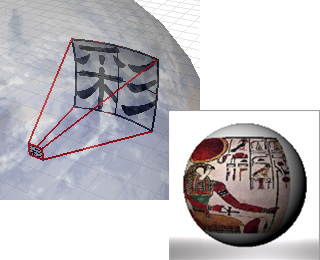
To place a spherical decal
- The action for placing a spherical decal is the same as the Sphere command.
For mapping objects completely covering a sphere, for example a globe, use the UV Mapping type.
Spherical map properties
XYZ Position
The location of the bounding box center of the decal widget sphere.
Pick Position
Click to relocate the decal widget.
Sweep angles
Start/End
Horz: The start/end angle of the decal display range in the circular direction.
Vert: The start/end angle of the decal display range in the vertical direction.
Radius
The radius of the decal widget sphere.
Transparency
Determines the visibility level of the decal map.
Map to inside
Maps the texture to the outside (convex) or inside of the sphere or cylinder with a thickness.
Outside (left), inside (right).
Texture pane
Click to create a new texture or select a different texture in the model.
Edit
Click to edit the texture properties.