Creating surfaces from curves and joining the surfaces together allows you much greater freedom.
This tutorial introduces the concept of drawing curves and one method of creating surfaces from those curves.
You will learn how to:
| ● | Draw free-form curves based on an existing object. |
| ● | Edit control points. |
| ● | Revolve surfaces around an axis. Revolving curves is a good method for creating tubular shapes like vases, wineglasses, and chair legs. |
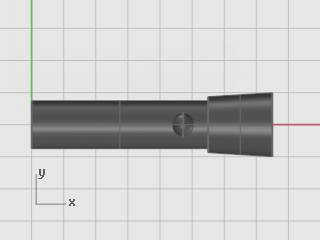
You are going to use a basic flashlight as a guide for drawing the curves you will need for the new model. Using the basic flashlight gives you a frame of reference for deciding about the size and shape of the object.
![]() To get started
To get started
| 4 | Open the tutorial model file Flashlight.3dm. |
You are going to trace around the old flashlight. To make this easier, you will lock the objects. When objects are locked, you can see them and snap to them, but you cannot select them. This keeps the objects from interfering when you want to select things close by. You can still use object snaps to snap to locked objects. You will then create some curves and revolve them to make the new flashlight.
![]() Lock the flashlight objects
Lock the flashlight objects
| 1. | Select all the objects. Press the Ctrland A keys to select all the objects in the model. |
| 2. | On the Edit menu, click Visibility > Lock.
|
Draw a construction centerline through the center of the old flashlight.
![]() Draw the construction centerline
Draw the construction centerline
| 1. | On the Curve menu click Line > Single Line. |
| 2. | At the Start of line… prompt, use the Center object snap to place the start of the line at the center of the flashlight base. |
| 3. | At the End of line… prompt, turn Ortho on, and draw the line through the exact center of the old flashlight.
|
You are going to draw a profilecurve that you will use to revolve to create the flashlight body. A profile curve defines a cross-section of one half of the part.
![]() Draw the body curve
Draw the body curve
| 1. | On the status bar, click the Layer pane and make the layer Free Form Body current. |
| 2. | On the Curve menu, click Free-Form > Control Points. |
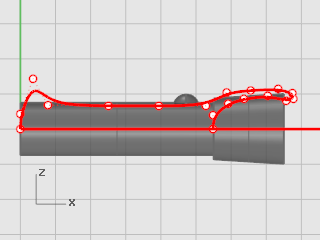
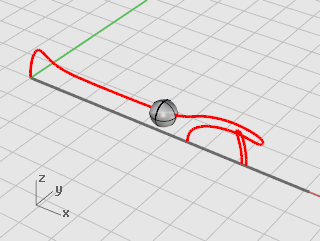
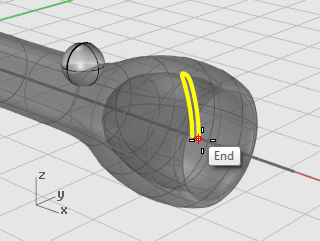
| 3. | At the Start of curve… prompt, in the Front viewport, start drawing a curve around the flashlight body as illustrated.
Use the End object snap to start the curve at the end of the construction center line. Use the Near object snap to end the curve on the construction center line. Starting and ending the curve exactly on the line is important so that later when you revolve the curve to create a solid, there will be no gaps or overlapping parts. When drawing the curve, use Ortho to control the first two (1 and 2) points and the last two points (3 and 4) on the curve. If the first two points and the last two points are placed in a straight line, the curve will start and end tangent to that line.
|
| 4. | When you have placed the last control point, press Enter to finish drawing the curve. To place the last two points in a straight line with each other, use Grid Snap, Ortho, or Perpendicular object snap. |
Make another profile curve for the lens.
![]() Create the lens
Create the lens
| 1. | On the Curve menu, click Free-Form > Control Points. |
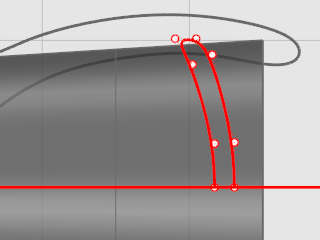
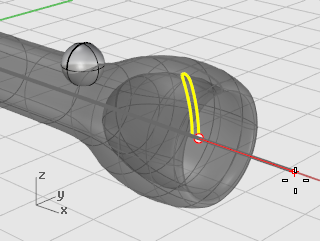
| 2. | At the Start of curve… prompt, in the Front viewport, place the first control point of the lens profile. Use the Near object snap to start and end the curve on the construction centerline. Place control points in the upper part of the lens curve so it crosses the body profile curve.
|
![]()
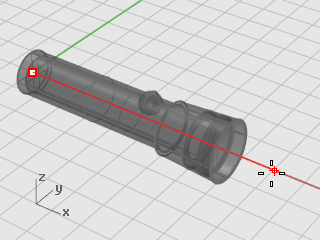
![]() Get the old flashlight out of your way
Get the old flashlight out of your way
| 1. | On the Edit menu, click Visibility > Unlock. |
| 2. | Select all the objects except the two profile curves you just drew and the switch sphere. |
| 3. | On the Edit menu, click Visibility > Hide.
|
To make the body, you will revolve the profile curve 360 degrees. You will use the endpoint of the curve and ortho to establish the rotation axis.
![]() Create the flashlight body
Create the flashlight body
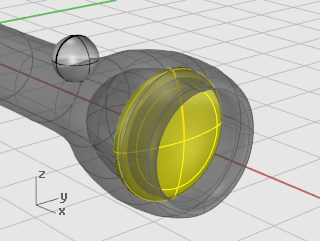
| 1. | On the Surface menu, click Revolve. |
| 2. | At the Select curve to revolve prompt, select the body profile curve. |
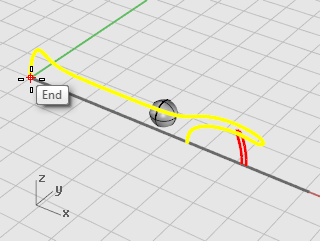
| 3. | At the Start of revolve axis prompt, use the End snap to snap to one end of the profile curve.
|
| 4. | At the End of revolve axis prompt, turn Ortho on, and specify the revolve axis line as illustrated.
|
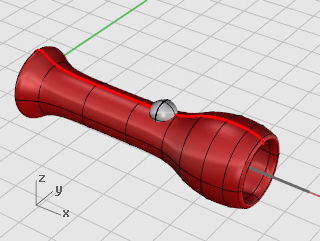
| 5. | In the Start angle... prompt, click the FullCircle option.
|
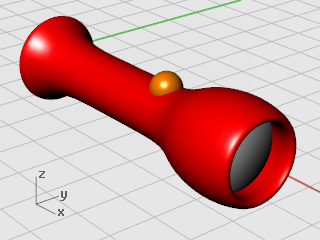
Now revolve the lens profile curve in the same way as the body.
![]() Revolve the lens profile curve
Revolve the lens profile curve
| 1. | On the Surface menu, click Revolve. |
| 2. | At the Select curve to revolve prompt, select the lens profile curve. |
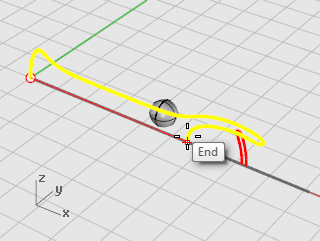
| 3. | At the Start of revolve axis prompt, use End object snap to locate the endpoint of one of the curve profiles.
|
| 4. | At the End of revolve axis prompt, turn Ortho on, and draw the revolve axis line as illustrated.
|
| 5. | In the Start angle... prompt, click the FullCircle option.
|