Decals
Decals are
non-tiling image maps that apply directly to objects instead of
indirectly using a material. Use decals to modify a limited part
of an object's color, reflectivity, or bumps.
Decals consist of a single instance of the image, rather than
being tiled as they are when used in a material
definition.
Some uses for decals include:
 Hanging artwork on interior
walls. Hanging artwork on interior
walls.
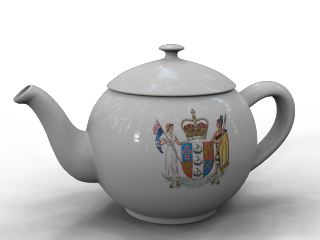
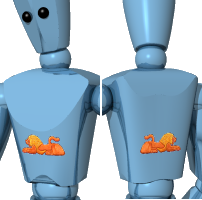
Placing labels or logos
on products.
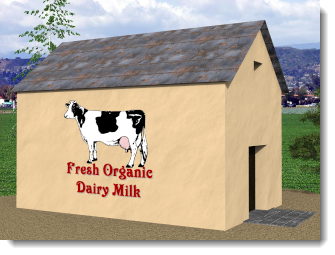
Adding signs to the model.
Creating stained glass
windows. |
|
Note:
Decal previews will only display in wireframe views if OpenGL is enabled
for wireframe mode. The Pipeline
setting must be OpenGL in Options > Appearance >
Advanced Settings > Wireframe > Other
Settings > Pipeline and
Conduits.
Decal Placement
Add
1. |
Select
one or more objects. |
2. |
On
the Edit menu, click Object Properties. |
3. |
On
the Properties list, click
Flamingo nXt Decals. |
4. |
Click
the Add button. |
5. |
In
the Open Bitmap dialog
box, select a bitmap name, and click Open.
Note
Refresh the image definition
When a bitmap file is changed using an
image editor such as Photoshop, you must refresh the bitmap definition
in Flamingo nXt.
To refresh the bitmap
 On the Flamingo
nXt menu, click Utilities
> Clear bitmap cache. On the Flamingo
nXt menu, click Utilities
> Clear bitmap cache.
|
6. |
In
the Decal Properties dialog
box, select options, and click Place. |
7. |
At
the prompts for points, pick points on the model to locate the
decal.
The precise sequence depends on the
type of decal selected: Planar,
Cylindrical,
or UVMap. |
Edit
Placement
1. |
Click
the Edit Placement button. |
2. |
At
the Select control point
prompt, use the graphical editor to change the placement of the
decal. |
3. |
Press
Enter when finished. |
Properties
1. |
Click
the Properties button. |
2. |
In
the Decal Properties dialog
box, use the controls to change the decal's properties. |
Delete
Click the Delete
button.
Move up / Move down
When multiple overlapping decals are applied
on a single object, the order in which they are applied may be significant.
Decals are applied in the order they appear in the list. The last decal
in the list appears to be on top.
Click Move
Up or Move Down to change
a decal's position in the list.
To place a planar decal
1. |
At
the prompts, pick locations for the decal's Width,
and Height direction. |
2. |
At
the Select control point...
prompt, select a control point to adjust the image size, rotation,
or location.
Or press Enter
to complete the decal placement. |
Options
Move
Moves the decal. At the Point to move from
and the Point to move to prompts, enter any locations as for the Rhino
Move command.
UseImageAspectRatio
Restores a stretched decal to the aspect
ratio of the original bitmap.
To place a cylindrical decal
1. |
At
the prompt, pick a location for the Center
point of the cylinder. |
2. |
At
the Select control point...
prompt, select a control point to adjust the image size, rotation,
or location.
Or press Enter
to complete the decal placement. |
Set or edit the decal placement using the control
widget
Note: When using the planar mapping on a
curved object, the entire bitmap must lie behind the surface of the object.
Portions of the bitmap that lie in front of the surface will not be visible.
To resize the decal width and height at the
same time
Drag the control points at the
corners of the control widget.
To change the decal height
Drag the center control point
on the top and bottom edges of the control widget.
To change the decal width
Drag the center control point
on the left and right edges of the control widget.
To move the decal
Drag the control point in the
center of the control widget.
To rotate the decal
Drag the x-, y-, or z-axis control
point on the widget axis icon.
Decal
Properties
The information from the bitmap replaces or blends the object's color
with the decal's color. This is the most common use of decals.
Projection
The mapping style determines how to project the decal onto the object.
It is a good idea to draw construction lines in the scene to help accurately
place decals. A rectangle drawn just behind a surface can act as a guide
for a standard decal. Use object snaps for accurate placement.
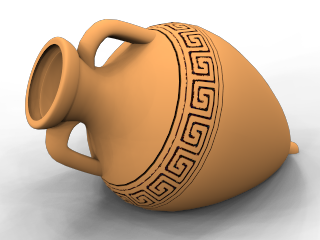
Cylindrical |
|
The
cylindrical mapping type is useful for placing decals onto objects
that curve in one direction, such as labels on wine bottles.
The cylindrical projection maps the
bitmap onto the cylinder with the bitmap's vertical axis along
the cylinder's axis, and the horizontal axis around the cylinder. |
 |
Planar |
|
Planar
mapping is the most common mapping style. It is appropriate when
mapping to flat or gently curved objects.
The corners define the bitmap's location
and extents. If the rectangle does not have the same proportions
as the bitmap, the bitmap will be stretched or compressed to fit.
When using planar mapping on a curved
object, the entire bitmap projection must lie behind the surface
of the object. Portions of the bitmap that lie in front of the
surface will not be visible. |
 |
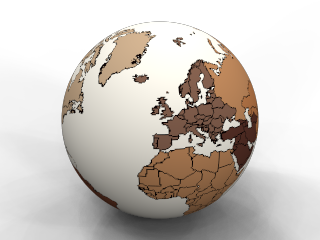
UV Map |
|
Decals
using UV mapping are useful for objects like hair and tree bark
where the decal flows and stretches to fit the surface.
The decal covers the entire object;
there is no control over the decal placement.
UV mapping uses the u- and v-parameterization
of the surface to bend and stretch the image; therefore, no manual
placement is necessary. |
 |
 Browse
Change the image file.
Note
Refresh the image definition
When a bitmap file is changed using an
image editor such as Photoshop, you must refresh the bitmap definition
in Flamingo nXt.
To refresh the bitmap
On the Flamingo
nXt menu, click Utilities
> Clear bitmap cache.
Strength
Color
Varies the relative strength of the image
color with respect to the underlying material. See also, Material
Texture Properties, Color Strength.
Bump
Bump maps create simulated shadows and highlights
on the surface. See also, Material
Texture Properties, Bump Strength.
Reflective
finish
Controls the same properties that are controlled
by a material definition. Apply these properties to the specific areas
of the object that are affected by the decal. By default, decals have
a matte finish.
Intensity
Adjusts the strength of the highlight. Larger
values increase the size and strength of the highlight. See Advanced Material Properties,
Intensity.
Sharpness
Sets the size of the highlight. Lower numbers
specify a broader highlight; higher numbers focus the highlight in a smaller
area. See Advanced Material
Properties, Sharpness.
Metallic
Sets the highlight color to match the base
color. See Advanced Material
Properties: Metallic.
Linking options
Specifies how the image file will be linked
to materials.
Linked
Creates a link to the image file. The file
must be present on the local disk.
Embedded
Embeds the image information in the current
file.
Linked and embedded
If the bitmap is found on the disk before
rendering, the external file is used. If the image cannot be found on
the disk, the internal definition will be used.
Note: The images are cached
for the life of the document.
To see changes in linked or linked and embedded
files
On the Flamingo
nXt menu, click Utilities
and then click Clear bitmap cache.
Masking
Obscures portions of the image based on either a color value or an alpha
channel stored in the image.
In this example, an image with an alpha-channel background is placed
as a decal on a rectangular surface. Masking for materials works the same.
The material assigned to a planar surface in this example has a red
base color.

Original decal image. The gray checkered area represents the image alpha
channel.

Final rendered image.
None
With no masking, the decal image obscures
the underlying material. The rectangular planar surface casts a rectangular
shadow on the ground plane. Masking allows the material to show through
the image where the alpha channel or color masking takes place, but the
shadow on the ground plane is rectangular, and the background behind the
surface is blocked by the surface.

Without masking (left) the image covers the surface, with masking (right),
the red material shows through.
Alpha Channel
Uses the image's alpha
channel to define the masked area if one exists.
The alpha channel is a portion of each pixel's
data that is reserved for transparency information. Alpha channels create
and store masks that let you isolate and protect parts of an image while
you apply color changes, filters, or other effects to the rest of the
image.
Each pixel in an image is described as channels of data that define
the mixture of the red, green, and blue (RGB) colors. The alpha channel
is an 8-bit (256-level) grayscale representation of the image that masks
the color of the underlying pixel. The value of the alpha mask determines
the intensity of the pixel color.
If a mask is fully transparent, a red pixel would have full intensity
(be fully visible bright red) and if the mask is completely opaque, this
red pixel will appear completely transparent.
Color
All image pixels within the sensitivity range
of the selected color will be masked.
Specify a color that will be masked and let
the background show through.
 Color Dropper
Click to select the color from the bitmap.
Color swatch
Click to select a color from the Select
Color dialog box.
Sensitivity (Color
only)
The value indicates the size of the area
around the color that is also masked. Must be greater than 0.0 for color
masking to occur.
Blur (Color only)
Partially masks pixels. The value determines
the magnitude of partial masking around the masked color
Reverse
Inverts the mask—pixels that would have been
masked are now included, and vice versa.

Transparent
Makes the masked area of the underlying object
transparent so other objects or the background behind the object can be
seen through the object. Normally, the material of the object shows through
in that area.
Transparent masking allows a more natural
shadow and allows the background objects to show. The underlying material
could simply be transparent, but sometimes it is useful to make the surface
behind the decal transparent while keeping other areas of the surface
opaque.

Advanced
Double Sided
Causes the decal to appear on the back face
of the surface on which it is placed as well as the front face.
Mirror
Mirrors the decal image.
Projection
direction
Backward
Projects the decal away from the back of
the decal image.

Front (left), back (right).
Forward
Projects the decal away from the front of
the decal image.

Front (left), back (right).
Forward & Backward
Projects the decal away from both the front
and the back of the decal image.
Front (left), back (right).
Transparency
Sets the transparency for the decal. See
Transparency.
Sets the index of refraction for the transparent
decal. See Index of Refraction