The Tab key locks the cursor's direction of travel.
To use direction lock
When drawing, after placing the first point, drag the mouse to a new location and tap the Tab key to lock the direction.
Draw a line using direction lock
Start the Line command, and place the first line point. 使用任何一种物件锁点锁定至其它物件上。
Tap the Tab key. The marker is now constrained along the line between the first point and the point where the marker, was when you tapped the Tab key. 锁定格点与正交同时打开时,TAB 方向限制会锁定它的方向与格线的交点。
技巧
Use the direction lock constraint when you want the line to pass through the end of a curve and then go beyond it. Turn on end object snap. When you move the cursor close to the end of the curve, the marker snaps to the curve end. Tap the Tab key and then move the mouse beyond the curve end and pick. The line will pass through the end of the curve.
A second tap of the Tab key will set Rhino into a tracking mode on a circle where, instead of locking to a line defined by the last pick point and the 3‑D mouse location when the Tab key is tapped, Rhino tracks to a circle with the center at the last pick point and the radius defined by the Tab tap location.
To use circle lock
When drawing, after placing the first point, drag the mouse to a new location and tap the Tab key twice to lock the circle radius.
At the Next point... prompt, hold Ctrl and pick a point in the perspective viewport.
在 perspective 工作视窗拖动鼠标。 A tracking line displays, indicating that the marker is constrained to move perpendicular to the construction plane. Click to select the point. Notice the location of the marker in the other views.
使用垂直模式将物件往与工作平面垂直的方向拖曳
选取要移动的物件。
Hold Ctrl and click and drag the selection set. 轨迹线的起点是您点选物件的点,终点是鼠标标记的位置,轨迹线的长度是物件被移动的距离。
放开鼠标左键放置物件。
如果不小心启用了垂直模式
After starting elevator mode, hold Ctrl and click the left mouse button again.
继续指定其它的点。 或在其它位置再次启用垂直模式。
角度限制与垂直限制搭配使用
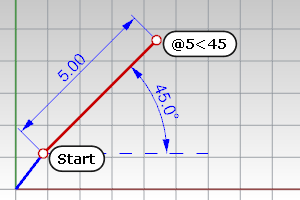
Start the Line command and place the first line point.
At the End of line… prompt, move the mouse to the location where the line should end, activate elevator (press Ctrl ), and type <30. 直线的终点会放在垂直限制的轨迹线上,直线与工作平面呈 30 度夹角。
This sets the x coordinate of the point to the right end of the curve.
在下一个点的位置提示下,输入.y。
在 Y 坐标轴提示下以端点物件锁点锁定直线的左侧端点。 This sets the y coordinate of the point to the left end of the curve.
在点物件位置提示下选取点的位置。 If you specified an x value, the coordinate of the new point matches the x value of the first point and the y, z value of the second point.
Entering numbers
Use numbers for entering distances, angles, and point coordinates.
No spaces are permitted in a number, angle, or x, y, z coordinate points.
基本数字
整数
123
小数
123.456
0.456
.456
科学计数法
-1.23456e10
1.23456E10
分数
5/16
1-3/4 (1.75)
单位
You can specify units when typing lengths and point coordinates. The numbers will automatically convert to the model's units. For example, if your model units are meters, and you type 27cm, Rhino automatically converts your number to 0.27. This also works for converting feet and inches or any other unit system.
Unit examples
1.235millimeters
-1.234cm
+16'5" (16 feet 5 inches)
1'2-3/4" (1 foot 2.75 inches)
Cartesian coordinates
当 Rhino 提示输入一个点时,您可以使用鼠标在工作视窗中指定一点或以许多不同的方式输入座标值:
您可以输入 XY 座标或 XYZ 座标指定一个点,以 w 开头的座标为世界座标,以 r 开头的是相对座标,以 wr 开头的是世界相对座标。
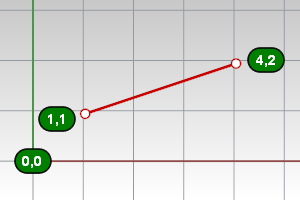
At a prompt, type the coordinate in the format x,y where x is the x coordinate and y is the y coordinate of the point.
Use 3-D construction plane coordinates
At a prompt, type the coordinate in the format x,y,z where x is the x coordinate, y is the y coordinate, and z is the z coordinate of the point. 输入的座标值之间不能有空格。
To place a point 3 units in the x direction, four units in the y direction, and 10 units in the z direction from the construction plane origin, type 3,4,10 at the prompt. If you enter only x and y coordinates, the point will lie on the construction plane.
范例
x,y,z
3,4,5
2,-11 (2,-11,0) 省略 Z 座标时,Z 座标自动设为 0。
If you type only x and y coordinates, the point will lie on the construction plane of the active view.
Start the Line command and place the first line point at 0,0. 直线会以工作平面原点为起点。
在直线终点…提示下,输入 12,6,10,按 Enter。 The line is drawn from the construction plane origin to a point 12 units along the x-axis, 6 units along the y-axis, and 10 units along the z-axis of the current construction plane.
The arrow icon in the lower left corner of each viewport displays the direction of the world x, y, and z axes. The arrows move to show the orientation of the world axes when you rotate a view.
Use 2-D world coordinates
At a prompt, type the coordinate in the format wx,y, and press Enter.
Use 3-D world coordinates
At a prompt, type the coordinate in the format wx,y,z, and press Enter.
To place a point 3 units in the world x direction, 4 units in the world y direction, and 10 units in the world z direction from the world origin, type w3,4,10 at the prompt.
附注
W0 is a shortcut for w0,0,0.
输入的座标值之间不能有空格。
范例
在座标之前加上 w,可以使用世界座标系统输入,否则输入的座标预设为使用中工作视窗的工作平面座标。
世界 X,Y,Z
w9,3,4
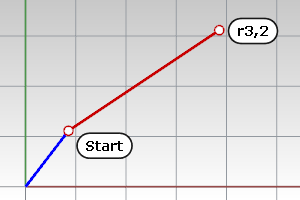
世界极座标
w78<32
Use world coordinates to draw a line
Start the Line command and place the first line point at w0,0,0, and press Enter. 直线会以世界座标原点为起点。