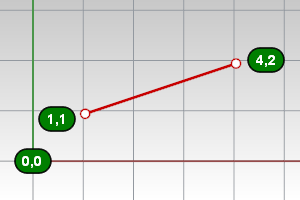
To use 2-D construction plane coordinates
| 4 | 當指令提示指定一點時,使用 x,y 格式輸入座標,x 代表該點的 X 座標,y 代表該點的 Y 座標。
一條從座標 1,1 至 4,2 的直線。 |
限制滑鼠標記的移動方向或距離。
未使用游標限制時滑鼠標記只能在工作平面上移動,將滑鼠游標從一個作業視窗移至另一個作業視窗時,移動的平面會變更為目前的作業視窗的工作平面。
以下是一些游標限制的方法:
| ● | 至指定的絕對座標點 |
| ● | 角度 |
| ● | 距離 |
| ● | 垂直 |
| ● | 至指定的相對座標點 |
| ● | 指定的方向 |
| ● | 擷取不同點的 X、Y、Z 座標 |
輸入 X、Y、Z 座標直接指定一點。
當 Rhino 提示指定一點時,如果您只輸入 x,y 座標,該點會落在使用中的作業視窗的工作平面上。
To use 2-D construction plane coordinates
| 4 | 當指令提示指定一點時,使用 x,y 格式輸入座標,x 代表該點的 X 座標,y 代表該點的 Y 座標。
一條從座標 1,1 至 4,2 的直線。 |
To use 3-D construction plane coordinates
| 4 | 當指令提示指定一點時,使用 x,y,z 格式輸入座標,x 代表該點的 X 座標,y 代表該點的 Y 座標,z 代表該點的 Z 座標。 輸入的座標值之間不能有空格。 |
| 4 | To place a point 3 units in the x-direction, 4 units in the y-direction, and 10 units in the z-direction from the construction plane origin, type 3,4,10 at the prompt. |
世界座標是 Rhino 使用的座標系統之一,世界座標系統是固定的無法改變。Rhino 提示輸入一點時,您可以選擇輸入該點的世界座標。
每個作業視窗左下角的世界座標軸圖示的箭頭代表世界座標 X、Y、Z 軸的方向,視圖旋轉時世界座標軸圖示也會跟著旋轉。

To use 2-D world coordinates
| 4 | 當指令提示指定一點時,使用 wx,y 格式輸入座標。 |
To use 3-D world coordinates
| 4 | 當指令提示指定一點時,使用 wx,y,z 格式輸入座標。 |
| 4 | 要將一點放置在距離世界原點 X 軸 3 個單位,Y 軸 4 個單位,Z 軸 10 個單位的位置可以輸入 w3,4,10。 |
附註
| ● | W0 is a shortcut for w0,0,0. |
| ● | 輸入的座標值之間不能有空格。 |
限制下一個點只能放置在上一個點的某些方向上。
使用角度限制
| 4 | Type an angle at the command prompt in the format <angle and press Enter. 滑鼠標記只能在指定角度的幾個方向上移動。 角度限制也可以用來完成垂直限制。 |
範例
| 1. | 執行 Line 指令,並指定直線的起點。 |
| 2. | 在直線終點提示下,輸入 <20。 The line is restricted to 20-degree angle increments. |
| 3. | Click to place the point, or, type a distance, and press Enter. |
限制下一個點只能放置在距離上一個點某個距離的位置。
範例
| 1. | 執行 Line 指令,並指定直線的起點。 |
| 2. | 在直線終點提示下,輸入 4。 The line endpoint moves around the last point 4dim units away. |
| 3. | Click to place the point, or, type an angle, and press Enter. |
Rhino 會記住上一點的座標,所以您可以使用與上一點的相對位置輸入下一點。在輸入一連串的點時以相對座標輸入會比使用世界座標方便許多,相對座標是以上一個點為原點。
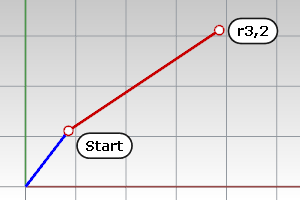
To use relative coordinates
| 4 | 當指令提示指定一點時,使用 rx,y 格式輸入座標,r 代表輸入的座標是從上一點算起的座標 - 相對座標。 |
例如
| 1. | 執行 Line 指令。 |
| 2. | 於直線起點...提示下,任意指定一點為直線的起點。 |
| 3. | At the End of line… prompt, type r2,3, and press Enter or Space. The line is drawn to a point 2 units in the x-direction and 3 units in the y-direction from the last point.
|
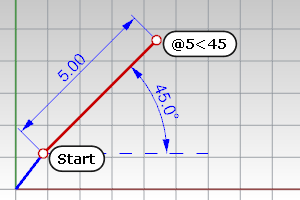
The distance and angle constraints can be combined.
To use both distance and angle
| 4 | At a prompt type the @ symbol, or type r to set the distance relative to the last point. |
範例
| 1. | 執行 Line 指令,並指定直線的起點。 |
| 2. | 於直線終點...提示下,輸入 @5<45 或 r5<45。 畫出一條角度 45 度、距離上一點 5 個單位的直線。
|
The Tab key locks the cursor's direction of travel.
範例
| 1. | 執行 Line 指令,並指定直線的起點。 使用任何一種物件鎖點鎖定至其它物件上。 |
| 2. | Press Tab. The marker is now constrained along the line between the first point and the point where the marker, was when you pressed Tab. If grid snap is on and ortho is activated, the direction lock snaps to grid lines. |
附註
| ● | Use direction lock constraint when you want the line to pass through the end of a curve and then go beyond it. Turn on end object snap. When you move the cursor close to the end of the curve, the marker snaps to the curve end. Press Tab and then move the mouse beyond the curve end and pick. The line will pass through the end of the curve. |
| ● | Use direction lock constraint combined with the distance constraint to draw a curve of a specified length and then constrain the angle with the Tab key. |
將滑鼠標記在工作平面上指定的基準點的正上、下方移動。
使用垂直模式建立一條曲線
| 1. | 執行 Curve 指令,並指定曲線的起點。 |
| 2. | 在 Perspective 作業視窗指定曲線的下一點。 |
| 3. | At the Next point... prompt, hold |
| 4. | 在 Perspective 作業視窗移動滑鼠游標。 移動滑鼠游標時會出現一條通過垂直限制啟用點並與工作平面垂直的軌跡線,滑鼠標記的移動會被限制在這條軌跡線上。按滑鼠左鍵指定曲線的下一點,並注意其它作業視窗中滑鼠標記的位置。 |
使用垂直模式將物件往與工作平面垂直的方向拖曳
| 1. | 選取要移動的物件。 |
| 2. | Hold 軌跡線的起點是您點選物件的點,終點是滑鼠標記的位置,軌跡線的長度是物件被移動的距離。 |
| 3. | Release the left mouse button to place the objects. |
如果不小心啟用了垂直模式
| 1. | After starting elevator mode, hold |
| 2. | 繼續指定其它的點。 或在其它位置再次啟用垂直模式。 |
角度限制與垂直限制搭配使用
| 1. | 執行 Line 指令,並指定直線的起點。 |
| 2. | At the End of line… prompt, move the mouse to the location where the line should end, activate elevator (press 直線的終點會放在垂直限制的軌跡線上,直線與工作平面呈 30 度夾角。 |
多重垂直模式
| 1. | Press |
| 2. | Change viewports, release 第二次啟用的垂直模式與使用中作業視窗的工作平面垂直。 |
取消垂直模式
| 1. | Press |
| 2. | Release |
Elevator mode can also be activated from direction lock, but only if the point can be truly 3‑D.
附註
| ● | 垂直模式啟用時在指令行輸入距離可以設定物件移動的垂直距離,正數代表往工作平面上方移動,負數代表往工作平面下方移動。 |
| ● | 以 2D 裝置 (滑鼠與螢幕) 指定 3D 點需要工作平面的輔助,在不使用任何建模輔助的情形下,滑鼠所指定的點都會落在使用中作業視窗的在工作平面上。 |
點過濾器可以取得不同點的 X、Y、Z 座標建立一個新的點。
點過濾器可以讓您每次指定一個點時只決定一個軸向的座標值,並忽略指定點的另兩個軸向的座標值。點過濾器配合物件鎖點可以取得其它物件上鎖定點的一個軸向的座標值。
在取得一個軸向的座標值以後,會提示您繼續指定剩下的軸向的座標。
Point filters only work when 3-D input is allowed, and you cannot start with one point filter and then apply another one.
範例
以一條直線的右側端點的 X 座標及左側端點的 Y 座標建立一個點物件。
| 1. | Start the Point command. |
| 2. | 輸入 .x。 |
| 3. | At the X coordinate of prompt, with the End object snap activated, pick the right end point of the line. |
| 4. | 以直線右側端點的 X 座標為將建立的點物件的 X 座標。 |
| 5. | 輸入 .y。 |
| 6. | At the Y coordinate of prompt with the End object snap activated, pick the left endpoint of the line. 以直線左側端點的 Y 座標為將建立的點物件的 Y 座標。 |
| 7. | 任意在工作平面上指定一點 (Z 座標為 0) 建立點物件。 如果指定第一個點的時候使用 .x 決定 X 座標值,指定第二個點的時候不使用 .y,而是直接鎖定至曲線的左側端點,第二個指定點同時決定 Y 與 Z 的座標值。 |
以下是可以使用的點過濾器:
.x
.y
.z
.xy (.yx)
.xz (.zx)
.yz (.zy)
.wx
.wy
.wz
.wxy (.wyx)
.wxz (.wzx)
.wyz (.wzy)
請參考
開啟、關閉暫時性的參考線/點建模輔助工具,或切換目前的狀態。
將滑鼠標記鎖定在物件上的某一點,例如:圓的中心點或直線的中點。
將滑鼠標記的移動限制在幾個設定的角度上。