Texture mapping properties manage texture map projections for selected surfaces, polysurfaces, and meshes.
Mapping is a process of defining how to represent a 2‑D image on a 3‑D model. Mapping transforms a 2‑D source image into an image buffer called a texture.
A texture can be applied to the surface of a 3‑D model to add color, texture, or other surface detail like glossiness, reflectivity, or transparency.
The problem of how to represent the texture in 3-D rendering can be overcome by means of uv‑mapping. U and V are the coordinates of the texture corresponding to X and Y. Think of u as one direction on a piece of graph paper (side to side). Think of v as the other direction (up and down).
Any time an image is applied in a material and then applied that material to a model, uv‑texture mapping is used.
一个贴图通道包含一组贴图参数,每个贴图通道通过其数字序号来识别,一个物件可以有任意的通道号,因此一个物件可以有任意贴图轴类型。
Textures in materials can be assigned a channel number. When the textures are applied to an object, the texture is applied using the matching channel number on the object. Texture channels default to channel 1.
If an object has no applied texture mapping, surface mapping is used to map the texture.
Options
 Default
The default texture mapping method for surfaces and polysurfaces is set by the control point structure of the surfaces and is called surface mapping.
 自定义
自定义
The Custom option allows any other texture mapping method.
Name
The name of the mapping.
Projection
The mapping type.
Surface mapping stretches the texture over the object.
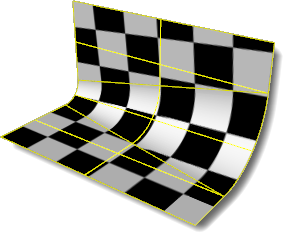
In this example, a variable radius fillet connects two planar surfaces and all are joined into one polysurface. The default surface mapping method uses the control point structure of each individual surface to orient the checkered texture map applied to the material. Notice how the checker texture does not match across seams in the polysurface.
See: ApplySurfaceMapping.
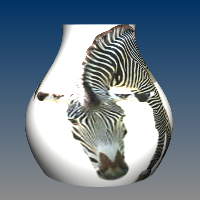
 Planar
Planar mapping projects a 2-D plane onto the side of an object.
See: ApplyPlanarMapping.
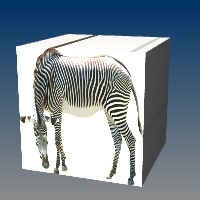
 立方体
立方体
Box mapping projects a 3-D box onto the sides and top of an object.
See: ApplyBoxMapping.
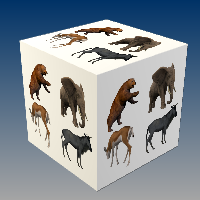
 Spherical
Spherical mapping wraps the object around a sphere. The top edge of the texture shrinks into the top pole and the bottom edge into the bottom pole.
See: ApplySphericalMapping.
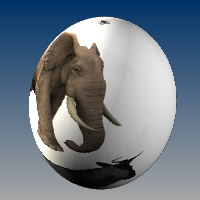
 Cylindrical
Cylindrical mapping an image around an object like a cylinder the left and right edge will join each other.
See: ApplyCylindricalMapping.
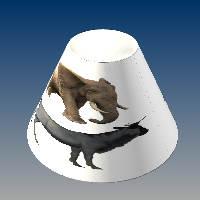
 Capped cylindrical
Capped cylindrical mapping also maps the image to the top and bottom of the objects.
See: ApplyCylindricalMapping.
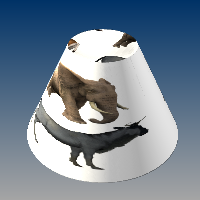
Texture space
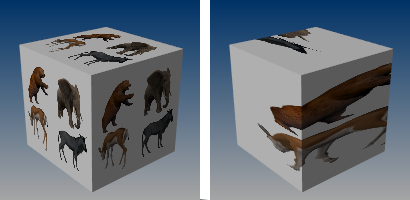
Single texture space (left), divided texture space (right).
 Single
Specifies that the texture will be mapped individually over each independent space.
 Divided
Specifies that distinct regions of the texture will be used for each space, matching parts of the mapped object to the six independent texture spaces.
Position X / Y / Z
Sets the center point of the texture mapping widget in world coordinates.
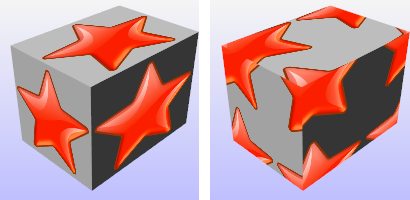
Default position (left), position moved to a different location (right).
Rotation X / Y / Z
Sets the rotation of the texture in world space.
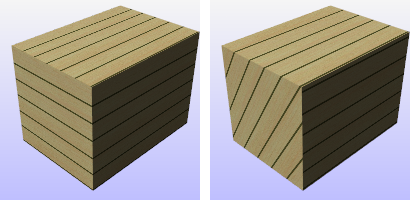
Default rotation (left), x-rotation 60 degrees (right).
Size X / Y / Z
The texture size.
Sets the texture size to be equal in all three directions.
Fits the texture to the object as established by the original mapping.
UVW offset
The amount the texture is offset from the origin of the UVW texture space.
UVW rotation
The rotation angle of the texture over the object in UVW texture space.
UVW repeat
The number of times the texture repeats across the object in UVW texture space.
The ApplyBoxMapping command adds a box texture mapping channel to an object and sets the mapping type to box.
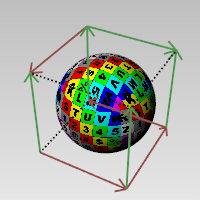
立方体贴图轴打开的物件。
ApplyBoxMapping command-line options
边框方块 选项使用物件的边框方块来确定立方体位置。
Capped
建立有上、下盖的立方体贴图轴。
The ApplyCylindricalMapping command adds a texture mapping channel to an object and sets the mapping type to cylindrical.
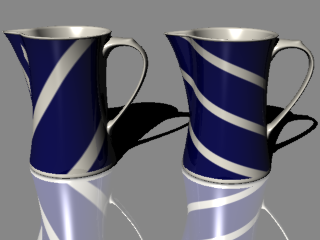
曲面贴图轴 (左) 与圆柱体贴图轴 (右)。
步骤
| 1. | 选取物件,按 Enter键。 |
| 2. | 建立圆柱体贴图轴。 |
Note: See the Circle command for option descriptions.
| 3. | 输入贴图轴通道编号,按 Enter 使用默认值。 |
指令行选项
方向限制选项
方向限制选项限制圆的方向。
无
中心点可以是 3D 空间中的任何一点。
第二点可以使用垂直模式、物件锁点或其它建模辅助工具放置在任何地方。
垂直
画一个与工作平面垂直的物件。
指定中心点及半径,或选择其它选项。
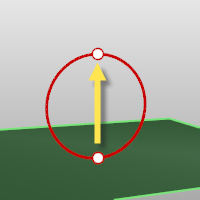
环绕曲线
画出一个与曲线垂直的圆。
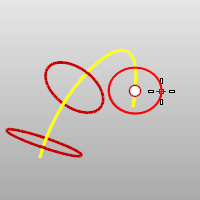
实体
实体选项以一个平面封闭底部建立实体。
边框方块 选项使用物件的边框方块来确定立方体位置。
Capped
The Capped option applies the mapping to all the top and bottom of the cylinder.
ApplyCustomMapping 指令赋予物件自定义的贴图轴。

没有贴图轴 (左)、赋予其它物件的贴图轴 (中)、结果 (右)。
Note: A specified mesh or NURBS surface or polysurface acts as the mapping for the selected objects. The mapping object is preserved in the mapping table so deleting the mapping object does not affect the mapping on the target object.
The ApplyPlanarMapping command adds a texture mapping channel to an object and sets the mapping type to planar.
指令行选项
边框方块 选项使用物件的边框方块来确定立方体位置。
Planar UV
The U and V coordinates are taken from the plane size, and the W coordinate is taken as the distance from the plane along the normal.
Planar UVW
The U and V coordinates are taken from the plane size, the W coordinate is always zero.
The ApplySphericalMapping command adds a texture mapping channel to an object and sets the mapping type to spherical.
步骤
| 1. | 选取物件,按 Enter键。 |
| 2. | 建立球体贴图轴。 |
Note: See the Sphere command for base sphere drawing options.
| 3. | 输入贴图轴通道编号,按 Enter 使用默认值。 |
指令行选项
边框方块 选项使用物件的边框方块来确定立方体位置。
The ApplySurfaceMapping command adds a texture mapping channel to an object and sets the mapping type to surface.
The MappingWidget command turns on the mapping widgets for the selected objects.
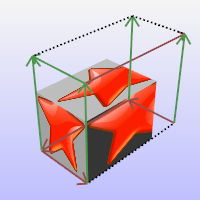
The box mapping widget:
| ● | Shows graphically how the texture mapping is bound to an object using a primitive (box, cylinder, sphere, or plane). |
| ● | Can be dragged, moved, rotated, and scaled by normal Rhino commands. |
| ● | Can have its control points turned on to re-size it. |
The MappingWidgetOff command turns off the mapping widgets for selected objects.
The MatchMapping command changes the texture mapping properties of a selected object to duplicate a specified object.
A Match Mapping button also appears in Texture Mapping Properties.
The RemoveMappingChannel command removes the specified mapping channels from an object.
The Unwrap command projects the texture coordinates of the selected objects to a specified region of space.
The render meshes for the selection are flattened and that flattened mesh is used as the mapping space for applying textures.
Surface mapping texture coordinates and the texture assigned to the objects are projected onto the world xy-plane.
步骤
| 4 | Select surface edges. Seams are allowed to separate during the flattening/unwrapping. Select a non-self-intersecting loop on the object. In many cases, particularly with closed objects, unwrapping will not be possible without the specification of seams.
|
指令行选项
Chain
Chain select the seams.
PreviousSeamSelection
Reselect the previous set of seams.
套用
Applies the seam selection.
Edit
Opens the UV Editor.
Cancel
Cancels the command.
The UVEditor command edits meshes that affect the texture coordinates of the original object. The texture meshes can be joined and split, and their control points edited.
步骤
| 1. | Select objects. |
| 2. | Draw a rectangular region on the world xy plane. 附注: 该选项详细描述请参考 Rectangle 指令。 The packed surface mapping texture coordinates are projected onto the world xy plane, and the texture assigned to the object is drawn in the same region. The texture coordinates are represented as a collection of texture meshes. When the texture meshes are edited, the texture changes on the object.
If an interior surface seam is selected in the polysurface prior to unwrapping, that seam will separate in the resulting flattened mapping meshes.
While the editor is open, control points for the mapping mesh objects can be turned on, and modeling commands such as Scale1D, SetPt, and CageEdit can be used to adjust the mapping mesh.
|
Texture transparency
Sets the transparency of the texture in the viewport for visibility.
Highlight selected
Highlights the surface mesh when the projected mesh is selected.
Show wireframe
Shows the mesh wireframe on the object even when in a viewport display mode that does not support mesh wires.
贴图
Use material
Displays the texture associated with the diffuse channel of the material assigned to the object being unwrapped.
Use texture
Displays a specified texture from the texture palette.
请参考
Render the objects using the current renderer.