![]()
Surface
Blend Surface
| Toolbar | Menu |
|---|---|
|
|
Surface Blend Surface |
The BlendSrf command creates a blend surface between two surfaces.
With Record History on, the result can pay attention to changes in the input objects and have its own input settings changed using the Edit command line option.
| Command-line option | |
|---|---|
|
ChainEdges |
Automatically selects surface edges that are touching the selected edge. |
| Keys for control | |
|
|
|
|
Shift |
By default the shape curves are separately edited at each end, Hold Shift to retain symmetry. With symmetry, point editing is mirrored to the other end of the curve. |
|
Alt |
Hold Alt while dragging the handles to change the angle between the shape curve and the surface edge.
|
|
Adjust seam options |
|
|---|---|
|
Flip |
Reverses the curve direction. |
|
Automatic |
Attempts to align the seam points and directions without intervention. |
|
Natural |
Moves the seam points to the way they were at the beginning of the command. |
Adjust Surface Blend options
Maintains the relationship between the two curve ends.
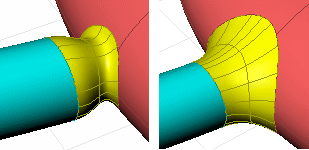
Determines the distance of influence the surface has on the edge curve.
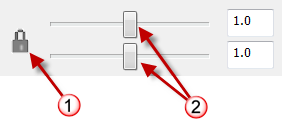
Sets the continuity for each surface end.
Adds additional curve profile shapes to increase control over the blend surface shape. This is especially important if the input shapes are complex and you want to control the shape in more locations.
When you snap to a point and add a shape, the command automatically creates a shape that connects to the corresponding point on the other side, which attempts to keep the blend simple.
Forces all shape curves to be planar and parallel to the specified direction.
If the gaps between the surfaces vary, this option maintains the height of the shape curves throughout the blend.
Displays a preview as the options change.
Visually evaluate surface smoothness and continuity using a stripe map.
Fillet, blend, or chamfer between curves and surfaces
Rhino for Mac © 2010-2017 Robert McNeel & Associates. 24-Oct-2017