![]()
Surface
Loft
| Toolbar | Menu |
|---|---|
|
|
Surface Loft |
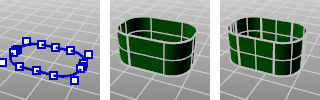
The Loft command fits a surface through selected profile curves that define the surface shape.
Adjust seam options (Closed curves only)
Reverses the curve direction.
Attempts to align the seam points and directions without intervention.
Moves the seam points to the way they were at the beginning of the command.
Select each seam point and move it along the curve to line up all curve seams.
Use the Flip option to make all seam arrows point to the same side.
Press Enter to continue.
|
Command-line option |
|
|---|---|
|
Point |
Allows picking a location for the start or end of the loft at a point. This tapers the loft to the selected point. No point object is necessary, but it is a good idea to have some reference geometry in place to aid in picking the point location. Point steps
|
|
Type subcrv to select part of a curve as input. |
|
Loft Options
Determines the knot and control point structure of the surface.
When some, but not all, endpoints of loft shapes touch, the loft type is restricted to Straight sections to avoid self-intersecting loops in the resulting surfaces.
The surface control points are created at the same locations as the control points of the original. This is a good option if the control points will be edited later.
The surface has an average amount of stretching between the curves. This is a good choice when the curves are proceeding in a relatively straight path or there is a lot of space between the curves.
Creates a ruled surface. The sections between the curves are straight.
The surface closely follows the original. This is a good choice when the input curves are going around a corner.
Makes the object knot vectors uniform.
Creates a closed surface, continuing the surface past the last curve and around to the first curve. Available when you have selected three shape curves.
If the start curve is a surface edge, the lofted surface maintains tangency with the adjacent surface. You must use at least three curves to activate this option.
If the end curve is a surface edge, maintains tangency with the adjacent surface. You must use at least three curves to activate this option.
If checked, the loft creates a single surface.
If unchecked, the loft creates a polysurface when the input curves are joined tangent curves. Faces in the resulting polysurface correspond to the tangent sub-curves in the input curves.
Click the end of a shape curve to reverse the direction.
Curves will not be rebuilt.
Rebuilds the shape curves before lofting.
Refits the shape curves to the specified tolerance value.
| Toolbar | Menu |
|---|---|
|
|
|
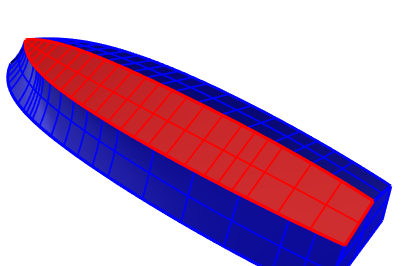
The DevLoft command creates a single developable surface between two curves.
The resulting surface can be flattened by the UnrollSrf command.
Type a hyphen in front of the command name: -DevLoft.
Interactive mode provides options for fine tuning the resulting surface.
|
Command-line options |
|
|---|---|
|
Density |
The number of rulings across the surface. |
| AddRuling |
Lines across the surface that define the straight sections on the developable surface. A developable surface can be flattened to a plane by bending along the ruling lines with minimum stretch or compression distortion. |
|
Untwist |
Optimizes the rulings. It may help to run Untwist more than once. |
|
CurvatureDisplay |
Visualizes the Gaussian curvature of the surface with false colors. The analysis mesh density is based on Polygon Mesh Options in the CurvatureAnalysis command. 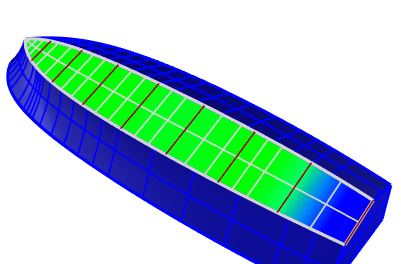
The Gaussian curvature analysis in the interactive mode. The blue area is where stretch or compression distortion happens when the surface is flattened. |
Flatten (develop) a surface or polysurface with curvature in one direction to a planar surface.
Rhinoceros 6 © 2010-2020 Robert McNeel & Associates. 11-Nov-2020
